
Troubleshooting
Dec 7 2023 at 12:00 AM
- Overview
- Project Startup Configuration
- Driver Crash After Startup - Decryption Key
- Sending Data to Commander
Overview
This document will discuss general issues related to configuring the Driver SDK’s project startup, as well as typical problems encountered when sending data to Commander. It will be divided into two sections:
- Project Startup Configuration
- Sending Data to Commander
Project Startup Configuration
When a Driver crashes on startup of the service, the most typical reasons are related to Certificates and whether or not they have been set up properly in the Driver. This section looks at the most common issues related to the setup of Certificates on the Driver, as well as a couple of other issues that could arise during the project’s startup.
Certificate not found
Consider a scenario where the Driver startup crashes and the log warning says the following:
Certificate specified by option [DataProtectionOptions.CertificateSubjectName==[*Certificate URL*]] could not be found or loaded.
This warning could indicate:
- The Certificate has physically not been added to the project or does not exist.
- The Certificate exists but has not been specified correctly in the DataProtectionOptions file (as
"CertificateSubjectName"). - The Certificate exists and has been specified correctly in the DataProtectionOptions file, but the user has forgotten to copy the file to the output directory.
1. Certificate does not exist - solution:
Navigate to the Service -> Data -> Certificates folder in the SDK.
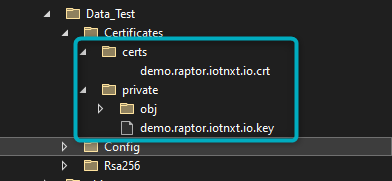
Figure 1 - Certificates folder
Ensure the correct Certificate has been saved in the Certificates folder.
To find out how to generate/issue a Certificate to connect to V-Raptor, see Connect to the V-Raptor and V-Raptor Portal - Certificates.
2. Certificate not specified correctly in DataProtectionOptions file - solution:
Another reason the error Certificate...could not be found or loaded might occur is that the CertificateSubjectName in the DataProtectionOptions file does not correspond with the correct Certificate.
To amend this, open the DataProtectionOptions.json file (found in the Config file) and ensure the CertificateSubjectName is correct:
{
  "DataProtectionOptions": {
    "CertificateSubjectName": "xxx", //Ensure this certificate subject name is correct
    "AllowInvalidCRL": true,
    "VerifyUsingSigningCertificates": true,
    "SigningCertificates": [
      "$data$/Rsa256/root-ca.crt",
      "$data$/Rsa256/signing-ca.crt"
    ]
  }
}
| The name provided for the Certificate under CertificateSubjectName refers to the CN (common name) provided in the Certificate itself. Open the Certificate and look for the CN - ensure that the CN is specified in CertificateSubjectName. |
3. Certificate not copied - solution:
Finally, ensure that the Certificate has been copied to the output directory. If this has not been done, the Certificate might be available but cannot be accessed by the Driver. This will also lead to the Certificate...could not be found or loaded error.
Certificate not loading
Once the Certificate is available and has been specified in the DataProtectionOptions file, other possible errors include:
- The Certificate’s corresponding Key has not been added and/or copied to the output directory.
- The user’s local machine does not trust the Certificate.
1. Certificate Key not matching - solution:
Once the Certificate is available and has been specified in the DataProtectionOptions file, ensure that the Certificate’s corresponding Key is available and has also been copied to the output directory. The error for this issue will read:
Verification failed for certificate with thumbprint[xxx], PartialChain: unable to get local issuer certificate
This error indicates that the Driver has failed to verify the Certificate because it cannot find the matching Key. It cannot verify the Certificate and will therefore not be able to load it.
Add the Key for the corresponding Certificate in this folder:
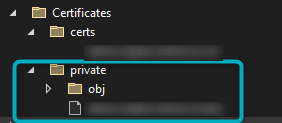
Figure 2 - Save the Certificate's Key
2. Certificate not trusted by the local machine - solution:
Another possible reason the Driver will crash on startup is that the user’s local machine does not trust the Certificate. The error will read:
Verification failed for certificate with[xxx], PartialChain: unable to get local issuer certificate
This also relates to a verification error. The Driver is not able to identify who has issued the Certificate and therefore cannot load it. Solutions include:
- Installing a Certificate Authority on the local machine.
- Specifying the Certificate Authority in DataProtectionOptions.
If a Driver SDK has been downloaded, a Certificate Authority is generated automatically with a Root and Signing Certificate in the Rsa256 file:
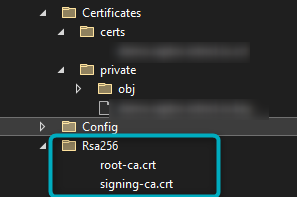
Figure 3 - SDK auto-generated Root and Signing CA Certificates
In this scenario, check that the following has been specified:
- Ensure that the Certificate Authority has been specified in the DataProtectionOptions file.
- Ensure that the local machine recognises the Root and Signing Certificates.
Specify Root and Signing Certificates in DataProtectionOptions:
Open the DataProtectionOptions file:
{
  "DataProtectionOptions": {
    "CertificateSubjectName": "demo.raptor.iotnxt.io",
    "AllowInvalidCRL": true,
    "VerifyUsingSigningCertificates": true,
    "SigningCertificates": [
      "$data$/Rsa256/root-ca.crt", //Add correct path for root certificate here
      "$data$/Rsa256/signing-ca.crt" //Add correct path for signing certificate here
    ]
  }
}
- Set
VerifyUsingSigningCertificatesto true. - Add the paths of both the Root and Signing CA Certificates under
SigningCertificates
Install Certification Authority in local machine (for Windows):
Navigate to the Root and Signing Certificate files in your local machine’s file explorer:

Figure 4 - File explorer - local machine
Open the Root signing Certificate. If the window that opens has a red cross warning next to the Certificate icon, the local machine does not trust the Certificate. The image below shows a trusted Certificate. If it isn’t trusted, there will be a warning label on the highlighted icon:
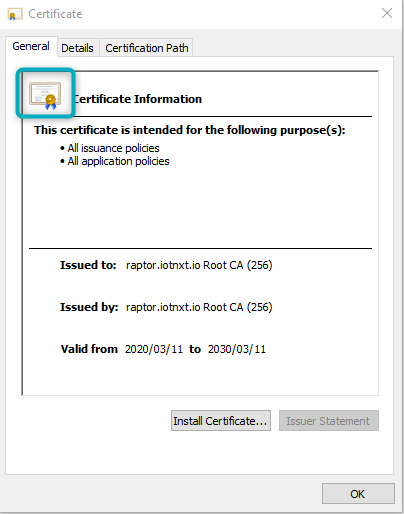
Figure 5 - Root Certificate Warning
If the Certificate is not trusted, click on the “Install Certificate” button. In the window that opens, select “Current User” and then click “Next”:
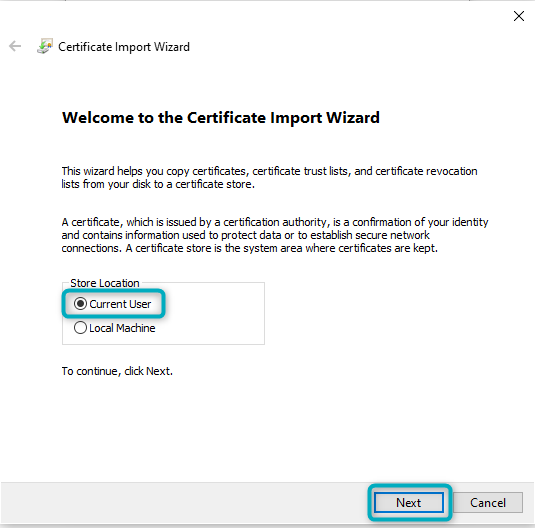
Figure 6 - Install Certificate (1)
In the prompts that follow, select “Place all certificates in the following store” and then click on “Browse”. In the “Select Certificate Store” window that opens, select “Trusted Root Certification Authorities” and then click “OK” and “Next”:
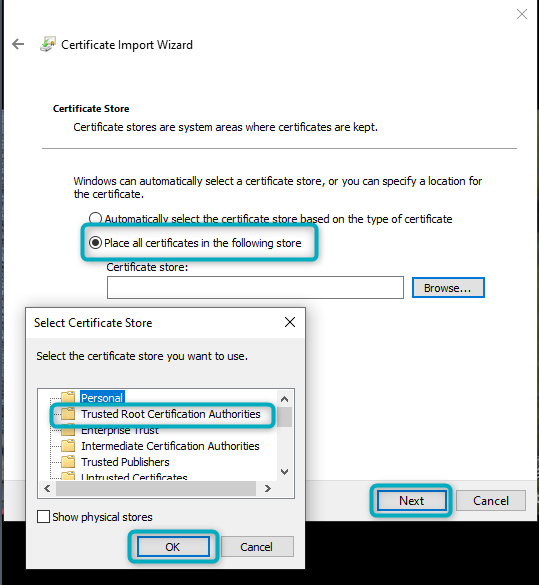
Figure 7 - Install Certificate (2)
A Warning will pop up that reminds the user that they should ensure the Certificate is trusted. Click “Yes”.
When the Root CA Certificate is opened again, the red warning sign should be gone. It is now a trusted Certificate on the local machine.
Navigate back to the Signing Certificate file in the local machine’s file explorer. Follow the same steps as above, except in the final prompt. When the final prompt shows “Place all certificates in the following store”, click on “Browse”. In the “Select Certificate Store” window that opens, select “Intermediate Certification Authorities”. Then click “OK” and “Next”:
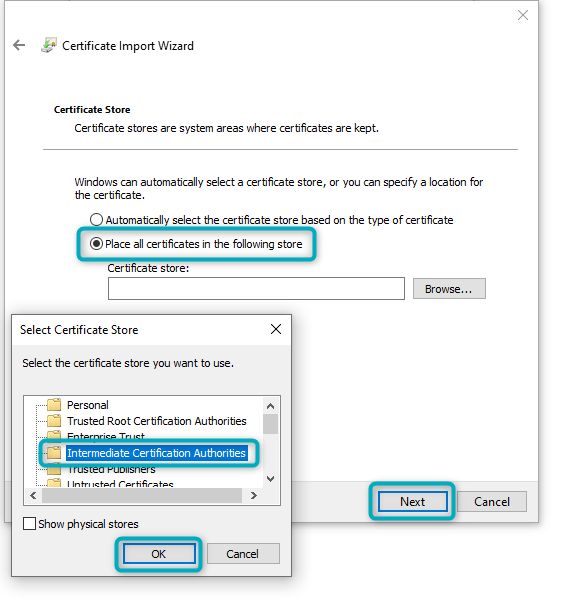
Figure 8 - Install Certificate (3)
Click “Finish”. Both the Root and Signing Certificates are now recognised by the local machine. To check this, open the Signing Certificate and open the “Certification Path” tab:
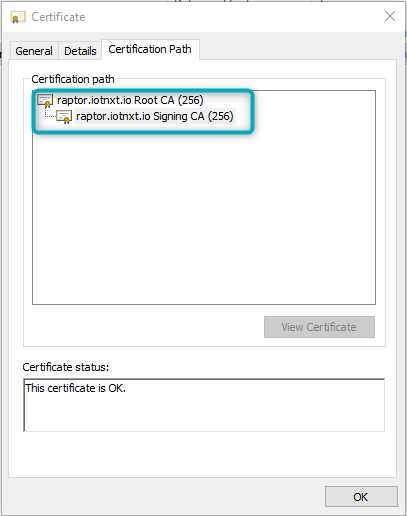
Figure 9 - Install Certificate (4)
The Certification Path should show both the Root Certificate path (first in the hierarchy) and the Signing Certificate path. Both have now been authorised by the local machine to be loaded by the Driver.
| Yellow warnings on the Certificate icon (once the file is opened in the file explorer on the local machine) indicate partial trust. Ensure that all Certificates in the hierarchy (Root and Signing) have been installed on the local machine and placed in the correct certificate store. A yellow warning will still lead to problems when the Driver starts up, so make sure there are no warnings next to the Certificate icon. |
| To make the project a portable solution, it should be sufficient to include the Root and Signing Certificates in the Rsa256 folder and specify the path in DataProtectionOptions (as shown above). Ensure that the Certificates have been copied to the output directory. This method is useful when a user needs to switch between V-Raptors. Place all relevant Certificates in the Certificates folder and ensure the Root and Signing Certificates have been specified in the DataProtectionOptions file. |
Kestrel Options
If the Driver crashes on startup even though all Certificates are present and verified, another typical issue is that the Certificate has not been correctly specified in the Kestrel.json file. The error would read:
Unhandled exception. System.ID.FileNotFoundException: Could not find file '....pxf'.
The SDK will generate a Certificate and add an https option in Kestrel.json but might not specify the Certificate path:
{
  "Kestrel": {
    "EndPoints": {
      "Https": {
        "Url": "https://*:6010",
        "Protocols": "Http1AndHttp2"
      }
    }
  }
}
Alternatively, the path might be present but incorrect:
{
  "Kestrel": {
    "EndPoints": {
      "Https": {
        "Url": "https://*:6010",
        "Certificate": {
          "Path": "./Data_Test/demo.raptor.iotnxt.io.pfx", //Path might be incorrect
          "Password": "12345"
        },
        "Protocols": "Http1AndHttp2"
      }
    }
  }
}
The path needs to represent the pfx file that should be present in the Certificates folder (as shown in this example):
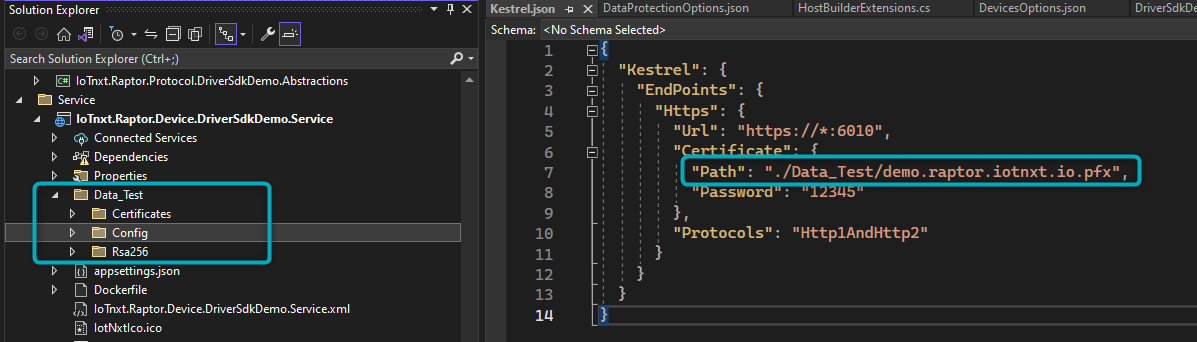
Figure 10 - Pfx file path in Ketrel.json
If the pfx file is not present, or the path is incorrect, the Driver will crash on startup.
| Generally, if https is specified in Kestrel.json DotNet will read the Certificate and generate a default developer Certificate (pfx file). However, if the Certificate is expired or DotNet is not, for any reason, generating the default pfx file, the user will have to manually generate a pfx file for the Certificate. |
Generating a pfx file for the Certificate:
A Certificate can be generated or issued on V-Raptor. Open the V-Raptor portal and navigate to the Credential Manager section:
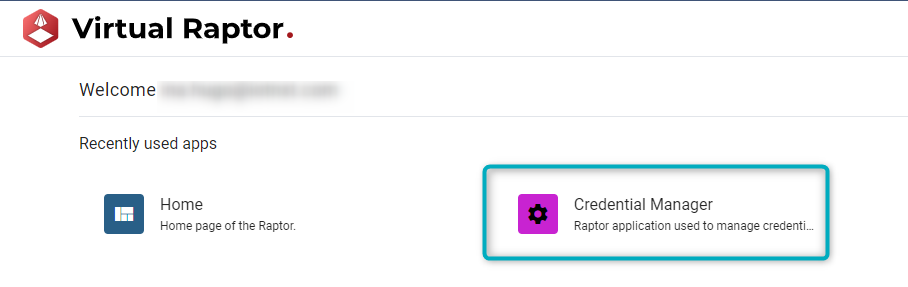
Figure 11 - V-Raptor Credential Manager
If an existing Certificate needs to be renewed, hover on the Certificate’s name and click on the renew icon (as shown below). If a new Certificate needs to be generated, click on the “Generate Certificate” button:
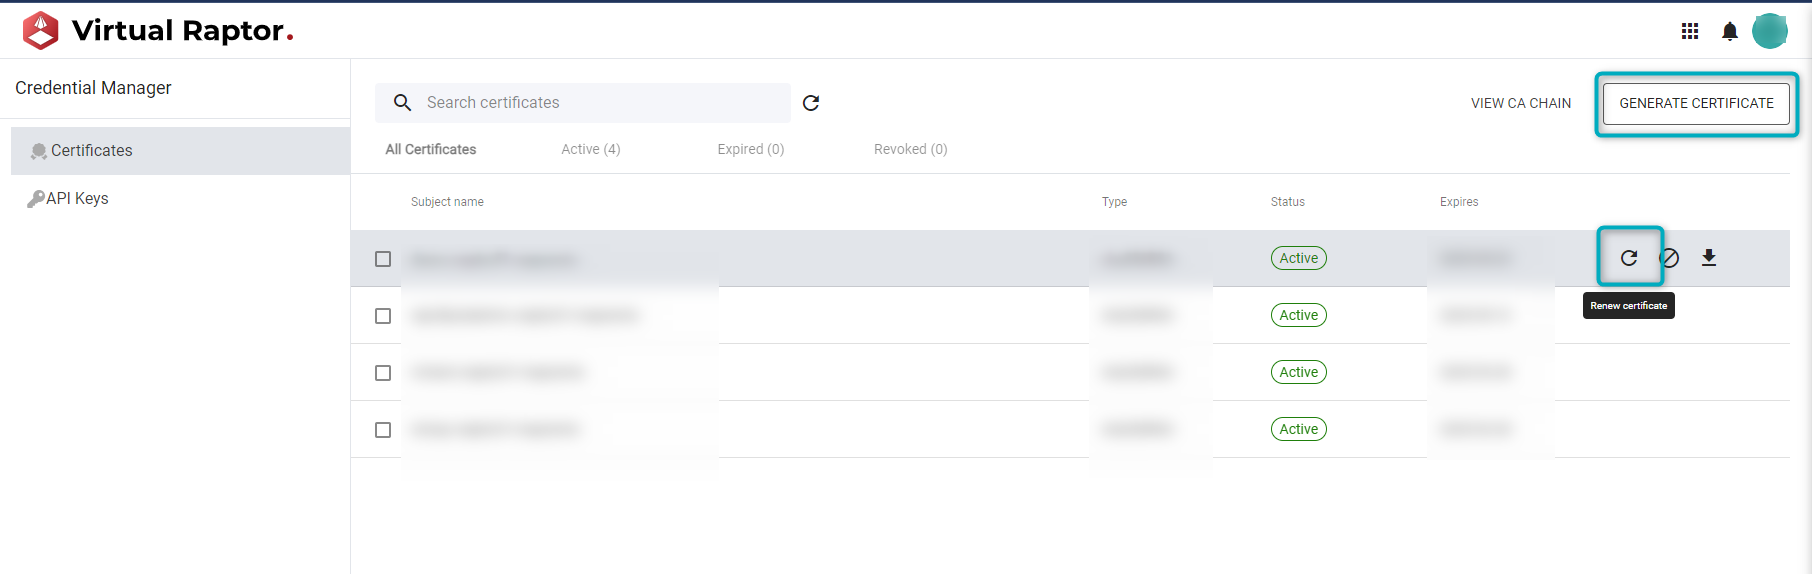
Figure 12 - V-Raptor Generate/Renew Certificate
In the “Certificate overview” window, the public key, private key and digital signature can be copied. To create the pfx file, click on “Download Results”. This will download all relevant Certificate details as a compressed folder:
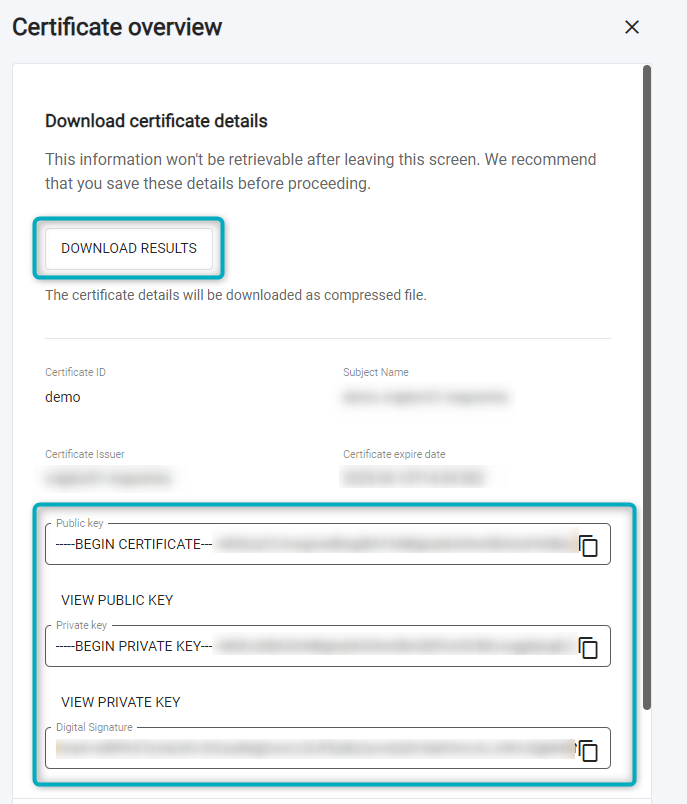
Figure 13 - V-Raptor Certificate Overview
A Readme.txt file can be found in the compressed folder. This file will contain the commands needed to generate a pfx file manually. The command will resemble this line of code:
openssl pks12 -export -out 'demo.vraptor.iotnxt.io.pfx' -inkey 'demo.vraptor.iotnxt.io_key' -out 'demo.vraptor.iotnxt.io.crt'
The command will:
- Find the correct Certificate in the Certificates folder.
- Retrieve the key from that folder.
- Generate a pfx file called (in this example) demo.vraptor.iotnxt.io.pfx.
Copy the command and paste into the Command Prompt (after specifying that the generated pfx file should be in the Data_Test folder as shown in the examples above) using the Certificate’s common name (CN) where applicable. The Command Prompt will ask for the password specified in the Kestrel.json file and ask the user to export the password (create any applicable password here):
{
  "Kestrel": {
    "EndPoints": {
      "Https": {
        "Url": "https://*:6010",
        "Certificate": {
          "Path": "./Data_Test/demo.raptor.iotnxt.io.pfx",
          "Password": "12345"
        },
        "Protocols": "Http1AndHttp2"
      }
    }
  }
}
Now add the pfx file’s path to the Kestrel options under Certificate.Path (as shown in the image above).
| Remember to copy the pfx file to the output directory. |
When the Driver starts up again, the error should not be present unless the password specified in Kestrel.json is incorrect. If the password is incorrect, the error will read:
CryprographicException:...password may be incorrect.
Ensure the password in Kestrel.json is correct and restart the Driver.
| It is possible to run the Driver without specifying these Certificates by removing the ‘s’ in ‘https’. |
Database Specification incorrect
Anther problem that might arise on the Driver’s startup is that the database type in DatabaseOptions.json is incorrect. The error will read:
Connection String has not been configured
Ensure that the database specification in DatabaseOptions.json is correct:
  "DatabaseOptions": {
    "DatabaseType": "Sqlite"
  }
}
If a database’s connection string is not specified or is incorrect, the Driver will assume that it does not exist. This will lead to the Driver crashing on startup. By default the database will be Sqlite. Note that if the project is using a different database type the connection string will need to be specified (the connection string will need to point to the server being used for the project).
Driver Crash After Startup - Decryption Key
The Driver will crash after startup if it cannot retrieve the decryption key. The error will read:
unable to retrieve decryption key
A data protection key is generated on startup that is used to encrypt data at REST. This protection key is stored in the DataProtection folder and is linked to the Certificate. Each time the Certificate changes, the key will change to match the new Certificate. In V-Raptor, when a Driver is deployed and the Certificate is renewed, the key will be rotated/migrated. However, if users switch between Certificate Authorities the key cannot be migrated as it is linked to a different Certificate Authority.
A way to avoid this in the development environment is to delete the contents of the DataProtection folder. Once this is done, the Driver will create a new data protection key linked to the correct Certificate.
| Note that the contents of the DataProtection folder cannot be deleted in a Production environment as this will cause the user to lose access to the data. |
The sections below will look at common issues related to data being sent to Commander.
Sending Data to Commander
Once the Driver is running, typical problems related to sending data to Commander include:
- Data not sending to Commander after the Device as been set up to send meta and telemetry.
- Data from the Driver sending to Commander but not showing in Commander.
Data not Sending to Commander
The problems below are some of the common issues related to data not sending to Commander. They include the Driver not being able to authenticate with V-Raptor, and the authentication token not being set up properly. These will be discussed below in more detail.
Invalid Client - Cannot authenticate with V-Raptor
If the Driver cannot authenticate with the V-Raptor, the error will read invalid client. Possible reasons for this include:
- The Certificate has been revoked on V-Raptor. If this is the case, contact Mahlako to rectify the issue.
- The Certificate has not been installed on V-Raptor. To rectify this, install the Certificate on V-Raptor. For more information about how to do this, read V-Raptor Certificate Setup.
- If the Certificate has been installed, navigate to “Credential Manager” in the V-Raptor portal and click on the relevant Certificate to examine the public key. Ensure this key matches with the relevant Certificate (see the image below).
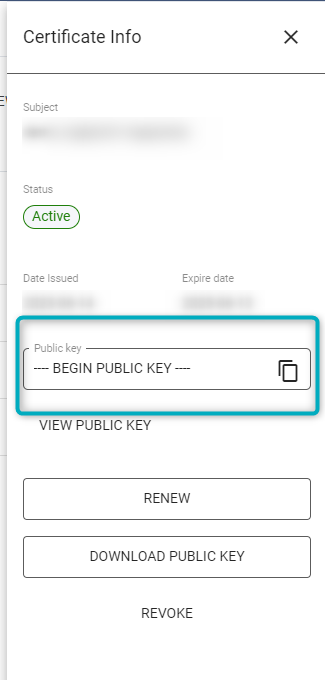
Figure 14 - Inspect public key - V-Raptor
GRPC Endpoint/Authentication Token not set up correctly:
Once telemetry has been configured in the Device file, a possible reason the data is not being sent to Commander is that the GRPC default endpoint has not been set up correctly and/or the authentication token needed from Identity Server is incorrectly configured.
The log errors (if both these problems exist) will initially read:
DataStoreRpc | Endpoint not defined [default] - Endpoint names are case sensitive
Message was not delivered and will be deleted from DSIT
In the SDK, the default endpoint in the GrpcClientConnectionEndpointsOptions.json file will have placeholder values that need to be configured to match the RPC Host and Port for the project. These values reflect the endpoint’s Host URL and Port that need to communicate with the Collector Service:
{
  "GrpcClientConnectionEndpointsOptions": {
    "Endpoints": {
      "default": {
        "Host": "collector.httpspi.raptor.iotnxt.io",
        "Port": 6003
      }
    }
  }
}
If the Host URL and Port are not configured properly, the most likely error message will be:
RPC Offline - connection pending
| The Host URL in this section needs to be written without the protocol. If (for example) ‘https://’ is added, the Driver will not be able to connect to the Collector Service. |
Once this has been set up, the data might still not send to Commander because the authentication token is incorrectly configured. In a scenario where the GRPC default endpoint has been configured correctly and data gets sent from the Driver to Commander, the logs will first read:
IdentityClient | Getting authentication token from Identity Server
IdentityClient | Discovery endpoints for the Identity Server at URL [*IdentityServiceURL*]
This indicates the Driver is looking for an authentication token from the IdentityServiceURL, which is configured in the IdentityClientOptions.json file:
{
  "IdentityClientOptions": {
    "IdentityServiceURL": "https://identity.httpspi.raptor.iotnxt.io:6100",
    "APIName": "RaptorRPC",
    "EnableAspAuthentication": false
  }
}
If the Identity Client cannot retrieve the authentication, the error will read:
invalid_client
When this happens, it is either because the server to which Identity Service is pointing does not exist or because the server is from a different V-Raptor. This URL needs to match the relevant V-Raptor’s settings correctly. In the case of Mahlako, it will be:
https://vraptor02-mapremis.commander.io:[port] - the Port will match the GRPC Endpoint Port number.
Once this has been amended in the IdentityClientOptions.json file, the Driver will be able to authenticate with the correct V-Raptor and data will be sent successfully.
| If the data is still not being sent, ensure that the ‘CertificateSubjectName’ in the DataProtectionOptions.json file is also correct and pointing to the relevant Certificate. If is it incorrect, the Driver will be contacting the correct Identity Server but the Certificate configured by the service will not be trusted by V-Raptor (the error will read: ‘invalid_client’). |
In summary, ensure that the following is configured correctly:
- GRPC Endpoint Host URL and Port
- IdentityServiceURL
- CertificateSubjectName
Once this has been done, the log messages will show something similar to:
Device[DeviceName] sending Device meta for [GatewayID][GroupName:DeviceType|DeviceName]
Device[DeviceName] sending Device telemetry for [GatewayID][GroupName:DeviceType|DeviceName]
This indicates the Driver is successfully sending meta and telemetry to Commander.
| RPC layers might differ according to the development environment. The example uses GRPC but these steps can be applied to SignalR. |
Data not Showing in Commander
This section will discuss typical reasons data might not be showing in Commander. These include:
- The Gateway has not been associated in Commander.
- The registration message is not being sent before the telemetry package.
- The Gateway is associated to the wrong account in Commander.
Gateway Association
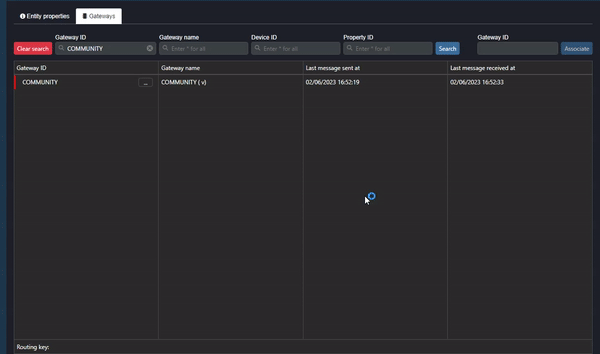
The first reason the data might not be showing on Commander is that the Gateway (configured in the meta packet in the Driver Device) has not yet been associated. Navigate to “Entity management” in the Commander Portal and select the “Gateways” tab. Enter the Gateway ID configured in the meta packet under ““Gateway ID” and click “Associate” (as shown in the clip below):
Clip 1 - Associate Gateway
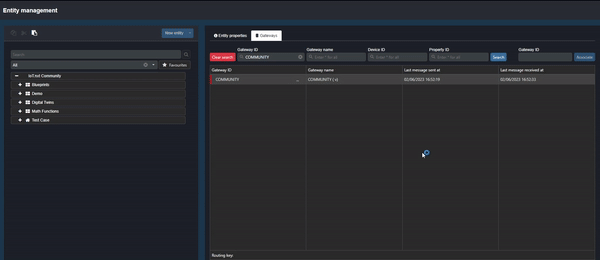
To see the Gateway in “Entity management” (once it has been associated), enter the Gateway ID under “Gateway ID” on the left of the tab and press enter. The Gateway will now be listed in the Gateways table:
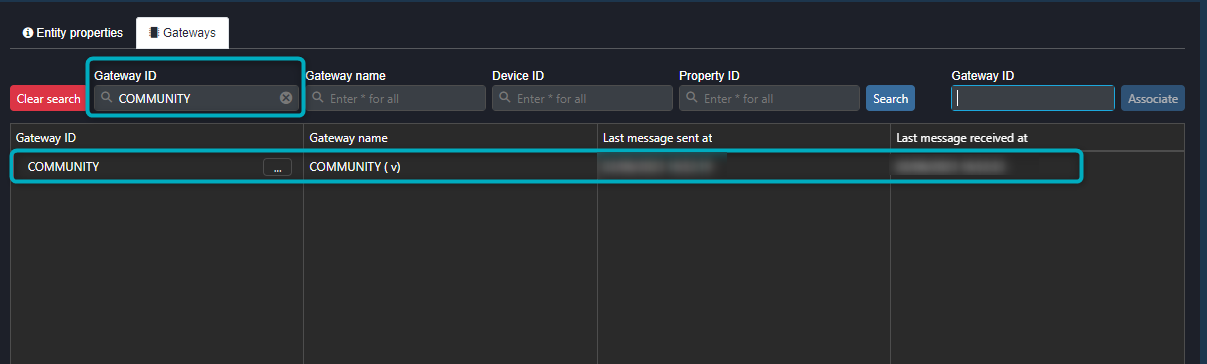
Figure 15 - Associated Gateway
To inspect the data being sent to Commander, click on the ellipsis next to the Gateway name and select “Inspect values”:
Clip 2 - Inspect Values
The table that opens allows the user to see data values and the history of the data being sent (click on the expand button to the left of the value for the history).
Registration Message
It is important to note that telemetry sent to Commander needs to be defined by the registration message in the Device’s configuration. If properties are configured in the telemetry packet but the registration message is not sent before the telemetry is sent to Commander, the data will not be defined and will either show a value of null in Commander or not be present as a Property ID (endpoint) in the Commander Portal.
To inspect this, click on the gateway (in the Commander Portal -> Entity management section):
Clip 3 - Property ID: Data Values
As shown in the clip above:
- Double-click on the Gateway name.
- Click on the ellipsis in the Device ID column and select “Set context”.
- Inspect the Property ID (data value) in the Property ID column.
If there is no data value (endpoint) in the Property ID column, the data has been sent but is not being read correctly by Commander (the endpoint cannot be defined by Commander). Another way to inspect this is to click on the ellipsis next to the Gateway and select “Inspect live values”. If the value type is “null”, Commander cannot read the data correctly.
To prevent this from happening, ensure that the registration message in the SDK’s Device file is configured properly and is sent before the telemetry message. In the Device file, check that the SendMetaAsync command is executed before the SendTelemetryAsync command.
| Ensure that the registration message is resent every time a new telemetry property is added to the telemetry packet. |
Account Association
The Commander account used to associate the Gateway needs to be the account that owns the Gateway’s data. If the Gateway is associated to the wrong account, when the user wants to associate it to the correct account Commander will warn the user that the Gateway is already associated to another account. To “move” the Gateway to the correct account, unassociate the Gateway in the incorrect account like this:

Clip 4 - Unassociate Gateway
Once the Gateway has been unassociated in the incorrect account, associate the Gateway in the correct account as shown in the sections above.
| Note that configuring the Gateway ID in Commander and the SDK with underscores will lead to Commander not being able to associate the Gateway properly. When creating the Gateway ID name, use camel case (e.g. GatewayId) or dashes (e.g. gateway-id) to distinguish between separate words in the name. Do not use spaces to separate words in the Gateway ID name. |