Data Integration
Mar 1 2023 at 12:00 AM
- Overview
- Open Data Integration
- Add a Data Source in Table Loader
- Inspect a Data Source
- Create a Data Lakehouse Table
- Inspect Table
- Delete a Table
- Streaming Configuration
- Data lakehouse table for other applications
Overview
Navigator allows the user to integrate data streamed in Commander™ and apply it to various applications that visualise data, create predictive models and analyse long-term trends. Data integration is the first step in this process, where the user sets up data sources and converts them into tables that can be used in numerous Navigator applications.
In Data Integration’s Telemetry Streamer, data sources are extracted and streamed from Blueprints and Digital Twins configured in Commander. These data sources can then be converted into tables with schemas that can be stored in a data lakehouse (in Table Loader).
What to expect from this section
This guide will show the user how to:
- Add a Data Source from Telemetry Streamer and list it in Table Loader.
- Inspect a Data Source.
- Create a Table and configure the Table Schema.
- Configure account (streaming) settings
Before adding a Data Source to Table Loader
Data Integration extracts data streams set up in Commander as Entities (and their tagged Blueprints) or Digital Twins. In order to extract this data, the user has to ensure Entities (and tagged Blueprints) or Digital Twins have been properly configured in the relevant Commander account.
To find out how to create a Blueprint, click here.
To find out how to create a Digital Twin, click here.
Open Data Integration
On the Commander landing page, click on the Navigator application logo:
Clip 1 - Open Navigator
Once the Navigator landing page opens, click on either the Data Integration card in the center of the page or the Data Integration icon found in the left-hand navigation:
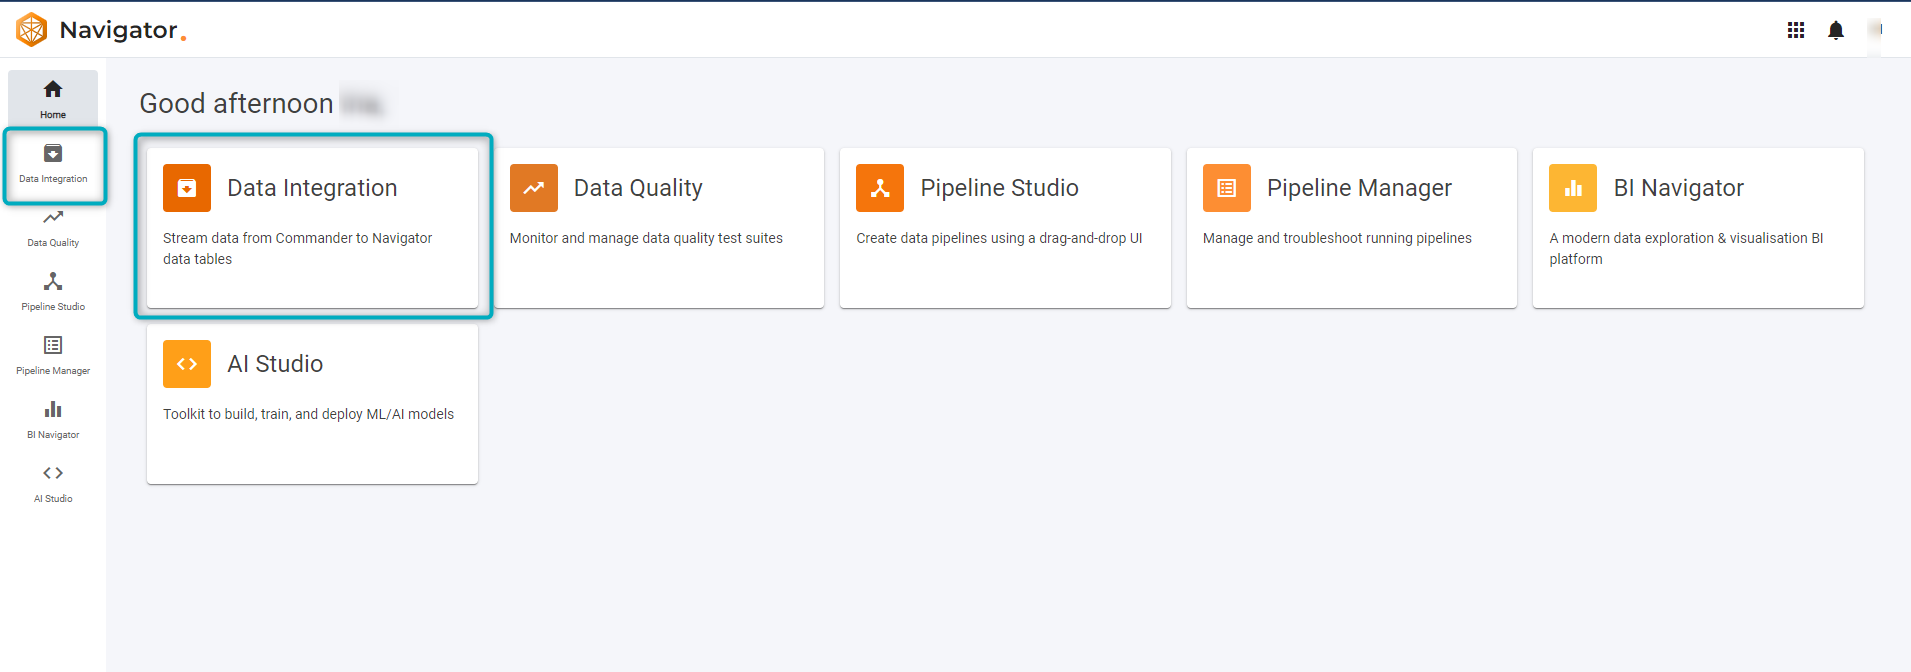
Figure 1 - Data Integration
This will open the Data Integration page which includes Table Loader.
Add a Data Source in Table Loader
Table Loader includes two Tabs, Sources and Tables:
Clip 2 - Sources Tab and Tables Tab
To add a Data Source to the list under the Sources tab, click on Telemetry Streamer:
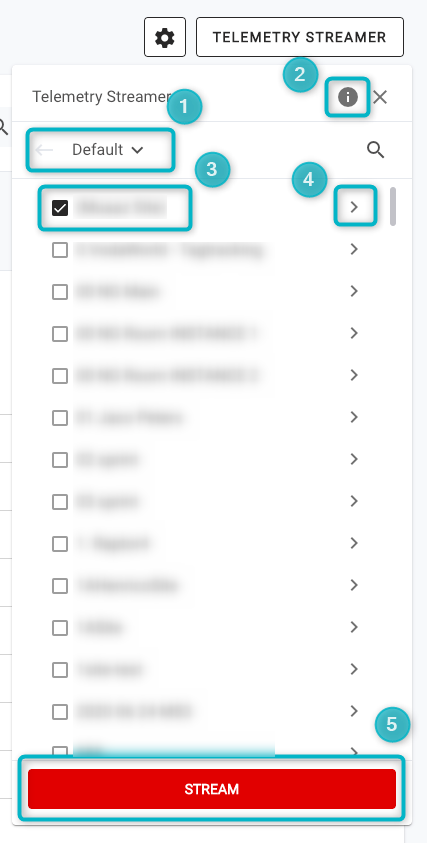
Figure 2 - Data Integration
The dropdown in Telemetry Streamer will show Entities created in the relevant account in Commander.
- Open the dropdown to select the account from which to choose Entities.
- Click on the information icon to see which Data Streams are currently being streamed.
- Select the Entities you would like to stream.
- Click through Entity levels to see nested Entities and Endpoints.
- Click on
STREAMto start streaming all selected Entities.
A user can also search for a specific Entity:
Clip 3 - Search Entities
Once the relevant Entities have been selected and the user has clicked on STREAM, a summary popup will show which Entities have been selected. Click on Confirm:
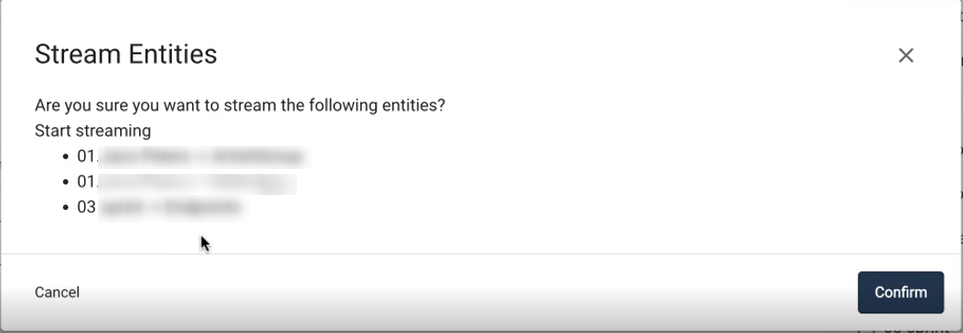
Figure 3 - Data Sources - Confirm Entities
Blueprints tagged to the selected Entities will show in the list of Data Sources in the Sources tab:
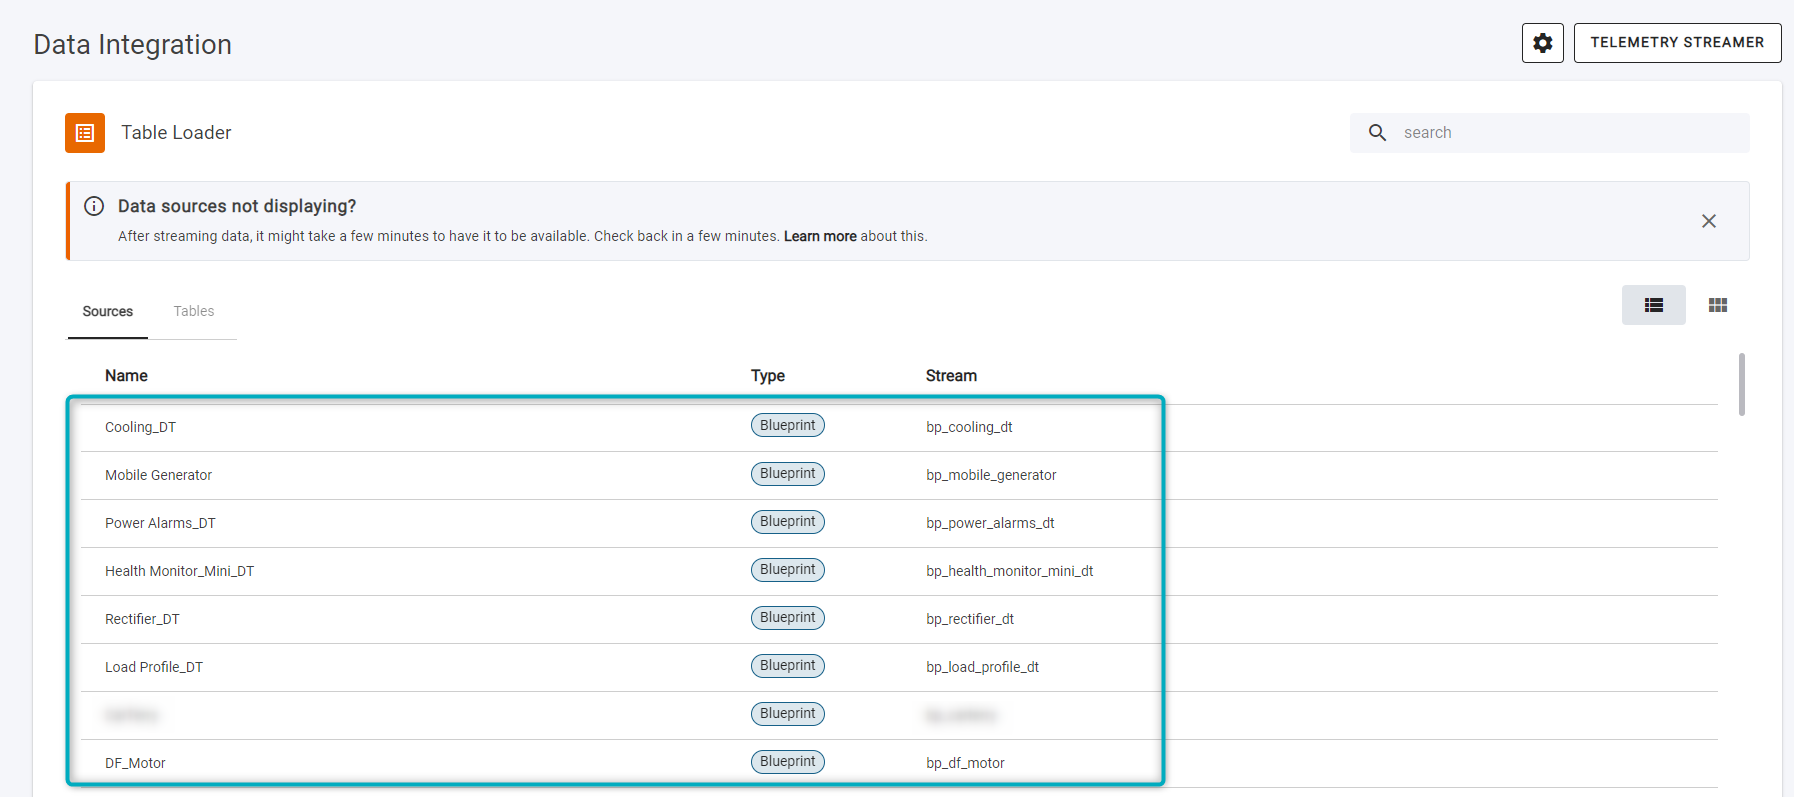
Figure 4 - Data Sources
| Navigator uses Commander Blueprints as building blocks for data that will be used in all its applications. However, the user selects Entities or Digital Twins from Telemetry Streamer in order to import data from Commander. Ensure that the correct Blueprints are tagged to Entities that are selected in Telemetry Streamer, so that the relevant Blueprints will be listed in the Sources tab under Table Loader. |
| Source data types include Blueprints and Data Streams. Data type Blueprint will be data streams from Telemetry Streamer. Data type Data Stream doesn’t have a Blueprint (from Commander) associated with it, and includes Internal Data Streams that output (for example) Machine Learning predictions from AI Studio. Data from data Type Blueprint is used to populate a Data Stream: |
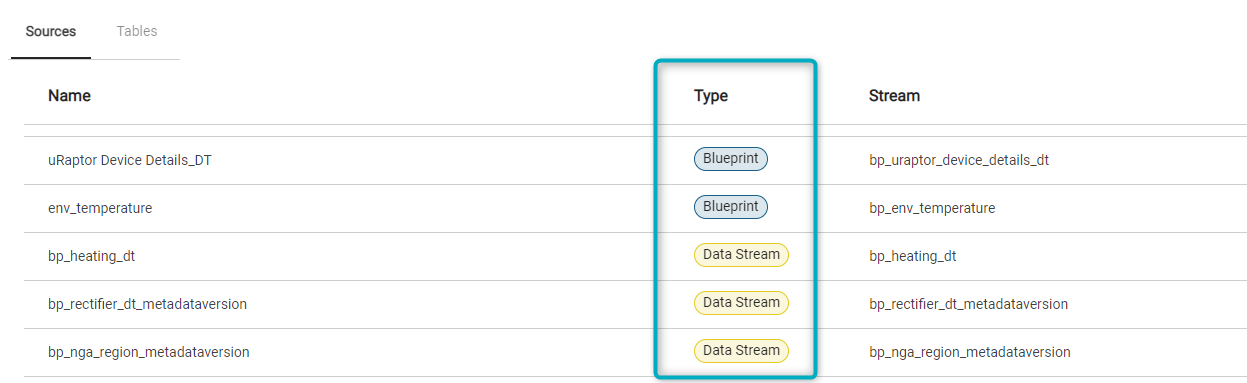 |
Figure 5 - Data Types
Inspect a Data Source
Before creating a table from a newly streamed Data Source, the user can inspect the Data Source to ensure that the data is correct. The user can click either on the Data Source name or on the ellipsis found on the far right of the Data Source row (click on “View Data” from the dropdown):
Clip 4 - View Data
The Data Source page will open:
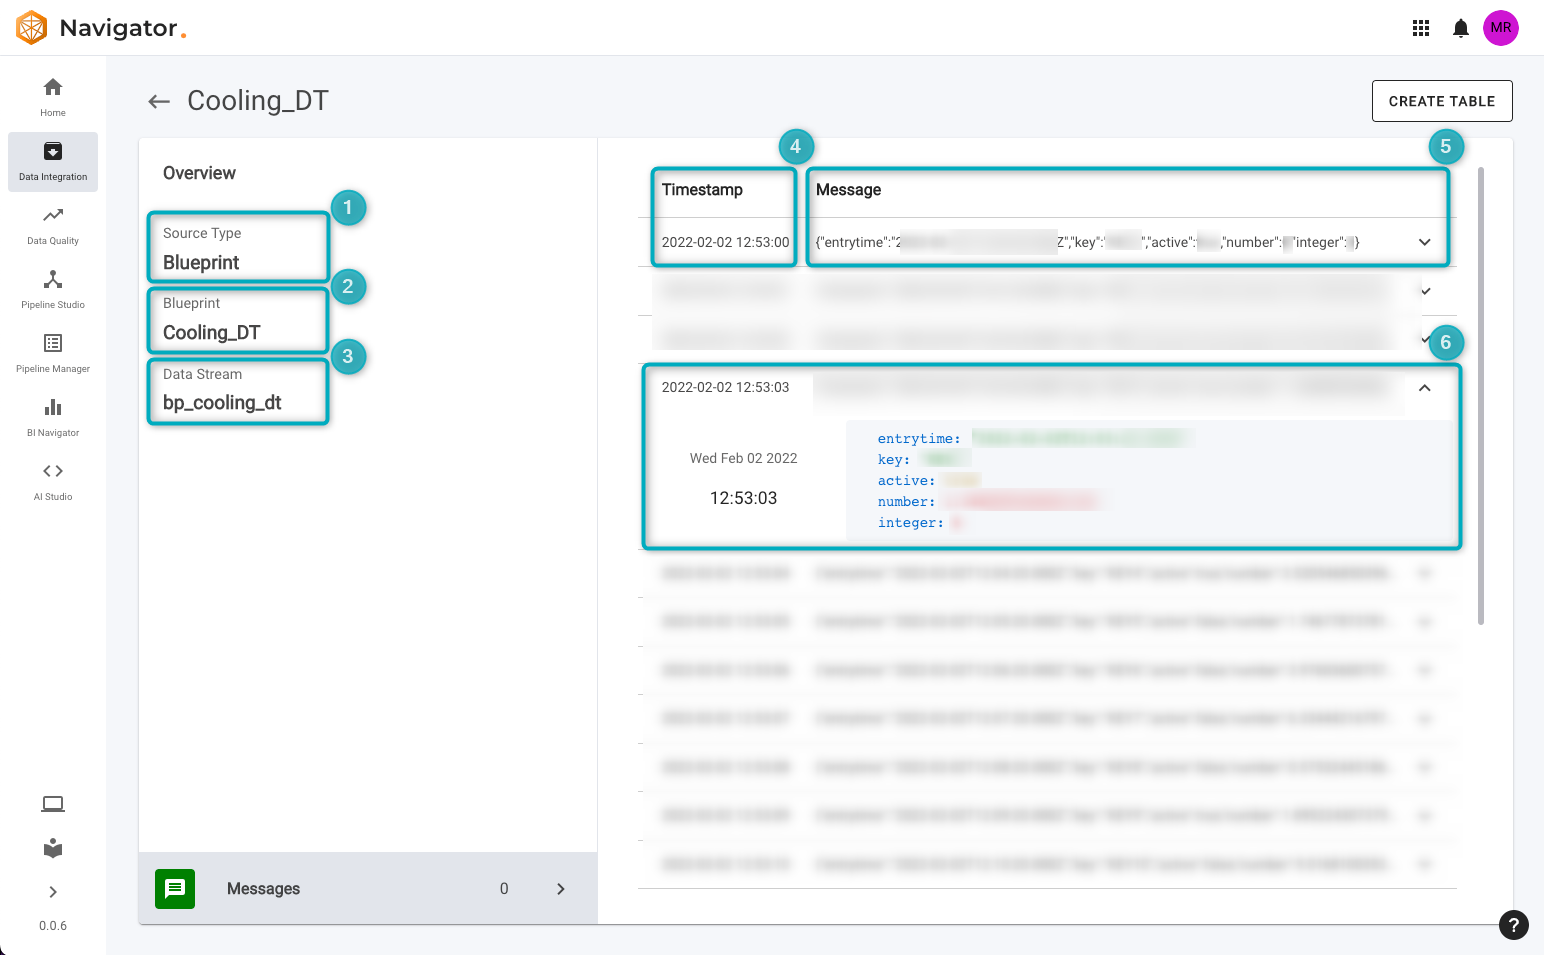
Figure 6 - Data Source page
The page will provide a summary of the following:
- Source type - the data type (eg Blueprint or Data Stream).
- Blueprint - the Blueprint associated with the Data Source.
- Data Steam - the data stream from Commander associated with the Data Source.
- Timestamp - the timestamp of the messages provided by the data stream.
- Message - a list of the sample messages that can be inspected. This sample will show up to 100 messages. A message is a single instance of data for that data stream at a specific timestamp.
- Click on the downward pointing arrow to expand any individual message. Once open, the information in the message can be seen as an object.
The Sources tab in Table Loader will show live Data Sources that do not have a longtime data retention policy. Data in this list will be lost in approximately 7-10 days. To store the data and use it BI Navigator, the Data Source has to be used to create a data lakehouse table.
Create a Data Lakehouse Table
To create a data lakehouse table, click on CREATE TABLE in the Data Source page or click on the ellipsis at the far right of the Data Source in the Sources list (in the dropdown, click on “+ Data lakehouse table”):
Clip 5 - Create Table
In the window that opens, review the data schema that will be used to create the data lakehouse table:
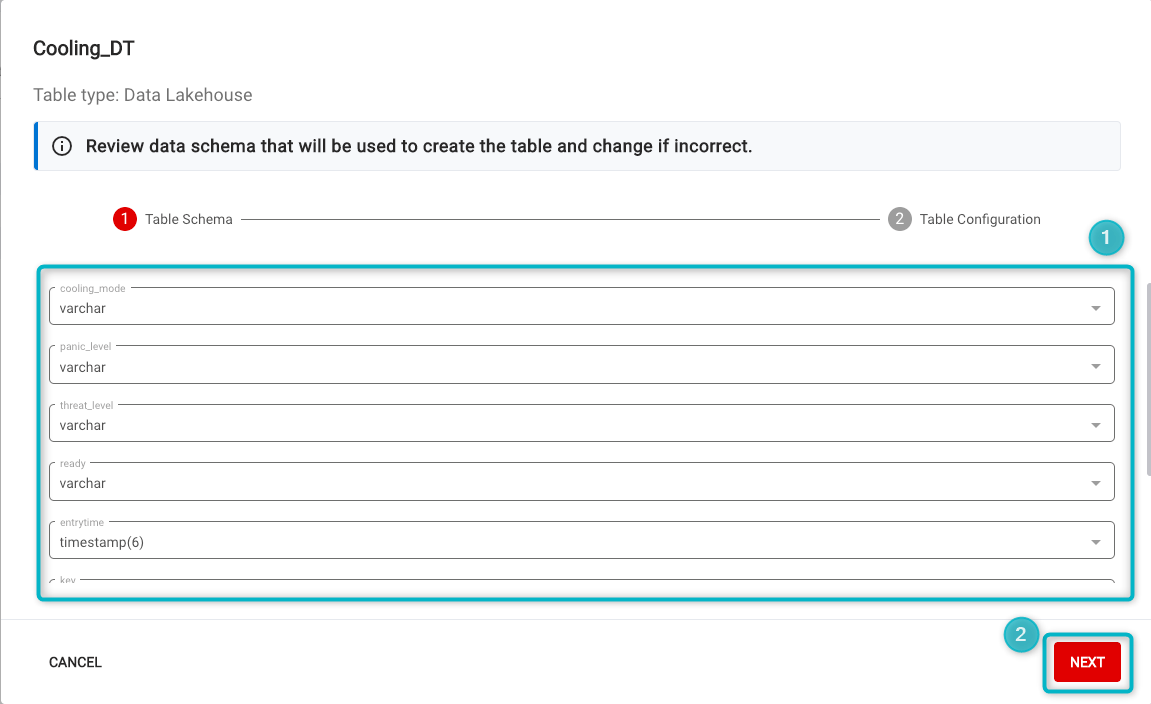
Figure 7 - Table Schema
Fields in this window will show all the schema properties and the data type related to each property. The user can click on the dropdown on each property to change the data type if it is incorrect. The data type will be set according to some checks done based on the data being captured. If a trend is picked up from the Data Source, the data type will be selected based on that. If the data is not sufficient to provide the correct data type, the system will then refer to the Commander Blueprint setup for the data type. If it has not been configured in the Blueprint, the data type “VarChar” will be set by default.
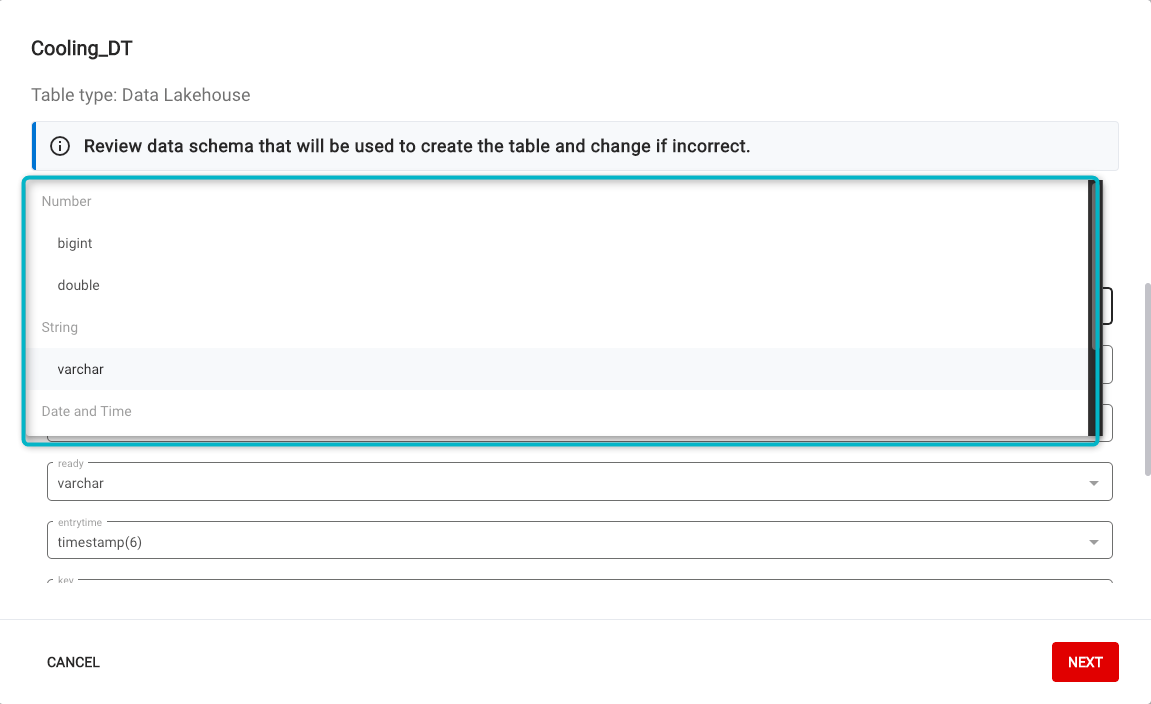
Figure 8 - Data Types - Table Schema
The following options are available:
- bigint - integer, number with no decimal point.
- double - number with a decimal point.
- varchar - variable character.
- timestamp(x) - the timestamp that should be used for the data stream.
- boolean - eg true/false.
Click on
NEXTto go to Table Configuration.
In the Table Configuration tab:
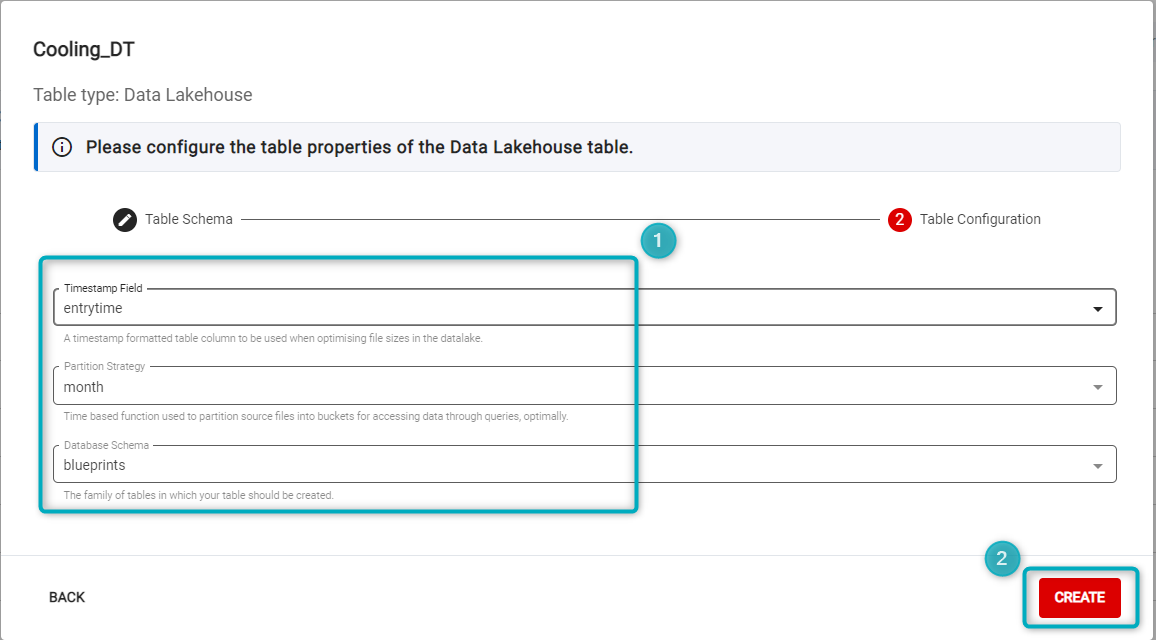
Figure 9 - Table Configuration
The user can configure “Timestamp field”, “Partition Strategy” and “Database Schema”:
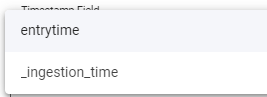
Figure 10 - Timestamp field - The Timestamp field dropdown will show timestamp options. Default options include “entrytime” and “_ingestion_time”. More options will be available if any of the data types have been configured as a timestamp.
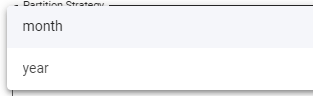
Figure 11 - Partition strategy - The Partition strategy dropdown will show “month” or “year”. This is to assist with partitioning the data when storing it, and will impact how fast you can query it. For larger data sets, choose “month”; for data that needs to be analysed over longer periods, choose “year”.
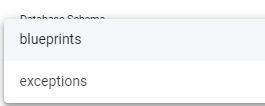
Figure 12 - Database schema - The Database schema will default to Blueprints. The dropdown will show the “exceptions” option - this will be an option if there is not a Blueprint associated with the Data Source.
Click
CREATEto create the data lakehouse table.
Once the table has been created, it will be listed under the Tables tab in Table Loader.
| As with Data Streaming, creating the data lakehouse table takes a while to show on the list under the Tables tab. It might not appear immediately. |
| Once a Data Source has been used to create a data lakehouse table, it will only appear under the Tables tab and will no longer be found in the Sources tab. |
Inspect Table
Once the Table is in the list under the Tables tab, click on the name or on the ellipsis on the far-right of the row (click on “View Data”):
Clip 6 - View Table
This will open an overview of the Table configuration:
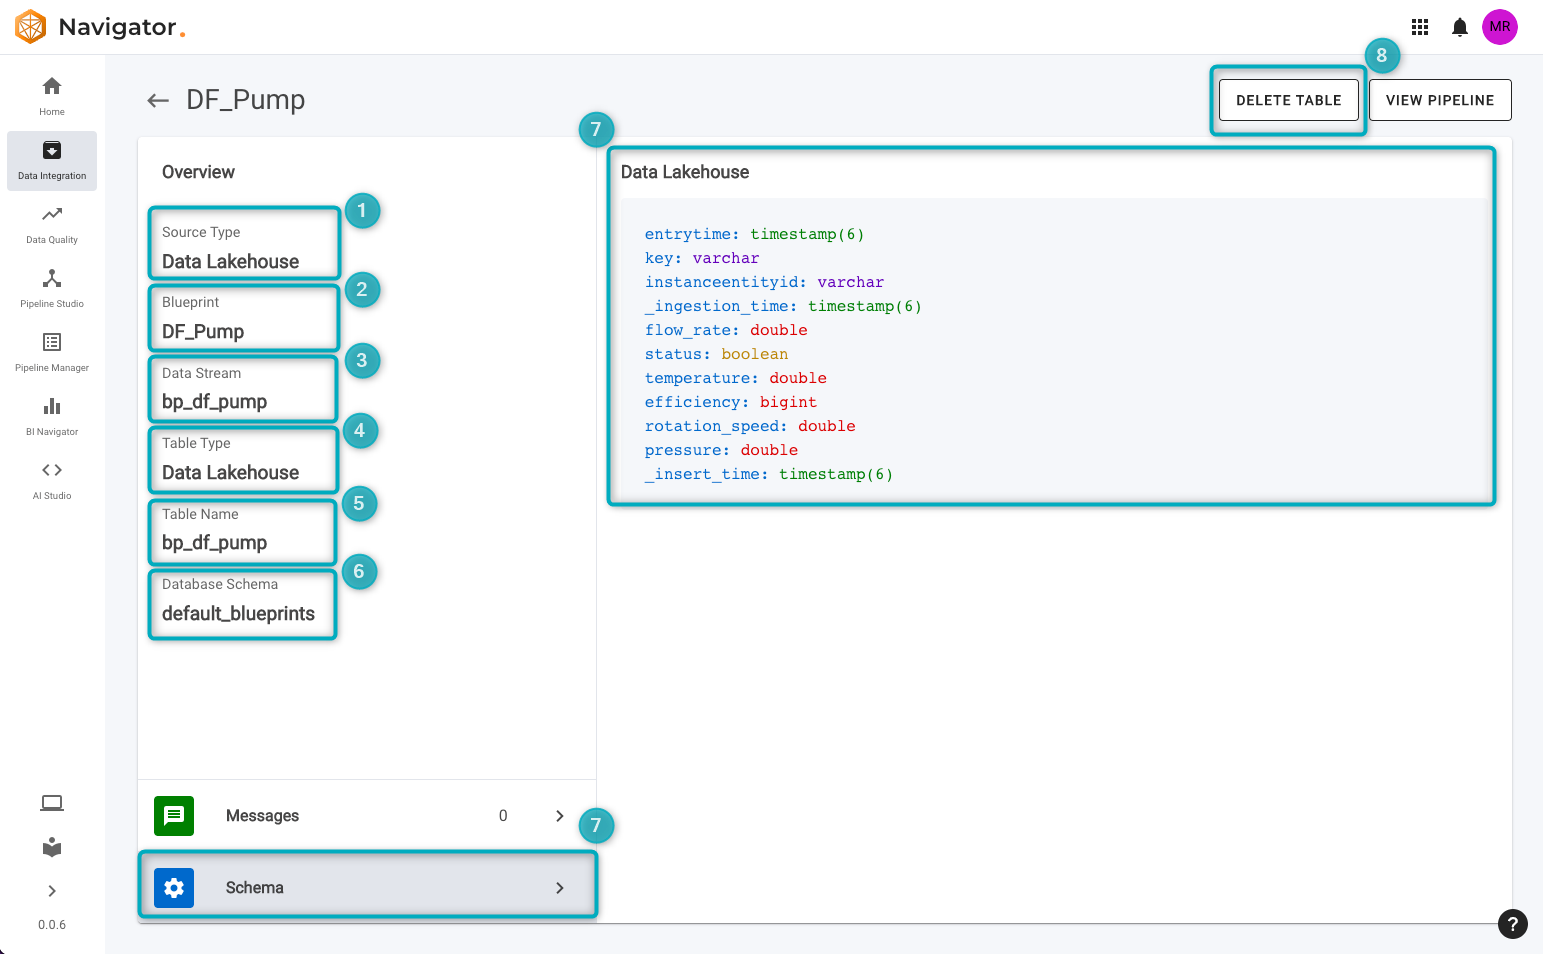
Figure 13 - View table information
- Source type - this will be Data Lakehouse by default.
- Blueprint - the Blueprint associated with this table.
- Data Stream - the name associated with the data stream (also known as the Kafka topic). Use this name to build a pipeline in Pipeline Studio using this data stream.
- Table type - this will be Data Lakehouse by default.
- Table name - the name given to the table stored in the data lakehouse. Use this table name to query the table in BI Navigator.
- Database Schema - this will be Blueprints by default and depends on the database schema chosen when configuring the table.
- To view the table schema, click on
Schemaon the bottom left. This will show the table schema on the right, with all configured properties and data types. - Click on
DELETE TABLEto delete the table.
Delete a Table
To delete a table, click on DELETE TABLE in the Table’s page (top right), or click on the ellipsis to the far right of the row next to the Table’s name (in the Tables tab) and choose “Delete Data lakehouse table” from the dropdown:
Clip 7 - Delete Table
This will open a window that prompts the user to type “DELETE” and then click on DELETE. Note that once the table has been deleted, the data will be lost.
Streaming Configuration
To view or update streaming configuration, click on the settings icon at the top right of the page:
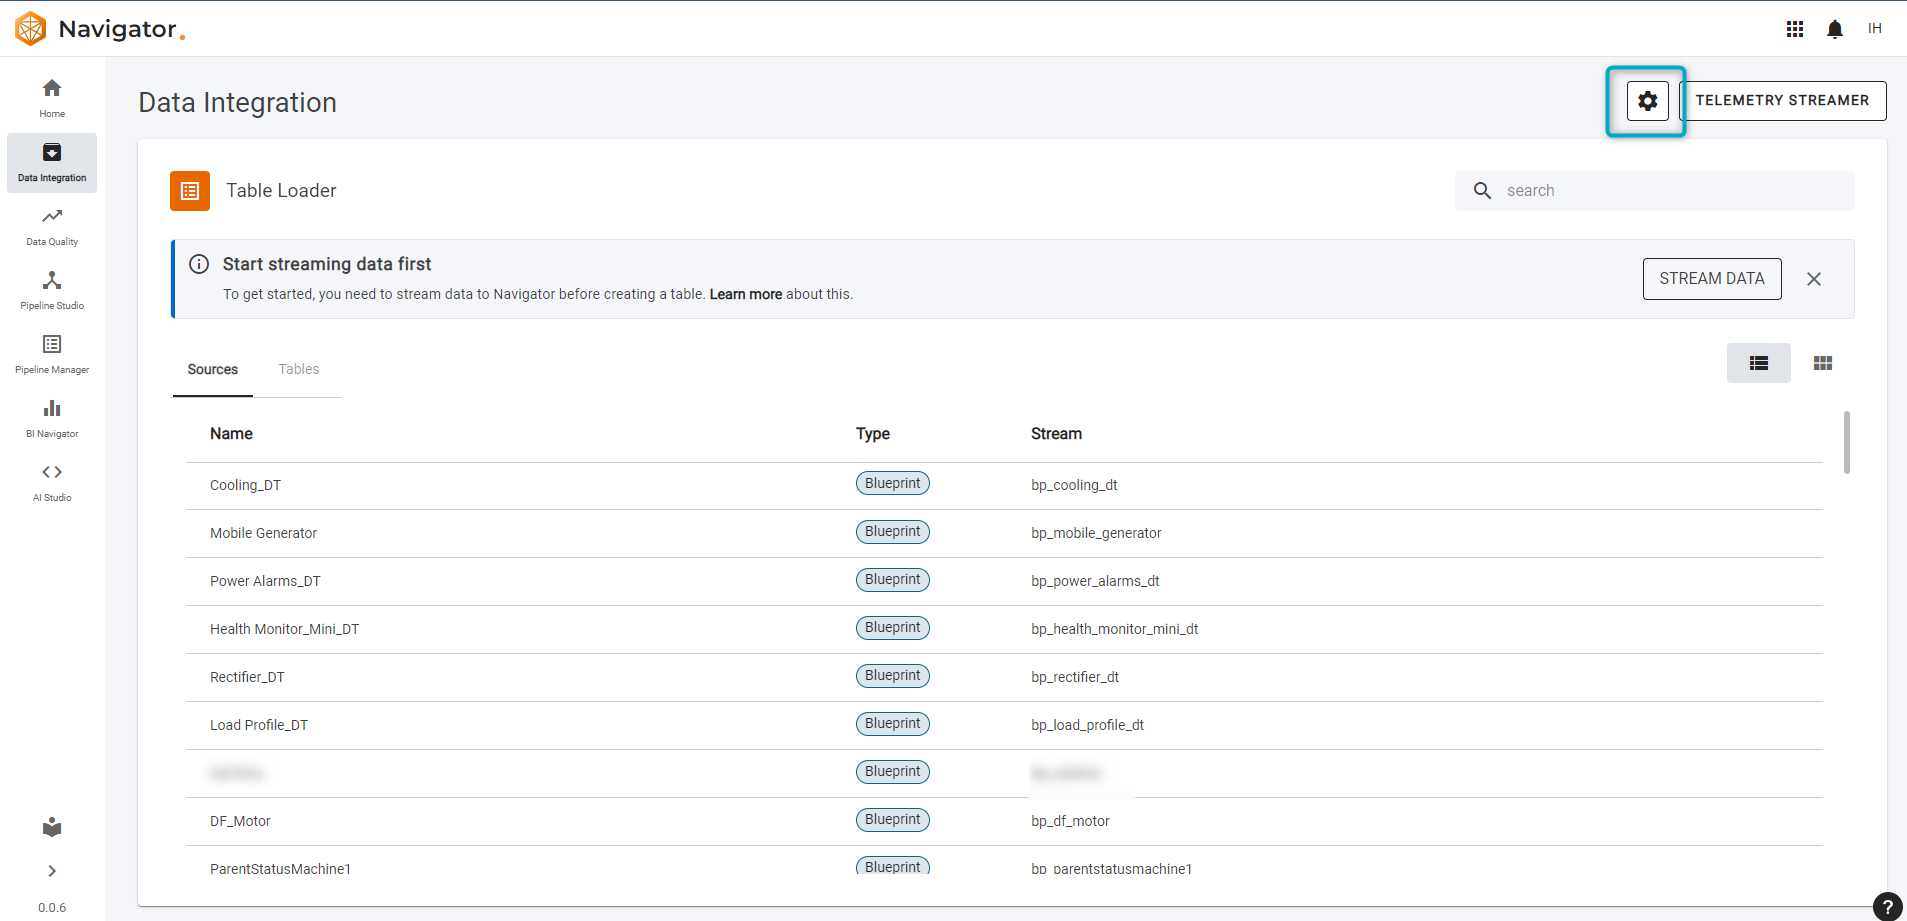
Figure 14 - Account configuration
For users without administrator permissions, the streaming configuration page will show settings that have been configured by the administrator:
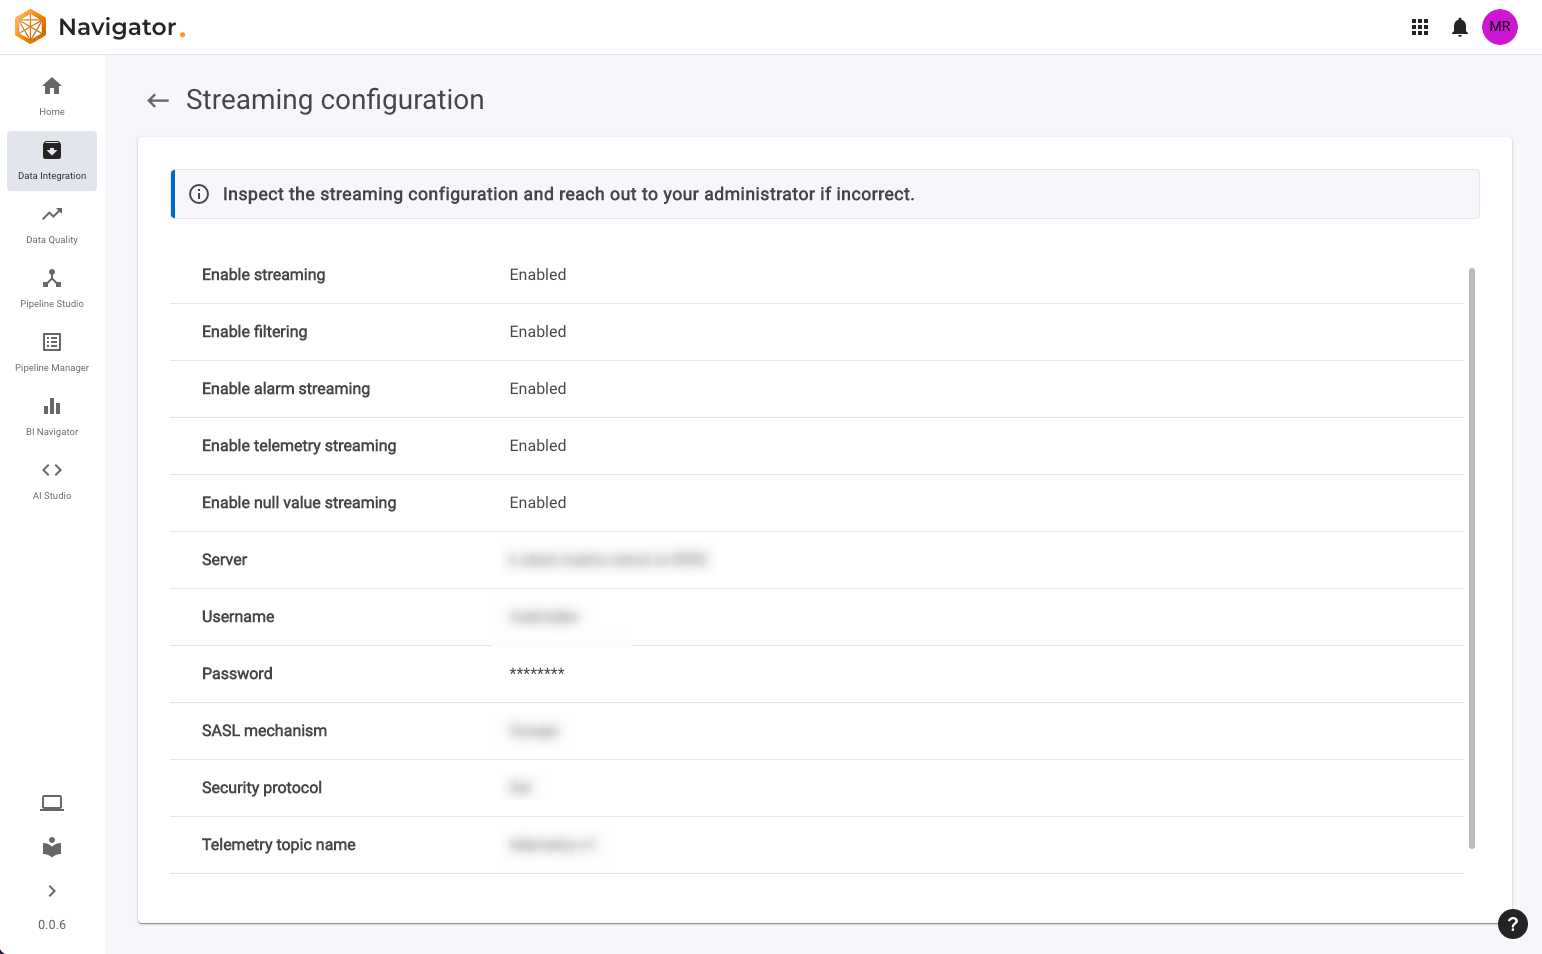
Figure 15 - Account configuration - non-administrator
The user will be able to see whether the following is enabled:
- Streaming
- Filtering
- Alarm streaming
- Telemetry Streaming
- Null value streaming
Other information such as the Server being used, the Username, Password, SASL mechanism, Security protocol and Telemetry topic name will also be listed here.
For users with administrator permissions, the following will be available for configuration:

Figure 16 - Account configuration - administrator
The administrator will be able to enable (or disable) the following;
- Streaming
- Filtering
- Alarm streaming
- Telemetry streaming
- Null value streaming
Other settings that can be configured include:
- Server
- Username
- Password
- SASL mechanism
- Security protocol
- Telemetry topic name
- Alarm topic name
- If settings have been changed and the administrator wants to revert to the default development setup configuration, click on
AUTO CONFIGand the account/streaming settings will revert to the default setup configuration. - Click on the
UPDATEbutton to update settings.
Data lakehouse table for other applications
Once the data lakehouse table has been created, it can be used in other Navigator applications to (for example):
- Explore and visualise data.
- Create predictive models and analyse long-term data trends.