
Raptor SDK Setup
Dec 7 2023 at 12:00 AM
Overview - Installing the Driver SDK
The V-Raptor SDK provides boilerplate code with a customisable framework that lets the user quickly set up and build a microservice. The guide below will show how to install the V-Raptor SDK on a local machine to build a Driver microservice.
Prerequisites
The following needs to be installed on your local machine to use the SDK on your machine:
- DotNetCore (ensure that the latest DotNet version is installed, which is DotNet7 at the time of this guide’s publication).
- Visual Studio (latest release).
- Git (latest release).
- NuGet (latest release).
1. Install SDK Template from a NuGet Package
Install the latest version of the full SDK template from a NuGet package.
The NuGet command line interface does not support interactive mode which allows credentials to be provided during installation of NuGet packages. This process therefore uses the Package Manager Console in Visual Studio to install the package.
Configuring the NuGet Package Source
To install the package, configure the IoT.nxt private-dev package source for the NuGet Package Manager.
Open Visual Studio and navigate to the Tools menu, then select “Options”:
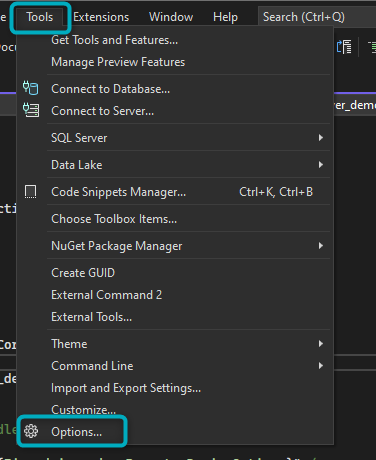
Figure 1 - Options in Visual Studio
In the Options window:
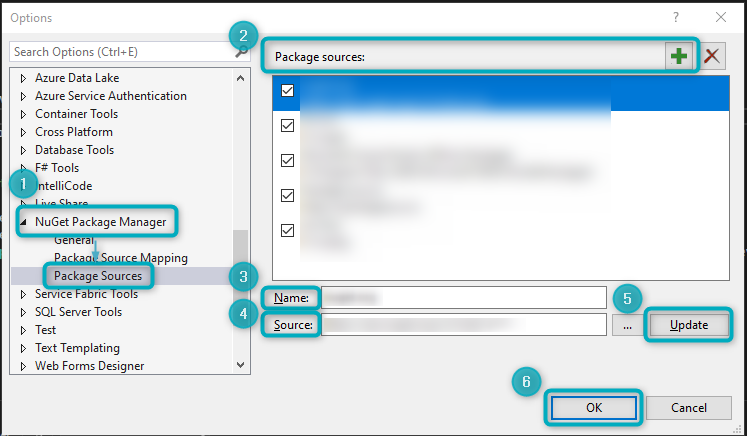
Figure 2 - Options Window
- Scroll down to find “NuGet Package Manager” and expand the dropdown. Select “Package Sources”.
- Click the ADD (the green + icon) button at the top right of the window to add a Package Source.
- In the Name field, enter the name IoT.nxt.
- In the Source field, ender the URL that points to the V-Raptor SDK stream. This is the stream where the SDK will be published. Note that credentials might be needed for this step.
- Click Update.
- Click OK.
2. Download the SDK Template Package
In Visual Studio, select the Tools menu and open the NuGet Package Manager sub-menu. Select the Package Manager Console menu item.
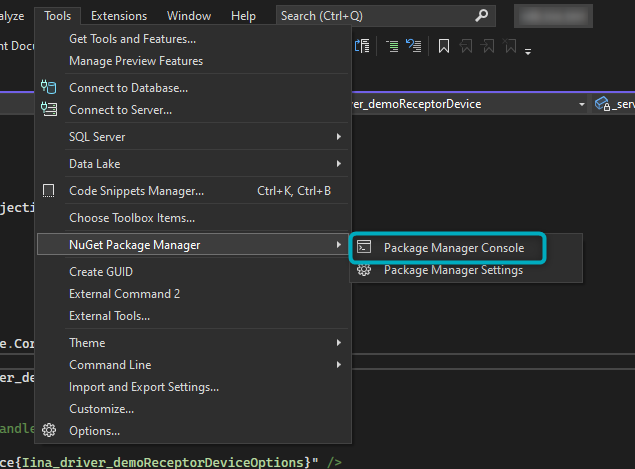
Figure 3 - Select Package Manager Console
This will open the Package Manager Console. In the console window, type the following:
nuget install IoTnxt.Raptor.Device.Template -version <VersionNumber>
It will look like this in the Package Manager Console:
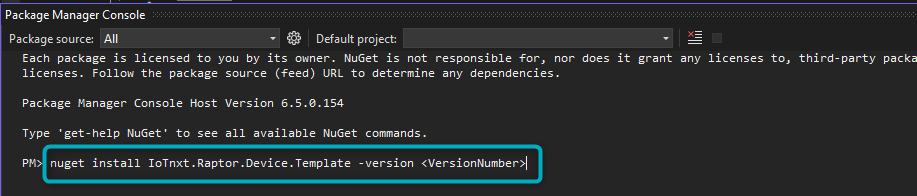
Figure 4 - Command in Package Manager Console
VersionNumber: Replace this with the latest released version of the template package. An example of a version number is 4.0.14.1.
The Package Manager will install the package. You will get the following error at the end:
Error NU5000: Package ‘IoTnxt.Raptor.Device.Template 4.0.14.1’ has a package type ‘Template’ that is not supported
Ignore this message. The package has been installed correctly.
Installing the SDK Template with DotNet
Open a PowerShell or Command window. Run the following command (for Windows) to install the Raptor Device Template package:
dotnet new –install IoTnxt.Raptor.Device.Template::<VersionNumber>
The VersionNumber will be the same as the version number used when installing the NuGet Package in the Package Manager Console.
The Template (Raptor.Device.Template) will now be installed in DotNet, ready to be used:
Figure 5 - Raptor.Device.Template
Run the command:
dotnet new --list
A list of currently installed SDK Templates will be displayed (see the image above). The Template for IoTnxt.Raptor.Device.Service (raptordeviceservice) will be in this list once it has been installed.
| For Linux operating systems, the Template can be downloaded and installed locally. |
For Linux (install locally):
Open a PowerShell or Command window and type the following:
dotnet new install ~/Downloads/IoTnxt.Raptor.Device.Template.<VersionNumber>.nupkg

Figure 6 - Install with Linux
As shown above, the command downloads and installs the Template locally, with:
Template Name: IoTnxt.Raptor.Device.Service (raptordeviceservice)
The Template has now been successfully installed. The next section will show how to run the Template.
3. Generate and Run a Project Template
Create a folder for the V-Raptor project that will include the Driver SDK Template.
To create a Device Name for your Driver, open a PowerShell or Command window in the folder created above and insert the following command:
dotnet new raptordeviceservice –devicename <DeviceName>
For a Linux operating system:
dotnet new raptordeviceservice –-devicename <DeviceName>
Once a folder and Device Name has been created, a complete SDK solution of files for a V-Raptor project will be installed and ready to use. DeviceName will appear as part of all Device Template names in the SDK project’s files. This solution can be compiled and run immediately, and will connect to the Collector microservice to send data for all types of Devices, including:
- Receptor Device
- Scheduled Device
- Scheduled Receptor Device
The solution is divided into four solution folder types:
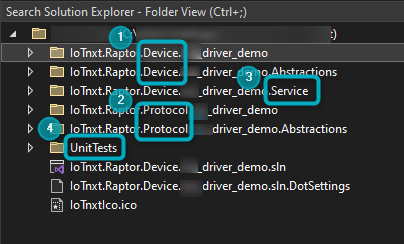
Figure 7 - Solution Folder Types
- Devices - Stores Abstract and Concrete projects for Devices (Device Interfaces) associated with the Raptor Device Service (the full SDK solution).
- Protocols - Stores Abstract and Concrete projects for Protocols associated with the Raptor Device Service (the full SDK solution).
- Services - Contains the Raptor Device Service’s Program.cs file (the root composite file for the Driver Service).
- Tests - Contains the Unit Test projects and services, if required.