
Scheduled Device
Jan 1 2022 at 12:00 AM
- Driver Characteristics
- Typical use case
- Driver description
- Driver State Transitions
- Properties
- Getting started
Driver Characteristics
The scheduled device template contains the following driver characteristics:
- Pull Device
- Runs on Schedule
- Has out-of-the-box configured Property Mappings. Scheduled Devices generally define the registration packet through the Devices Options (configuration) file.
- Limits external telemetry sources to one source per Device.
- Meta requests sent automatically
- Telemetry requests sent automatically
Typical use case
This driver template is suitable in use cases that have the following requirements:
- The user needs to extract telemetry from one or more external telemetry sources on a scheduled basis.
- The application requires configured Property Mappings. Although a Scheduled Device can be configured without property mappings, it is one of the Device templates that provides boilerplate code for this feature, making it easier to use with applications that would best suit this type of setup.
- Each configured Device communicates with exactly one external telemetry source. In other words, the Driver is able to communicate with multiple external telemetry sources using Scheduled Device Interfaces, however each Interface can only represent one physical device.
- The meta and telemetry sent from each configured Device has the same Device Name, Device Type, Group Name and Gateway Id. These values are defined in in the Device’s configuration file (e.g. “DevicesOptions.json”, in the “Devices” section).
Driver description
Scheduled Devices are devices that are executed on a regular basis by the Task Scheduler. Each time the device is executed, it is expected to send its current telemetry values. Device Workflow is used to coordinate the various processes needed to ensure that this happens.
The scheduled that a device is run on can either be set for each device individually, or through a global setting via the TaskScheduleOptions.json configuration file.
When a scheduled device is created by Device Manager, it is Initialized immediately. The execution of the device is then passed to Task Scheduler to execute according to the defined schedule.
Driver State Transitions
Driver utilising this template will utilise the following state transitions.
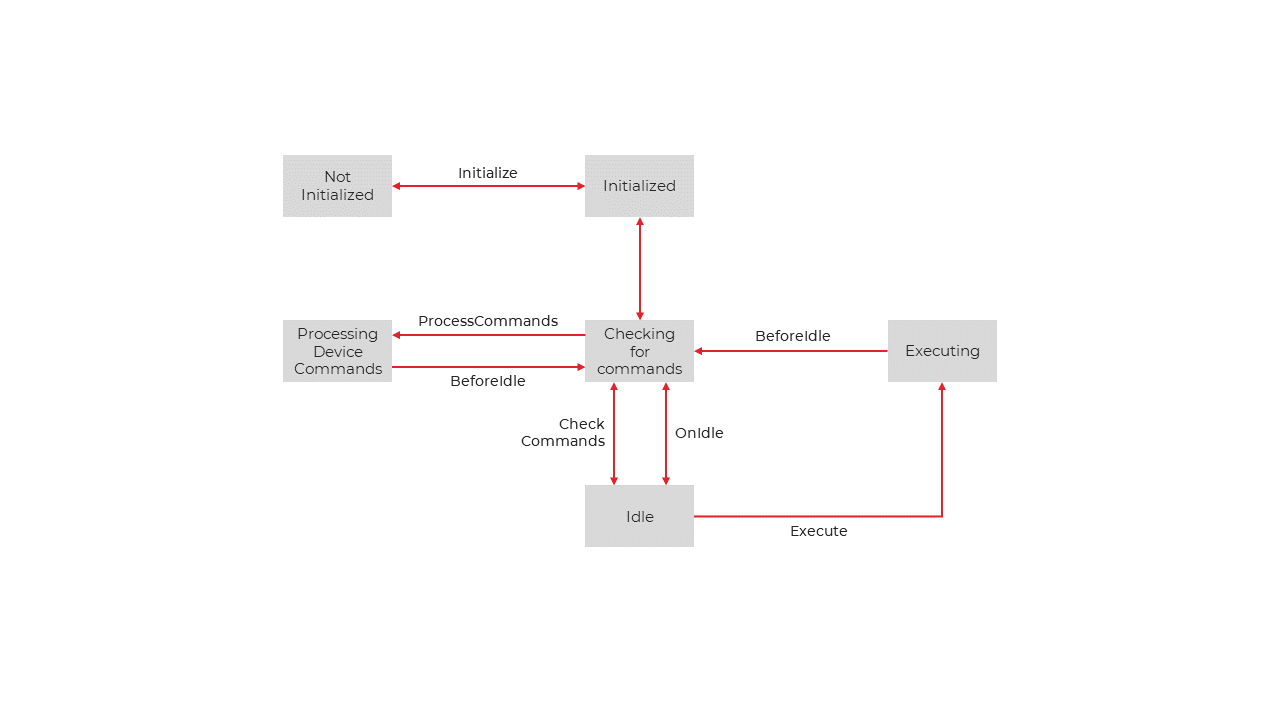
Figure 1 - Scheduled device state transitions
Initializing
- Check and load the current device options.
- Call OnGetPropertyMapsAsync for the Default Properties device (if configured) and for the current device.
- Executes OnConnectAsync to connect to the device, if required.
- Executes OnInitializeAsync to initialize the device, if required.
- Send the Device Meta to the Collector.
Checking for Commands
- If the device’s CanProcessDeviceCommands property returns true, then the system will check if there are any Device Commands to process.
- If called from Idle, then executes OnConnectAsync to connect to the device, if required.
- Executes OnProcessDeviceCommandAsync for each device command it finds.
- If the function returns true, the device command is removed from the processing list.
Idle
- Executes OnDisconnectAsync to disconnect from the device, if required.
Execute
Check and load any changes to the current device options.
If changes found a. Execute OnGetPropertyMapsAsync for the Default Properties device (if configured) and for the current device. b. Execute OnNewOptionsAsync to allow for additional processing to happen if the options change. c. Send the changed Device Meta to the Collector.
Executes OnConnectAsync to connect to the device, if required.
Execute OnGetCurrentTelemetryValuesAsync to get the current property values from the device.
Send the Telemetry to the Collector.
Properties
| Property Name | Data Type | Description |
|---|---|---|
| CancellationToken | CancellationToken | Holds the cancellation token that will signal when the device is being shut down. |
| CanProcessDeviceCommands | bool | Set to true if the device can process device commands. |
| DeviceHealth | IComponentHealthStatus | The device health instance associated with this device. Use this to set the RAG status to show the health of the device. |
| DeviceName | string | Holds the configured name of the device. |
| DeviceType | string | Holds the configured type of the device. |
| Options | TOptions | The current options for this device. |
| OptionsVersion | int | The version number of the options. This starts from 1 when the device is first created and increments each time the options change. |
Getting started
This section outlines the basic steps required to customise the scheduled device template.
Initialisation code
This code will be run once when the service’s schedule manager starts the device driver.
        protected override Task OnInitializeAsync()
        {
            // TODO: Run any initialisation logic here
            return Task.CompletedTask;
        }
Creating telemetry messages
Adding your properties
Make use of the devices options to create properties for your device. The properties will be registered for each device in the DevicesOptions.json file upon the service’s startup.
  "Devices": {
    "DefaultProperties": {
      "DeviceType": "DefaultProperties",
      "GroupName": "MyDeviceGroup",
      "PropertyMaps": {
        "Prop1": {
          "DataType": "double"
        },
        "Prop2": {
          "DataType": "int"
        },
        "ToggleDevice" : {
          "DataType" : "bool"
        }
      }
    }
  }
}
The OnStartAsync will get executed periodically. You can use this method to read from your device, create a telemetry message and send it to the V-Raptor’s™ Aggregation Service.
        /// <summary>
        /// Called when the Device is started
        /// This task can be long running.
        /// Use the <see cref="CancellationToken"/> property to detect when the service shuts down.
        /// </summary>
        /// <returns> A Task </returns>
        protected override async Task OnStartAsync()
        {
           // TODO: Start
            LogInformation("Opening connection to device...");
            //Read values from device etc...
            // An example of sending telemetry is shown below
            var info = await GetCurrentPropertyInfo();
            info.Properties["Prop1"].SetCurrentValue(123.456);
            info.Properties["Prop2"].SetCurrentValue(789);
            await SendTelemetryAsync(info.Properties);
        }
Note: Do not run blocking operations in this method.
Accepting device commands
This allows your device to receive commands from the IoT.nxt® Commander™ platform.
The first step is to specify whether or not your driver will accept device commands
        /// <summary>
        /// Gets whether this device can process device commands.
        /// </summary>
        public override bool CanProcessDeviceCommands => true;
The actual command execution can be done in the following method
        /// <summary>
        /// Called when a Device Command needs to be processed.
        /// </summary>
        /// <param name="deviceCommand">The device command to process.</param>
        /// <param name="currentProperties">The current properties</param>
        /// <returns>
        /// A Task which, when complete, has whether the command was successfully processed in the result
        /// </returns>
        /// <exception cref="NotImplementedException"></exception>
        protected override Task<bool> OnProcessDeviceCommandAsync(IDeviceCommand deviceCommand,
            ICurrentProperties currentProperties)
        {
            // Note: The property CanProcessDeviceCommands must return true for this function to be called.
            // TODO: Process the Device Command
             if (!deviceCommand.CommandText?.Equals("ToggleDevice", StringComparison.CurrentCultureIgnoreCase) ??
                false)
            {
                //TODO: Add your command logic
                return true;
            }
            // Return true if the command was processed successfully
            return Task.FromResult(true);
        }
The deviceCommand argument will contain the properties affected by the command.
Configuring the device(s)
Using the DevicesOptions.json file, additional devices and their options can be added.
{
  "Devices": {
    "DefaultProperties": {
    },
    "Device1": {
      "Enabled": true,
      "DeviceType": "MyDeviceType",
      "PropertiesDeviceName": "DefaultProperties"
    },
        "Device1": {
      "Enabled": true,
      "DeviceType": "MyDeviceType",
      "PropertiesDeviceName": "DefaultProperties"
    }
  }
}
In the example above, two devices will be created on service startup - each with the same properties as defined in the DefaultProperties section.