
Connection Manager Application
Jan 1 2022 at 12:00 AM
- Overview
- Certificate Features (external routing/server certificates)
- Internal Routing Rules
- External Routing Rules
This article provides a walk-through of an application within the Virtual Raptor that is referred to as Connection manager. This application can be found on a Raptor specific landing page.
Overview
This article provides a walk-through of a vRaptor application referred to as ‘Connection manager’. The application is required primarily for internal and external communication routes to be setup. This means that devices outside of the vRaptor (on a different secure/unsecure network and range) network will be able to communicate to the vRaptor. This is done by creating sets of internal and external rules as well as setting up port forwarding. All these communication lines are secured by certificates (internal vRaptor certificates or external trusted certificates). This will all be explained and elaborated within this document.
The Connection Manager application can be accessed from the Landing page application. The following screen will appear once the application is selected:
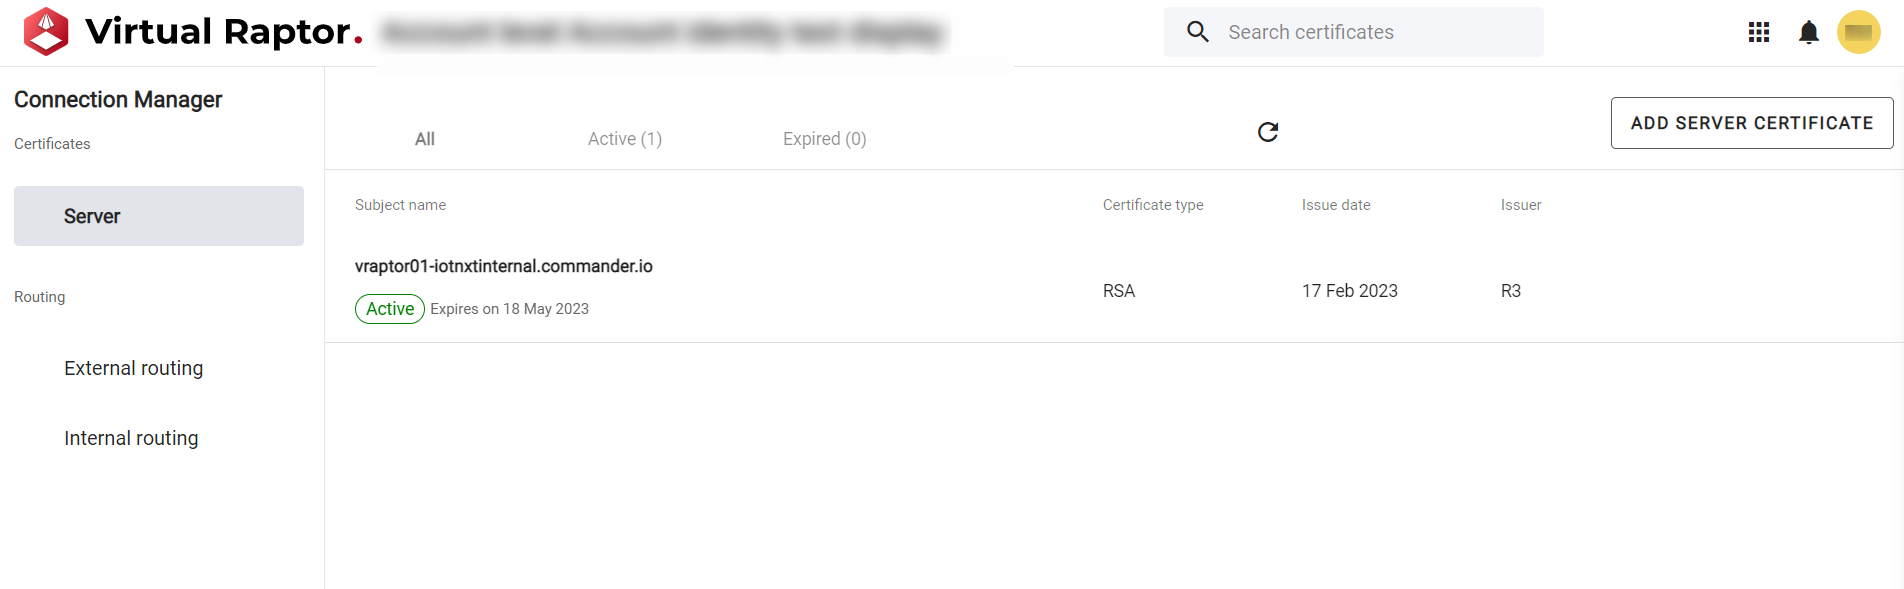
Figure 1 – Connection Manager - Landing Page
Certificate Features (external routing/server certificates)
- vRaptor requires the ability to accept/ingest certificate for communication purposes to vRaptor (External rules)
- Scenarios:
- Give the raptor an external trusted cert.
- Give the raptor an external trusted cert by the device (EC)
- Functions:
- Upload
- See when certificate is expiring (when/if possible)
- Show user notifications on UI when a cert is about to expire
- Show revocation status
- Scenarios:
- Give vRaptor ability to give certificate for communication purposes outside of vRaptor
- Scenarios:
- Give the raptor an external trusted cert by the world, like from Let’s Encrypt (Typically RSA)
- Give the raptor an external trusted cert by the device (EC)
- Functions:
- Upload public
- See when expired
- Show notifications when a cert almost expires
- Show revocation status
- Scenarios:
Certificate Creation
To setup external routing rules, users are required to makes use of certificates. These certificates can be uploaded via the application which will in turn allow the vRaptor to validate the certificate information provided when necessary. These certificates must be trusted (for example: Let’s Encrypt (Typically RSA)). The certificate information required to upload:
- Public key (publict.crt)
- Private key (private.key)
- CA chain (fullchain.crt)
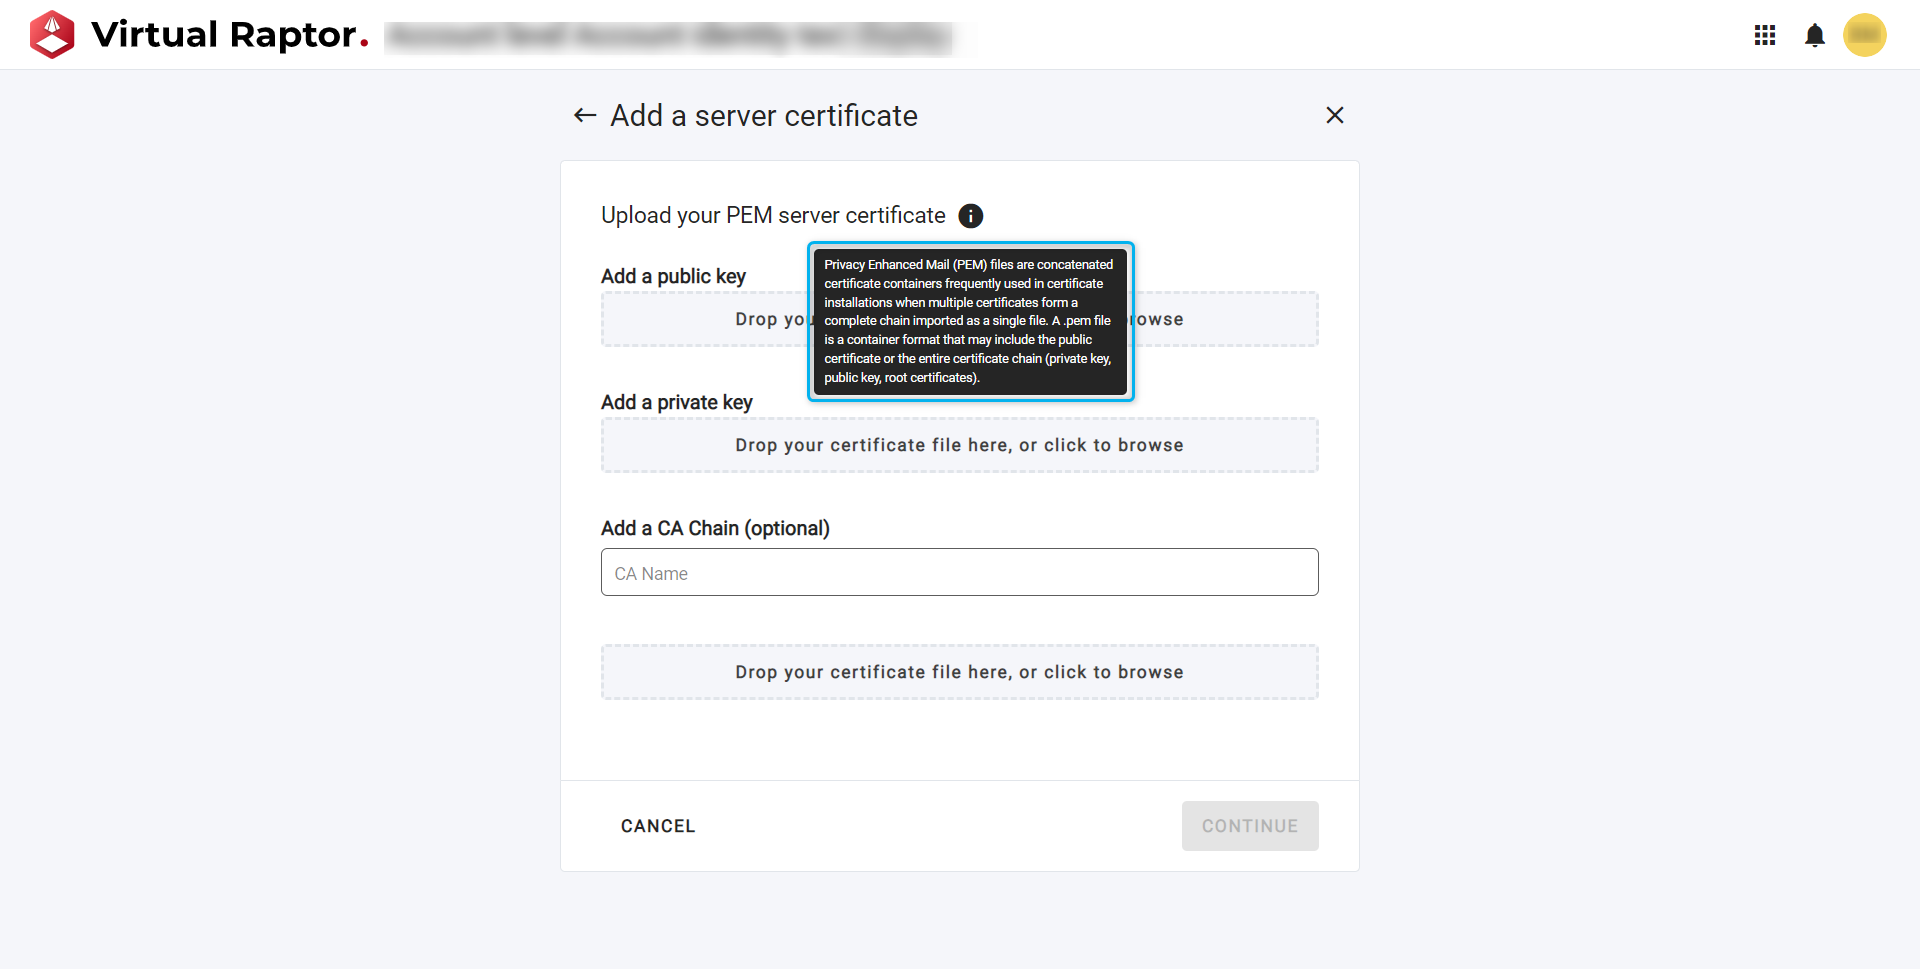
Figure 2 – Upload certificate files
Validation is performed on the certificate files (if invalid – the user cannot proceed until rectified):
- Corrupted Files
- Duplicate file names
- File format incorrect
- File size too large
- File upload timeout
A ‘review certificate’ summary view will be provided to the user upon successful upload. This will show when the certificate is valid from and until (expiry). The expiry will only show if the certificate details carry this information. The user interface will notify users when their certificates are about to expire.
Users are required to input a certificate name and brief description (140 characters) when uploading relevant information. This will later be used when setting up the external rules.
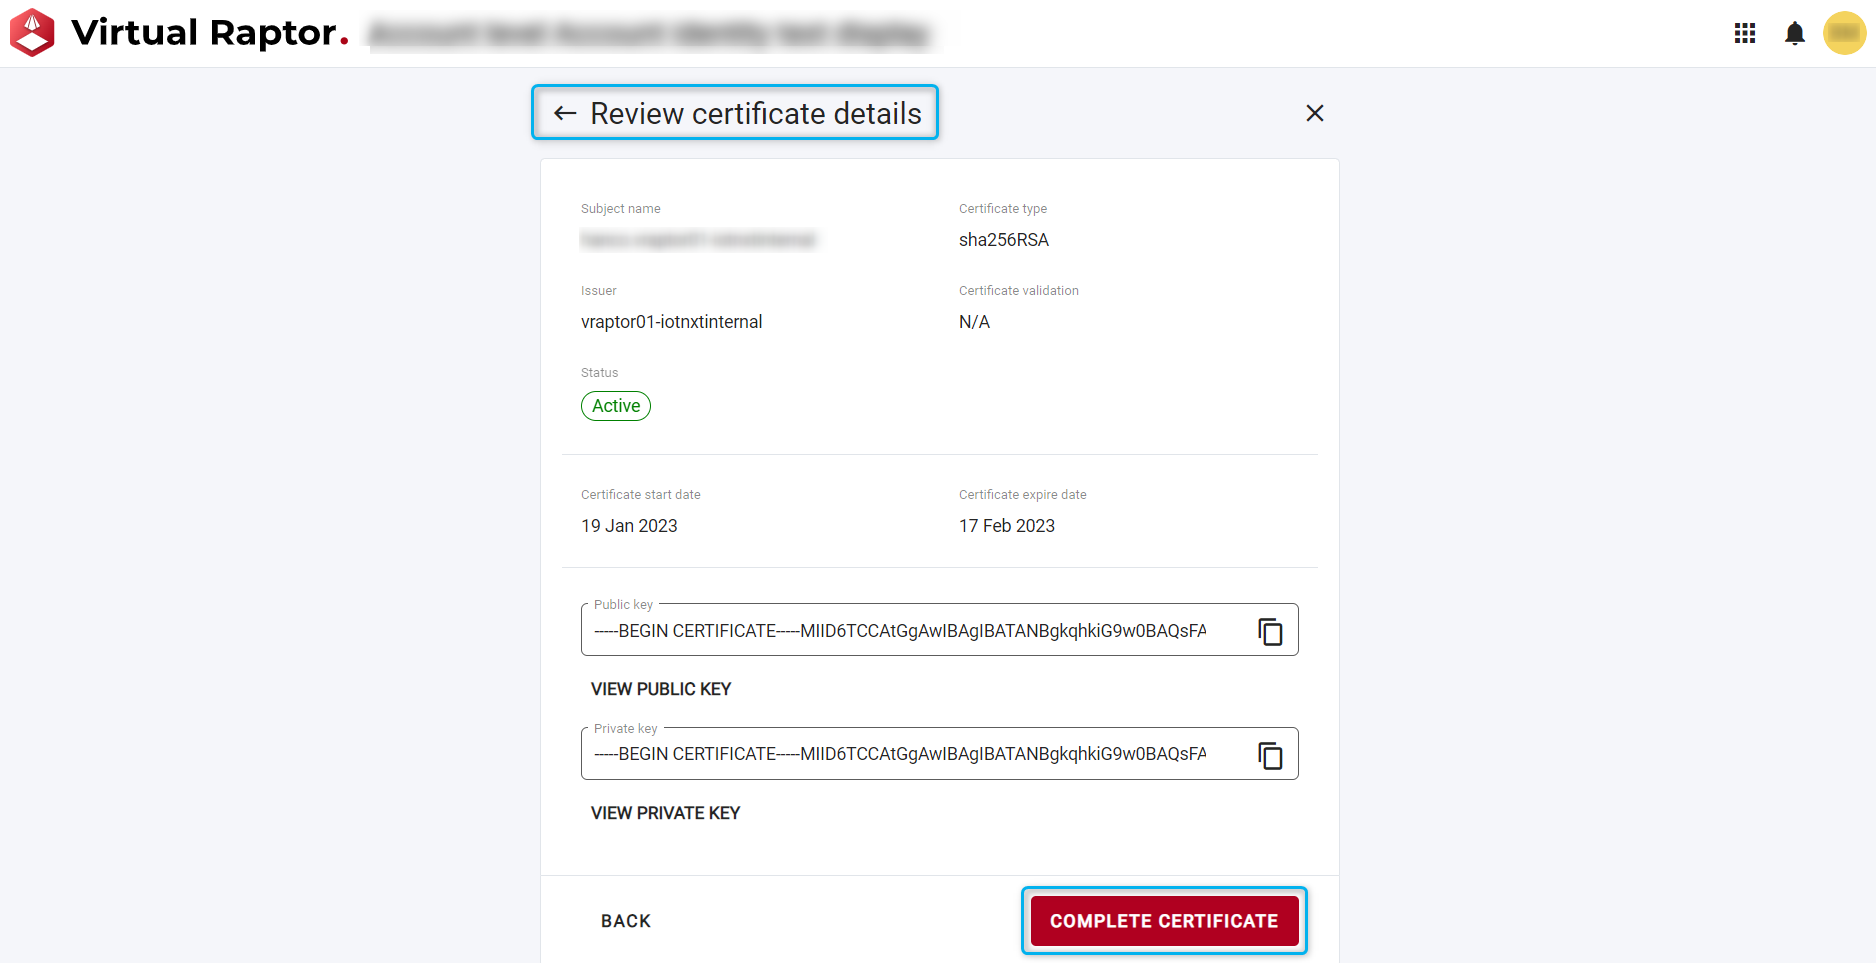
Figure 3 – Review certificate
Once the certificate has been confirmed the user will be returned to the connection manager home screen to show that the certificate has been added. If the certificate was not added and there was an error, this error will be displayed within a toast pop up:
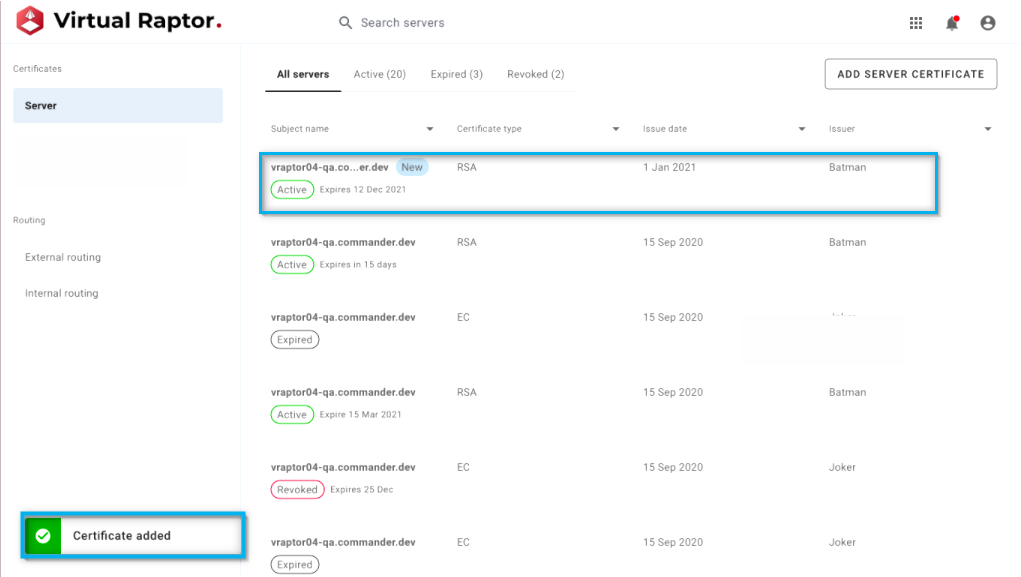
Figure 4 – Certificate added
A user can select a certificate from the list. This will allow them to view the details of that certificate. These details are:
- Certificate name
- Expiration status
- Date issued
- Expiry date
- Public key details
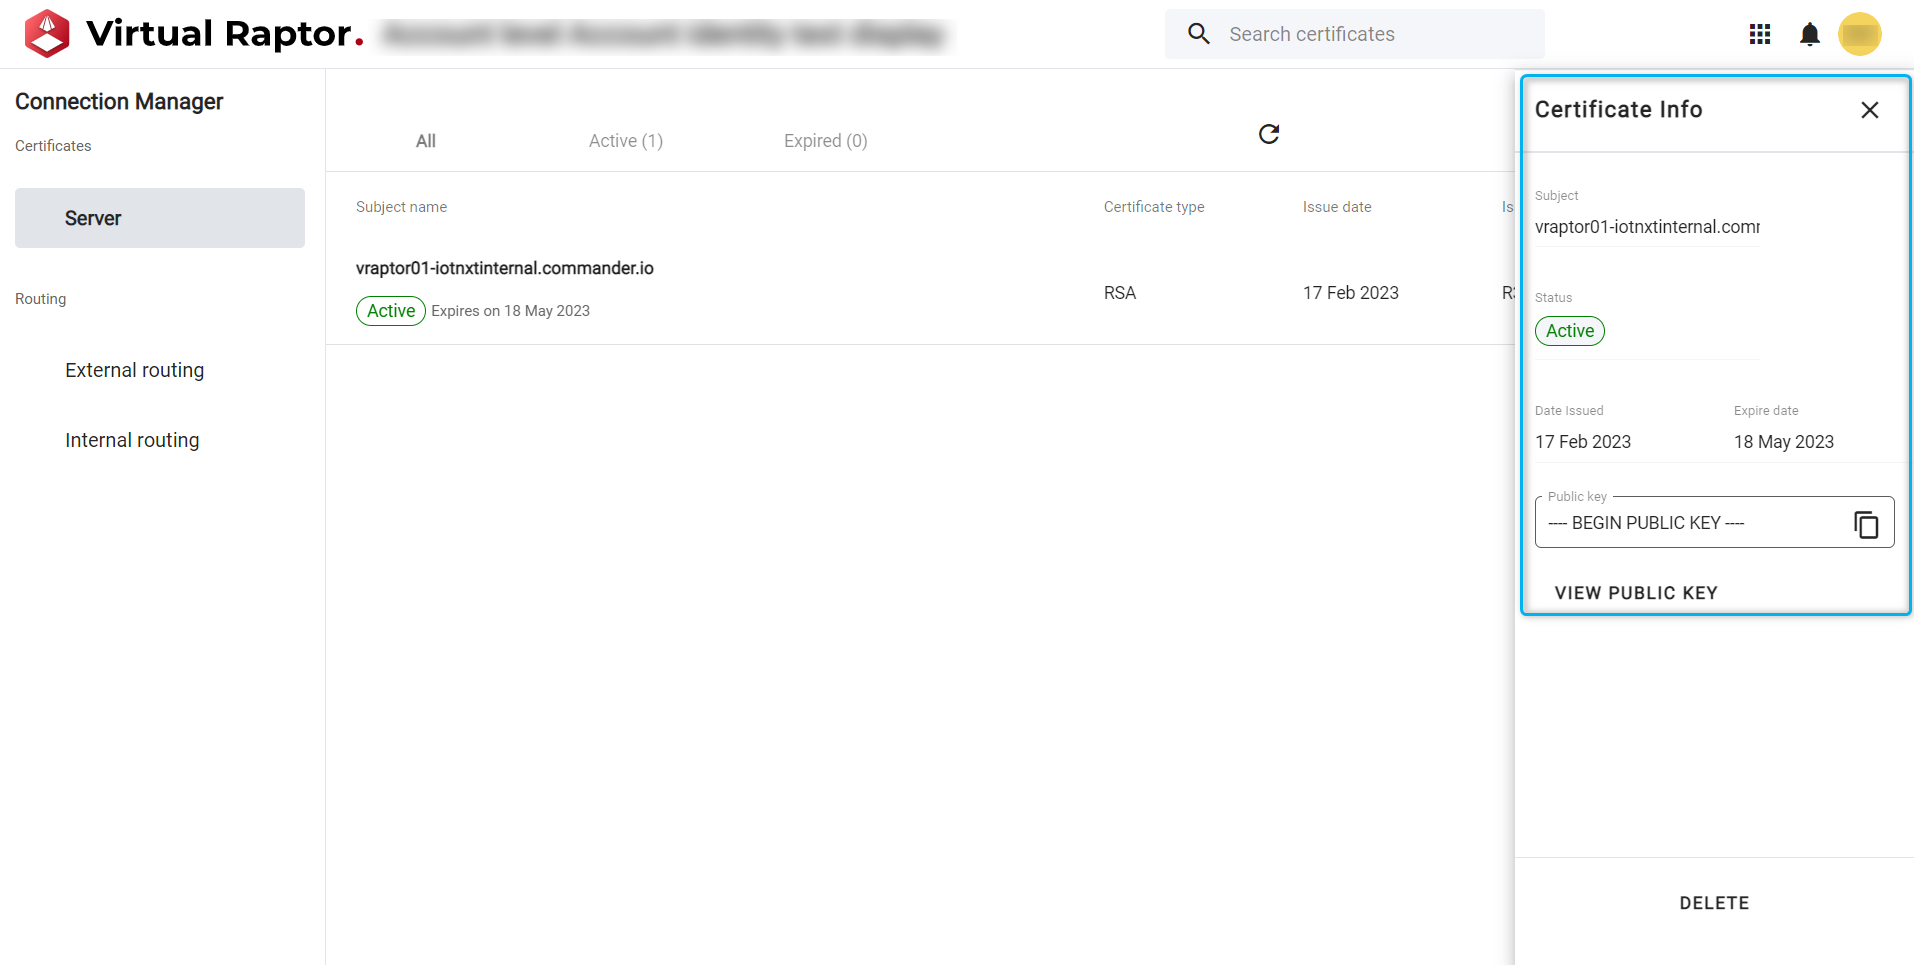
Figure 5 – View certificate
Certificate Removal and Replacement
Certificates can be replaced (due to expiration) and deleted/revoked if required:
Delete/Revoke
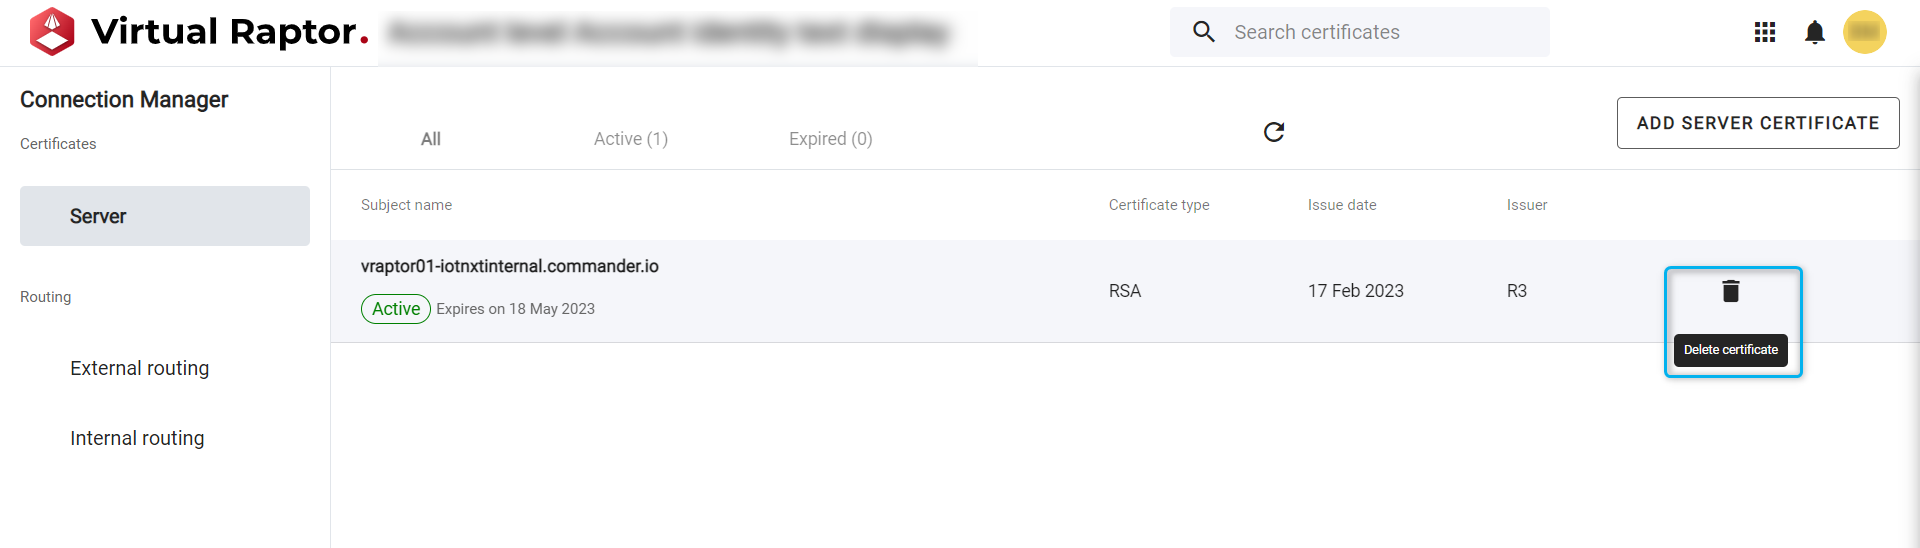
Figure 6 – Delete/Revoke certificate
Replace
The replace process is identical to the creation process. But the user interface will simply visualize to the user that the certificate has been updated:
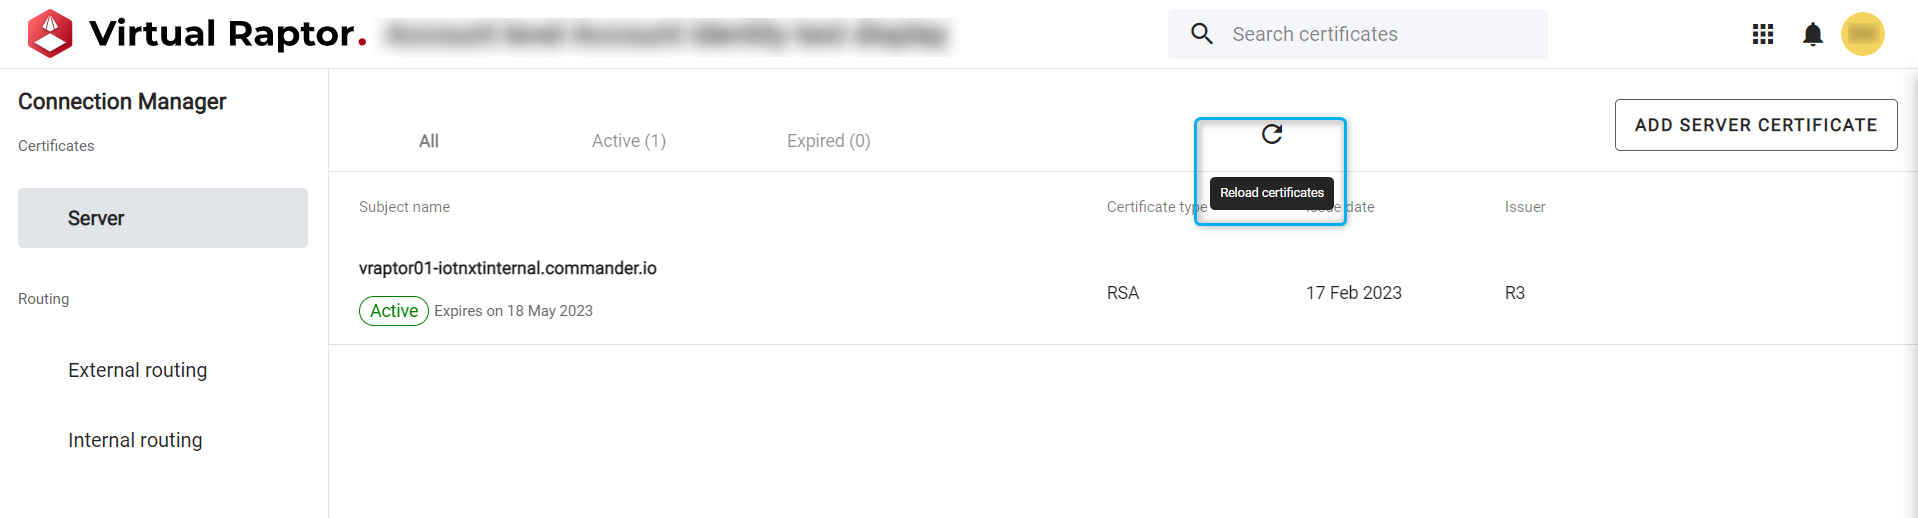
Figure 7 – Replace certificate process
Internal Routing Rules
- Functions
- URI Previewer
- Test if the endpoint is live
- Block previously setup routes
Internal routing rules are found within the connection manager application on the tab selected below.
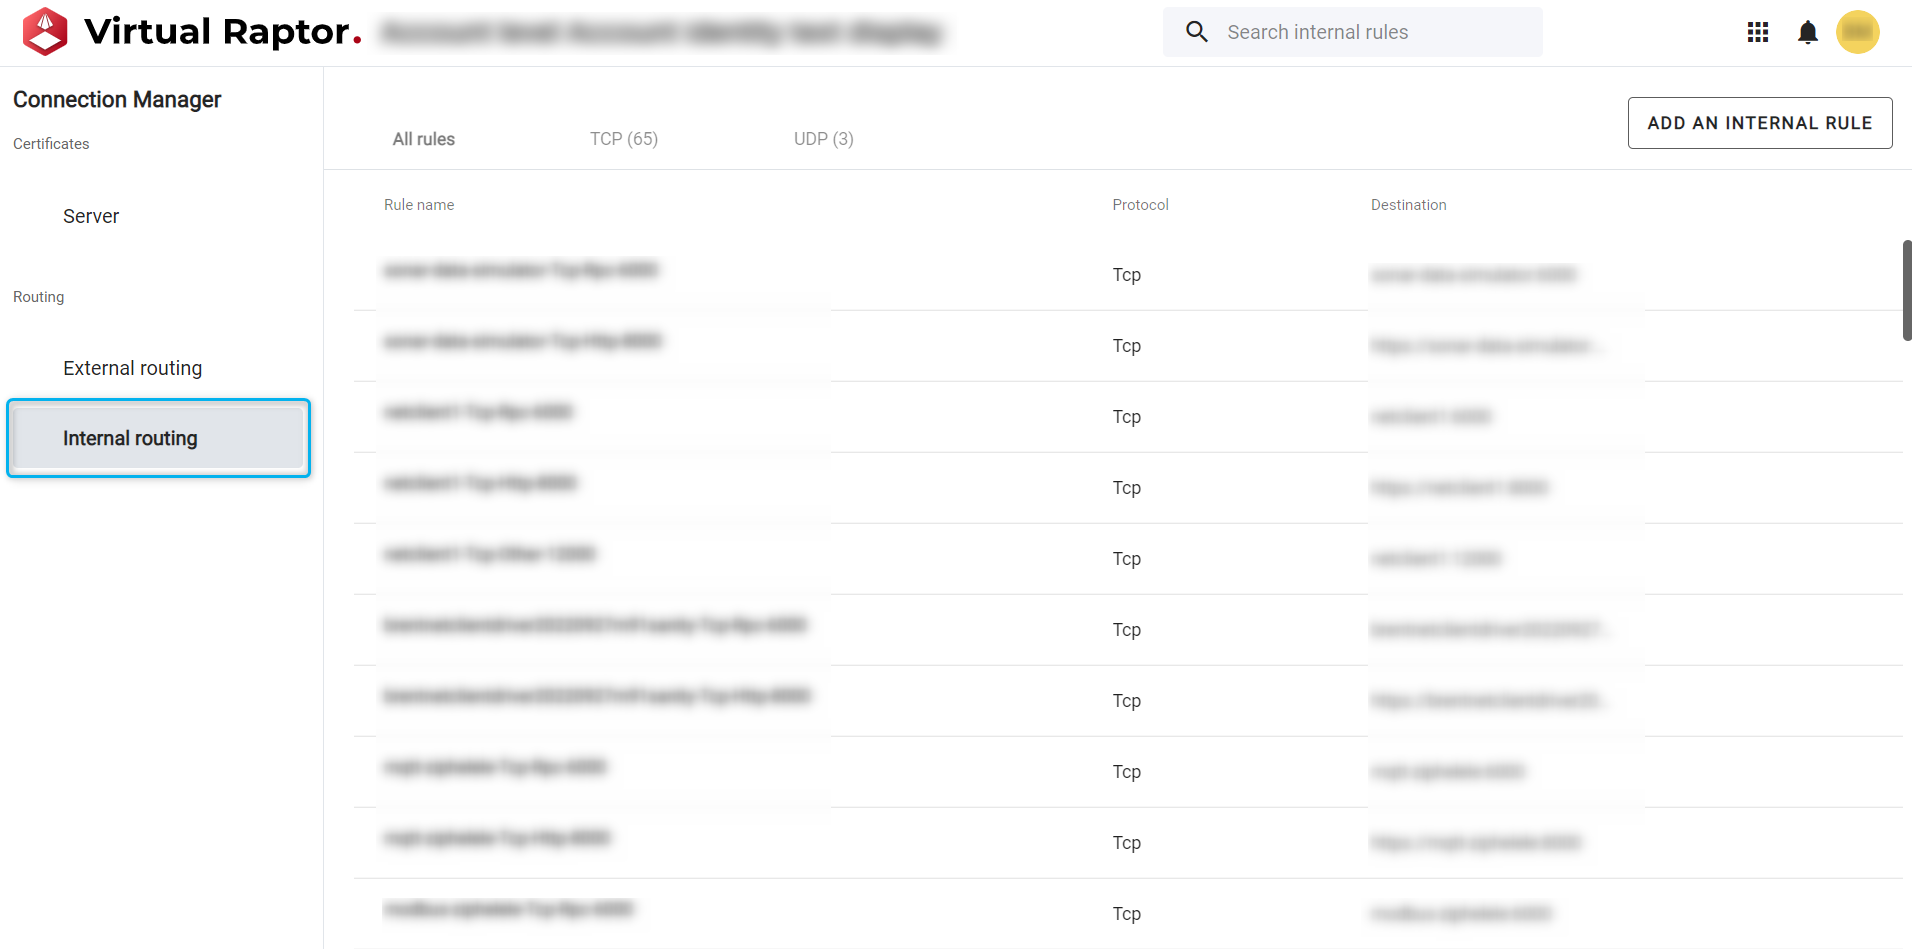
Figure 8 – Internal Routing
Users will be required to input an internal rule name, select a service as well as add a brief description to the rule. Checks will be performed on the components of the URL whilst it is populated:
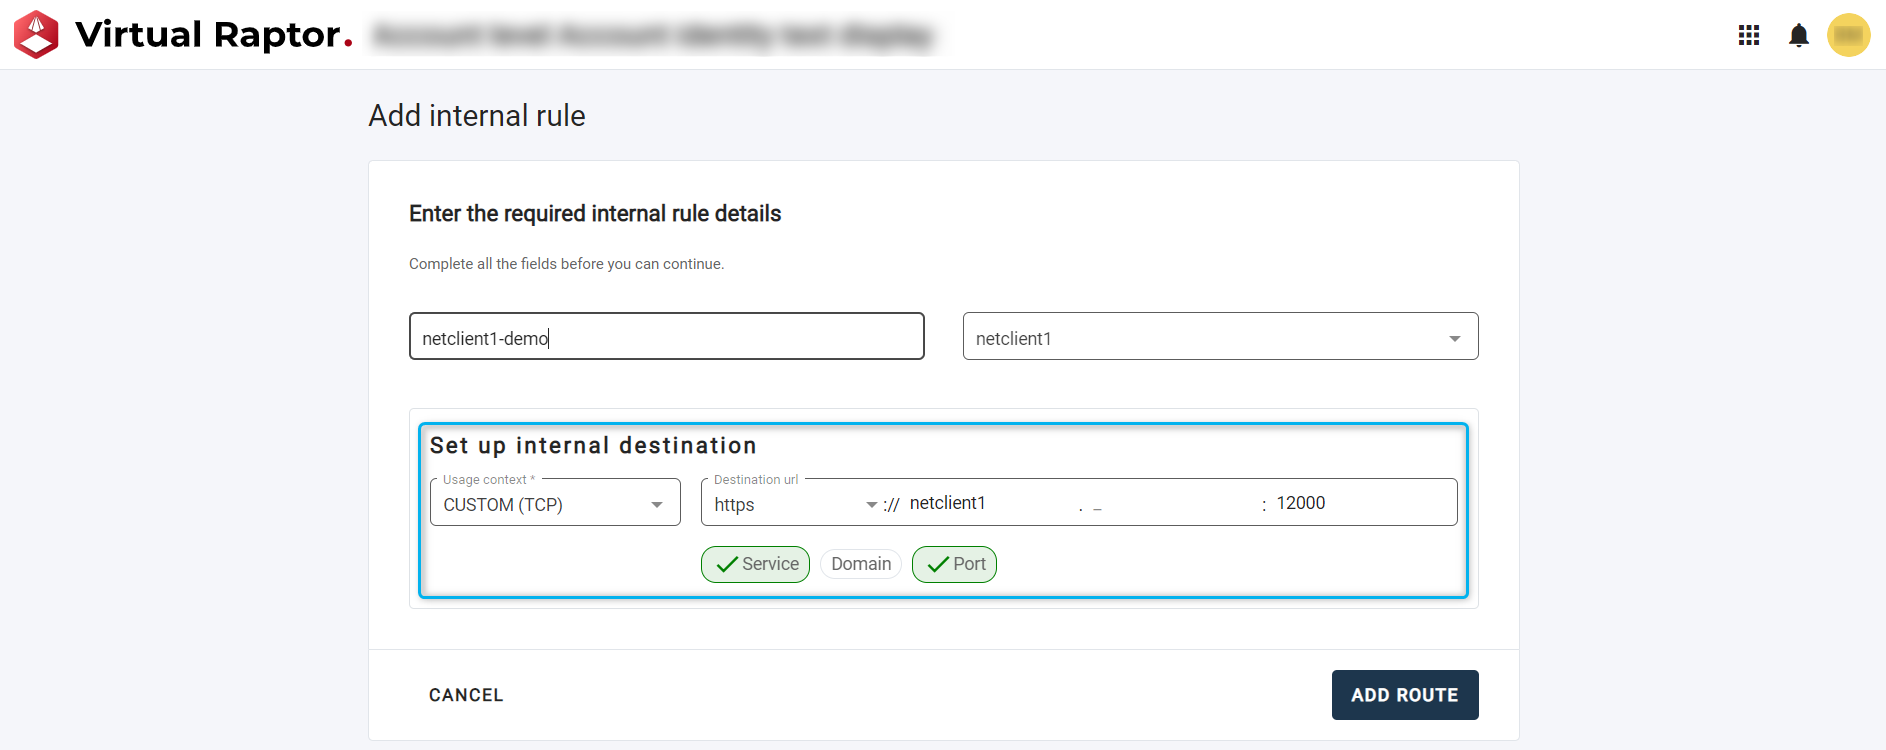
Figure 9 – Setup Internal Routing Rule
External Routing Rules
The vRaptor needs to provide the ability for outside (external) networks (devices on these networks) to connect to internal services. These rules are setup within this tab of the new connection manager application.
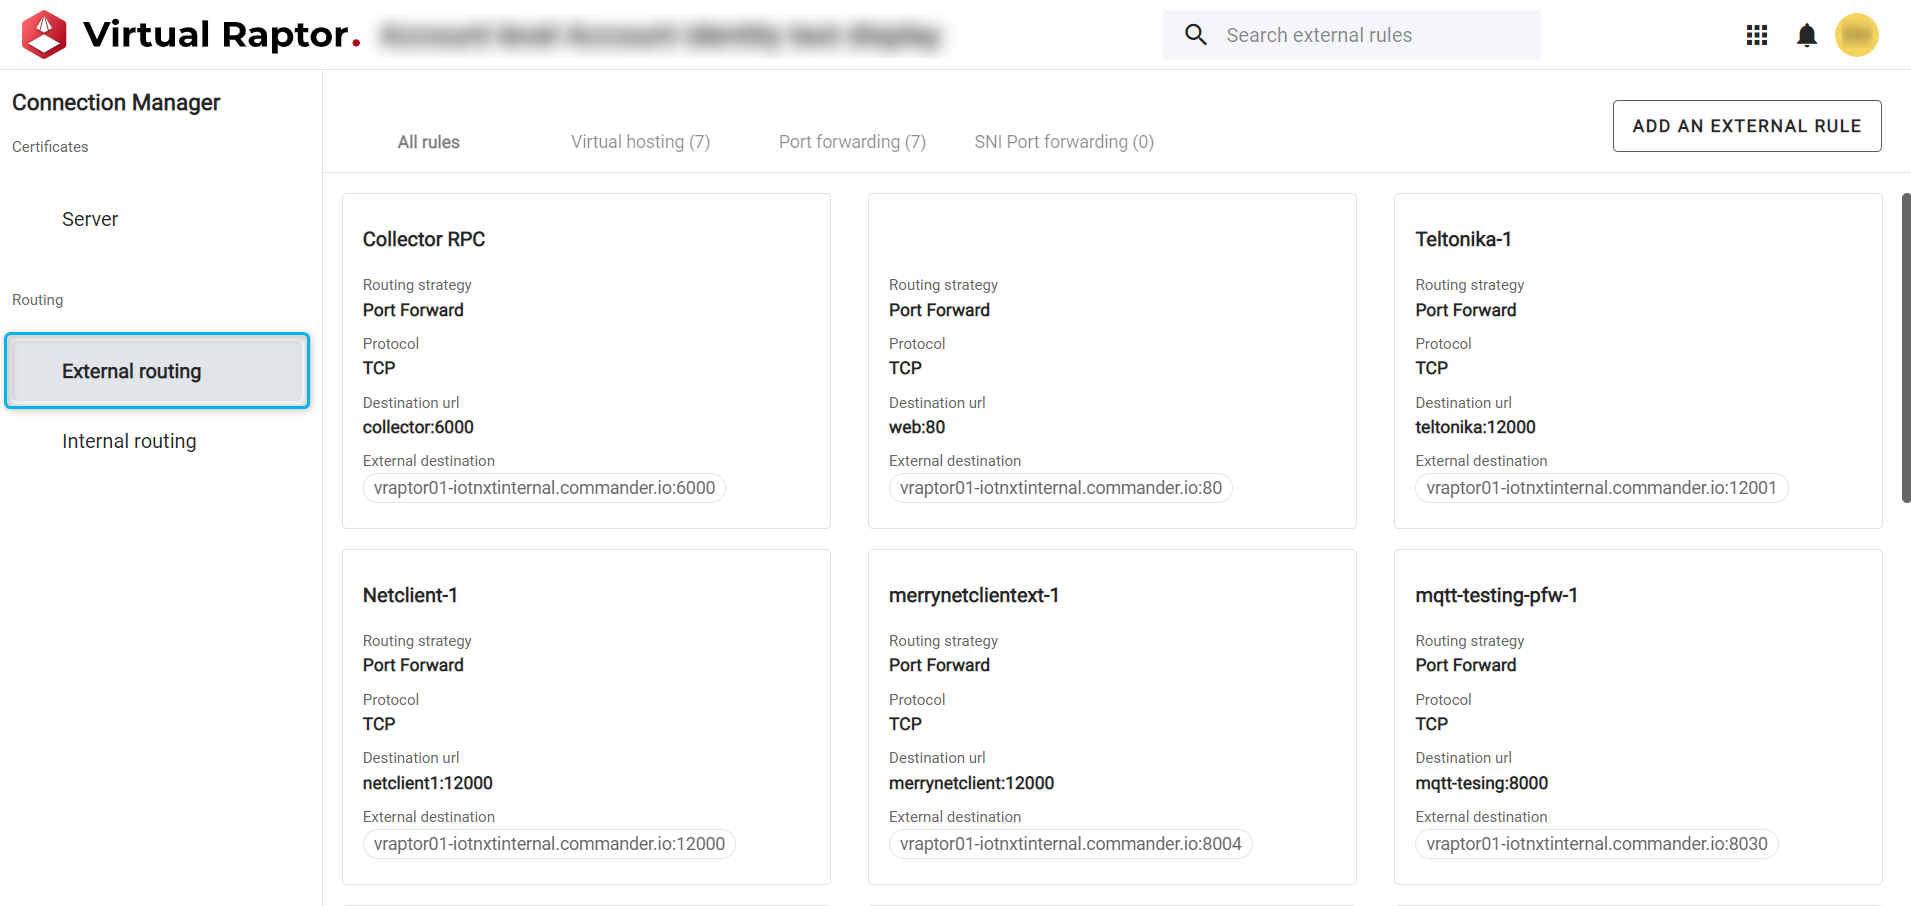
Figure 10 – External Routing
There are 2 strategies for external routing:
Port Forwarding (1)
Also called “port mapping,” port forwarding is directing traffic from the outside world to the appropriate server inside a local TCP/IP network.
Port Forwarding Rules
- TCP
- Select Service (e.g., mymqtt)
- Provide Name for service (e.g., mqtt-sample-tcp)
- Select Routing Strategy (e.g., Port Forward)
- Provide Destination (Existing) (e.g., mymqtt.iotnxt.io:8000)
- Provide Destination (New)
- Service Name (e.g., mymqtt - pull this through from previous)
- Protocol (e.g., TCP)
- Usage Context (e.g., other)
- Scheme (e.g., mqtt://)
- Port (e.g., 8000)
- Domain (e.g., pull through from config)
- Final Result: mqtt://mymqtt.iotnxt.io:8000
- Provide Protocol (e.g., TCP - pull this from internal rule)
- Provide Public Port (e.g., 12000)
- Provide Scheme (Optional) (e.g., mqtt://)
- Provide Domain (e.g., iotnxt.com - pull through from config)
- Final Result (e.g., mqtt://iotnxt.com:12000)
- Terminating
- SNI Terminating
- Non-Terminating
- SNI Non-terminating
- UDP
- Select Service (e.g., mymqtt)
- Provide Name for service (e.g., mqtt-sample-udp)
- Select Routing Strategy (e.g., Port Forward)
- Provide Destination (Existing) (e.g., mymqtt.iotnxt.io:8000)
- Provide Destination (New)
- Service Name (e.g., mymqtt - pull this through from previous)
- Protocol (e.g., UDP)
- Usage Context (e.g., other)
- Scheme (e.g., mqtt://)
- Port (e.g., 8000)
- Domain (e.g., pull through from config)
- Final Result: mqtt://mymqtt.iotnxt.io:8000
- Provide Protocol (e.g., UDP - pull this from internal rule)
- Provide Public Port (e.g., 12000)
- Provide Scheme (Optional) (e.g., mqtt://)
- Provide Domain (e.g., udp.iotnxt.com - pull through from config)
- Final Result (e.g., mqtt://udp.iotnxt.com:12000)
Port Forwarding Strategy
- Properties:
- Name (Text)
- Description (Text)
- Service Id (Text)
- Internal Domain (Text)
- External Domain (Text)
- External Port (Number)
- Internal Port (Number)
- Protocol (Text)
- Scheme (Text)
- SNI (Yes/No)
- SSL Terminate (Yes/No)
- SSL Protocol (Text)
- Public Key Path (Text)
- Private Key Path (Text)
- Public Key Data (Big Text)
- Private Key Data (Big Text)
- Client CA Chain Path (Text)
- Client CA Chain Data (Big Text)
- Protocol:
- TCP
- Terminating
- Examples:
- From External: iotnxtinternal.commander.io:12000
- To Internal: dylanmqtt.commander.io:8000
- Examples:
- Non-Terminating
- Examples:
- From External: dylanmqtt.iotnxtinternal.commander.io
- To Internal: dylanmqtt.commander.io:8000
- Examples:
- Server Name Indication Terminating
- Examples:
- From External: dylanmqtt.iotnxtinternal.commander.io
- To Internal: dylanmqtt.commander.io:8000
- Examples:
- Server Name Indication Non-Terminating
- Examples:
- From External: dylanmqtt.iotnxtinternal.commander.io
- To Internal: dylanmqtt.commander.io:8000
- Examples:
- Terminating
- UDP - Examples: - From External: udp.iotnxtinternal.commander.io:12001 - To Internal: udp.dylanmqtt.commander.io:8000
- TCP
Virtual Hosting (2)
Virtual hosting is a method for hosting multiple domain names (with separate handling of each name) on a single server (or pool of servers). This allows one server to share its resources, such as memory and processor cycles, without requiring all services provided to use the same host name. The term virtual hosting is usually used in reference to web servers but the principles do carry over to other Internet services.
Virtual Hosting Rules
- Select Service (e.g., mymqtt)
- Provide Name for service (e.g., mqtt-sample-http)
- Select Routing Strategy (e.g., Virtual Host)
- Provide Destination (Existing) (e.g., http://mymqtt.iotnxt.io:8000)
- Provide Destination (New)
- Service Name (e.g., mymqtt - pull through from previous)
- Protocol (e.g., TCP)
- Usage Context (e.g., http)
- Scheme (e.g., http:// & https://)
- Port (e.g., 8000)
- Domain (e.g., pull through from config)
- Final Result: http://mymqtt.iotnxt.io:8000
- Provide External Route (e.g., /my-mqtt - suggested service name)
- Provide Internal Route (e.g., / - suggested default)
- Final Result (e.g., https://iotnxt.com/my-mqtt)
Virtual Hosting Strategy
- Properties:
- Name (Text)
- Description (Text)
- External Route (Text)
- Internal Route (Text)
- Scheme (Text)
- Service ID (Text)
- Domain (Text)
- Internal Port (Number)
- Protocol:
- HTTPS
- Examples:
- From External: https://iotnxtinternal.commander.io/dylanmqtt
- To Internal: https://dylanmqtt.commander.io:8000
- Examples:
- HTTPS