Running the Installer
Jan 1 2022 at 12:00 AM
- Kubernetes Namespace
- Data directory
- Public certificate available
- Installer Startup
- Installation Process
- Kubernetes Objects
- Ingress Installation
- Copy generated data
- Start the deployment agent
Kubernetes Namespace
The namespace used by the installer is the combination of GatewayName and RaptorInternalDomain. This needs to be created before running the installer. Using the sample config provided in the previous article will result in the following namespace: vraptor01-organisation. If the namespace does not exist, the following error will be generated when running the installer:
2021-03-24 21:26:19.2264|INFO|IoTnxt.Raptor.Orchestration.Kubernetes.K8Context|Creating Kubernetes client
Unhandled exception. System.AggregateException: One or more errors occurred. (Cannot access namespace [vraptor01-organisation])
 ---> System.Exception: Cannot access namespace [vraptor01-organisation]
Data directory
The installation agent will create a number of database files on disc in the Data directory. These files should be cleaned prior to installation or conflicting certificates might be installed in the V-Raptor.
Public certificate available
You should ensure that a public certificate is available prior to installation or certain services will be by reachable or will fail to start (e.g. Raptor ingress).
Pre-Installation Checklist:
- All configs verified
- Data directory cleaned
- Namespace created
- Public certificates uploaded
- Storage class ready for volume claims
Installer Startup
To start the installation process, execute the installer as follows:
./raptoradm --mode=install
The installer will begin by generating a certificate authority, and performing several startup checks to ensure that communication with the Kubernetes cluster is possible. The Raptor’s configuration factory will also be populated using the values in the Defaults folder.
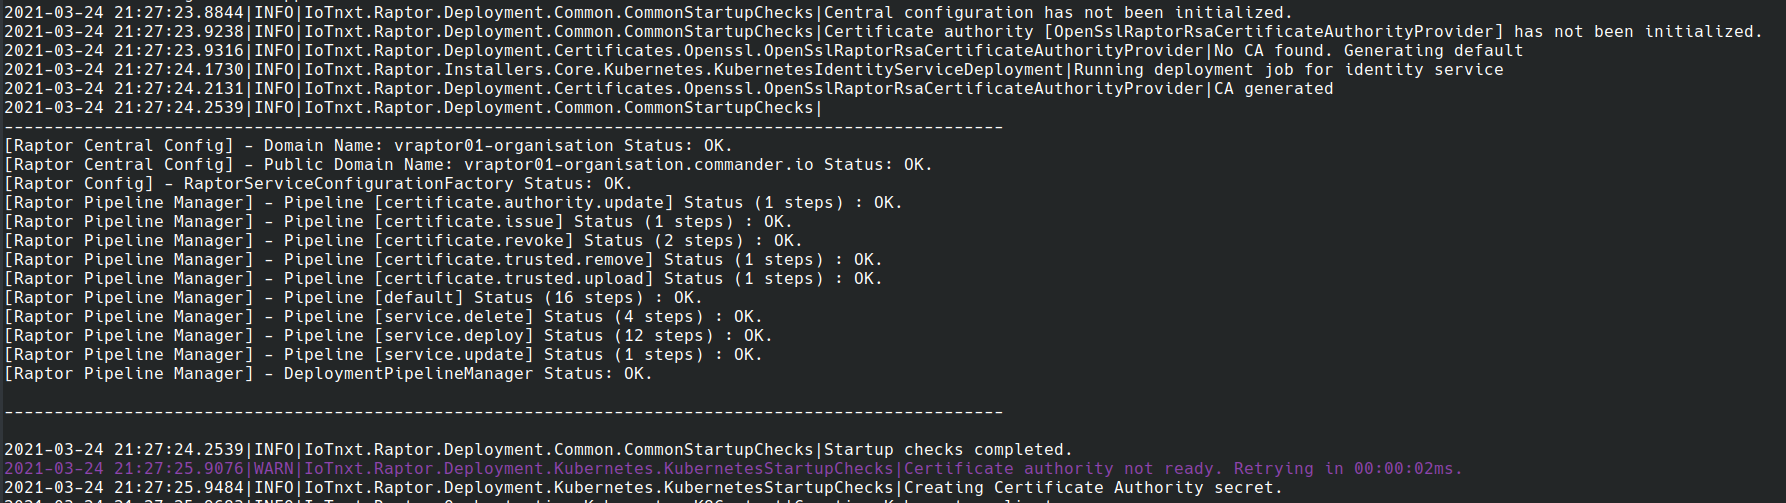
Figure 1 - Installer Startup Jobs
Installation Process
Once the startup checks have completed, and the CA and configuration factory have been initialized, the installation will commence. The installer will run through a series of steps for each core service. Each step will take care of generating configs and certificates, allocating storage and creating the necessary Kubernetes objects.
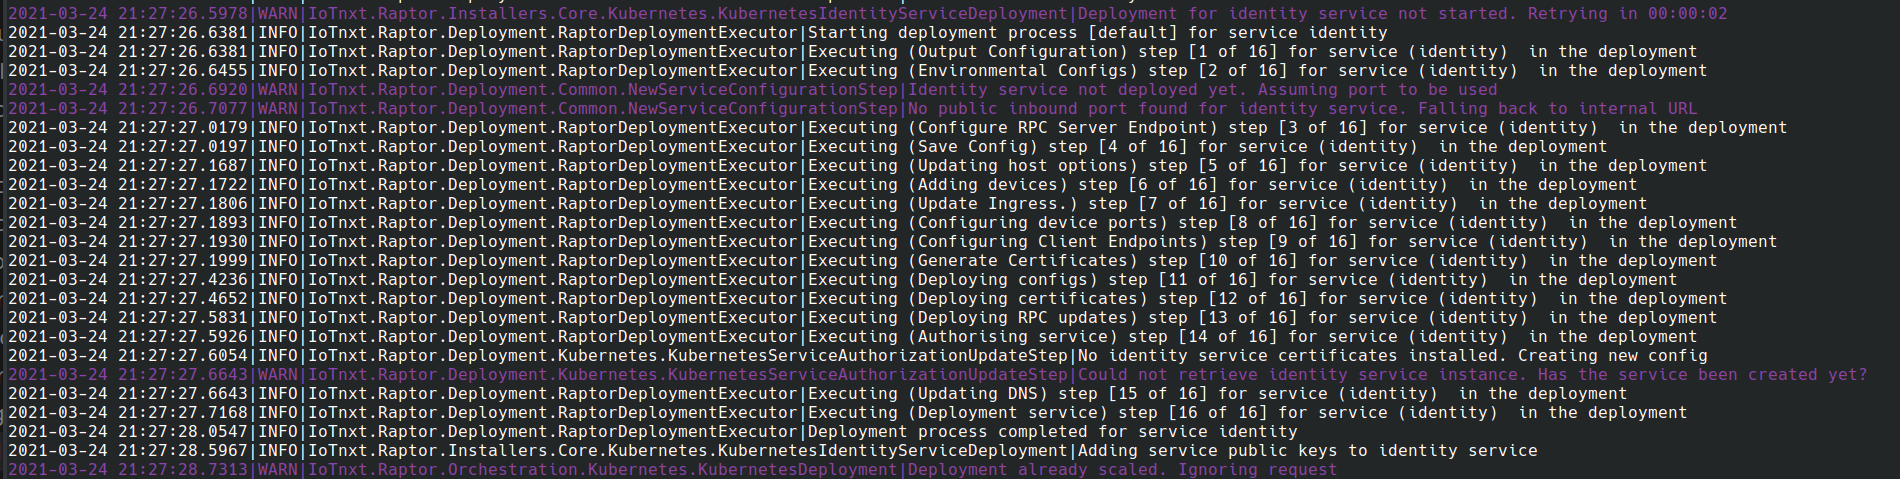
Figure 2 - Installing Services
Kubernetes Objects
Once the installation process has completed, the following deployments should be visible:
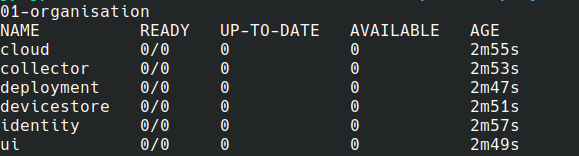
Figure 3 - Deployed Services
These are all the backend services required for a fully functional V-Raptor.
Each of these services will also have a set of config maps and secrets generated to hold service configuration files and certificates.
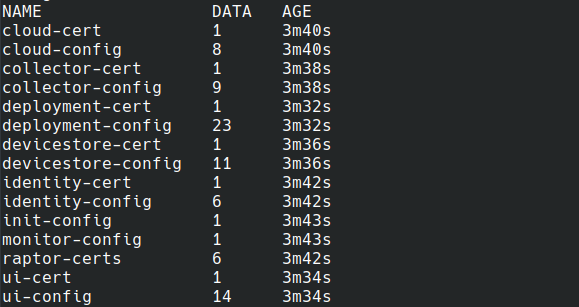
Figure 4 - Config Maps
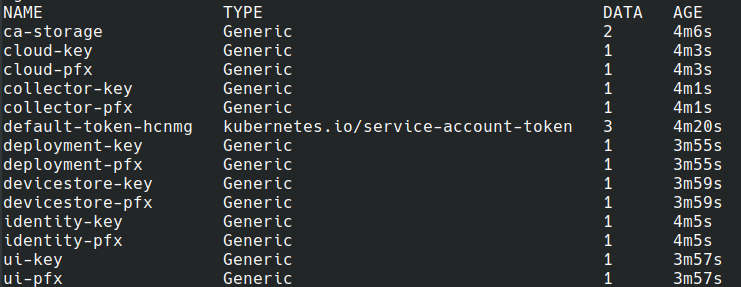
Figure 5 - Secrets
Services that require storage should also have bound volume claims.

Figure 6 - Persistent Volumes
Note This process can take several minutes depending on the storage provider.
Finally, all the ports required for communication with the services should also have been provisioned along with the relevant Kubedns entries.

Figure 7 - Services and ports
Ingress Installation
These ports are only for internal communication at this stage. For external communication, you will need to install the V-Raptor’s ingress.
If you are using the ingress solution provided by us, then this can be done by running the following. Be sure to change the NAMESPACE value to your V-Raptor namespace.
NAMESPACE=vraptor01-organisation
curl https://community.iotnxt.com/samples/vraptor/ingress.yaml | sed   "s/<namespace>/$NAMESPACE/g" | kubectl apply -f -
This should result in the following being created:
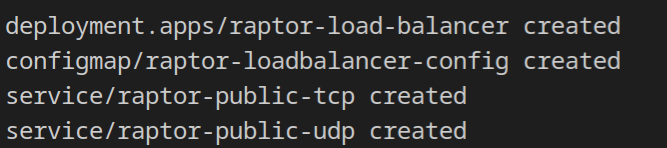
Figure 1 - Raptor Ingress Installation
These objects will contain the necessary components to get the V-Raptor’s ingress functional.
Note: This assumes that a public certificate has been installed on the V-Raptor. Also note that the provisioning of the two LoadBalancers can also take several minutes in some environments.
The two public IP addresses of the UDP and TCP load balancers can now be assigned to your chosen DNS entries. Once this is done, the V-Raptor services should be reachable on that domain name.
Copy generated data
The V-Raptor’s deployment agent will start up in a “idle” state. This is done so that the files generated during installation can be uploaded. You can use this script as a basis
# Simple wrapper to exec into container
run_command() {
    kubectl -n $NAMESPACE exec -t $POD_NAME -- bash -c "$1"
}

APP="${APP:-deployment}" # Name of the instance to use for deployment service
WORK_DIR="`pwd`"

TARGET_DIR="/data/$APP/Data"
DEFAULT_DIR="Defaults"

echo "Fetching name of deployment service Pod"
POD_NAME=`kubectl get pod -l app=$APP -o jsonpath='{.items[0].metadata.name}' -n $NAMESPACE  `

[[ -z $POD_NAME ]] && echo "Could not find deployment service instance" && exit 1

echo "Using $POD_NAME for deployment service"


currentDir='pwd'
cd $WORK_DIR/Data

COPY_DB=1
COPY_CONFIGS=1

if [ $COPY_DB -eq 1 ] ; then
    echo "Cleaning existing database files"

    # run_command "[ ! -z ` ls $RaptorEnvironmentOptions__DataDir ` ] ; then  echo 'Db Found' fi"
    run_command "touch $TARGET_DIR/fake.db && rm $TARGET_DIR/*.db*"

    FILES=`ls *.db*`

    echo "The following files will be copied to $POD_NAME"
    echo $FILES

    for f in $FILES; do

        echo "Copying $f to pod"
        kubectl -n $NAMESPACE cp $f $POD_NAME:$TARGET_DIR/$f
    done

fi

if [ $COPY_CONFIGS -eq 1 ] ; then

    defaults=`ls $DEFAULT_DIR`

    # Copy defaults
    run_command "mkdir -p $TARGET_DIR/$DEFAULT_DIR"
    echo "Copying service default configs"
    for f in $defaults; do
        echo "Copying $f to pod"
        kubectl -n $NAMESPACE cp "$DEFAULT_DIR/$f" $POD_NAME:$TARGET_DIR/$DEFAULT_DIR/$f
    done

fi
Start the deployment agent
The final step in the installation process is to start the V-Raptor’s deployment agent. This can be done by running the installer’s post-install process.
./raptoradm --mode=post-install
On startup, the deployment agent will perform a series of startup checks. These checks will determine whether or not the agent is correctly configured and is able to communicate with the Kubernetes API.
2021-03-18 07:38:42.4407|INFO|IoTnxt.Raptor.Orchestration.Kubernetes.K8Context|Creating Kubernetes client
2021-03-18 07:38:42.4994|INFO|IoTnxt.Raptor.Deployment.Common.CommonStartupChecks|

[Raptor Central Config] - Domain Name: vraptor01-organisation Status: OK.
[Raptor Central Config] - Public Domain Name: vraptor01-organisation.commander.io Status: OK.
[Raptor CA] - OpenSslRaptorRsaCertificateAuthorityProvider Status: OK.
[Raptor Config] - RaptorServiceConfigurationFactory Status: OK.
[Raptor Pipeline Manager] - Pipeline [certificate.authority.update] Status (1 steps) : OK.
[Raptor Pipeline Manager] - Pipeline [certificate.issue] Status (1 steps) : OK.
[Raptor Pipeline Manager] - Pipeline [certificate.revoke] Status (2 steps) : OK.
[Raptor Pipeline Manager] - Pipeline [certificate.trusted.remove] Status (1 steps) : OK.
[Raptor Pipeline Manager] - Pipeline [certificate.trusted.upload] Status (1 steps) : OK.
[Raptor Pipeline Manager] - Pipeline [config] Status (4 steps) : OK.
[Raptor Pipeline Manager] - Pipeline [configAndPort] Status (6 steps) : OK.
[Raptor Pipeline Manager] - Pipeline [default] Status (16 steps) : OK.
[Raptor Pipeline Manager] - Pipeline [deleteService] Status (4 steps) : OK.
[Raptor Pipeline Manager] - Pipeline [deployCertificate] Status (2 steps) : OK.
[Raptor Pipeline Manager] - Pipeline [deployPublicCertificates] Status (1 steps) : OK.
[Raptor Pipeline Manager] - Pipeline [deviceUpdate] Status (7 steps) : OK.
[Raptor Pipeline Manager] - Pipeline [generateCertificate] Status (1 steps) : OK.
[Raptor Pipeline Manager] - Pipeline [revokeCertificate] Status (1 steps) : OK.
[Raptor Pipeline Manager] - Pipeline [service.delete] Status (4 steps) : OK.
[Raptor Pipeline Manager] - Pipeline [service.deploy] Status (12 steps) : OK.
[Raptor Pipeline Manager] - Pipeline [service.update] Status (1 steps) : OK.
[Raptor Pipeline Manager] - Pipeline [updateServiceConfig] Status (3 steps) : OK.
[Raptor Pipeline Manager] - Pipeline [updateServiceContainer] Status (1 steps) : OK.
[Raptor Pipeline Manager] - DeploymentPipelineManager Status: OK.

2021-03-18 07:38:42.4994|INFO|IoTnxt.Raptor.Deployment.Common.CommonStartupChecks|Startup checks completed.
If all these steps are successful, then the installation process is complete. However, there are several post-installation steps that should be performed.