
Generic Driver User Guide
Dec 6 2023 at 12:00 AM
Landing Page
The V-Raptor Generic Driver landing page allows a user to see the list of devices configured for the Generic Driver. It consists of functionalities that a user can perform once they have added a device. These functionalities are highlighted in Figure 1 below:
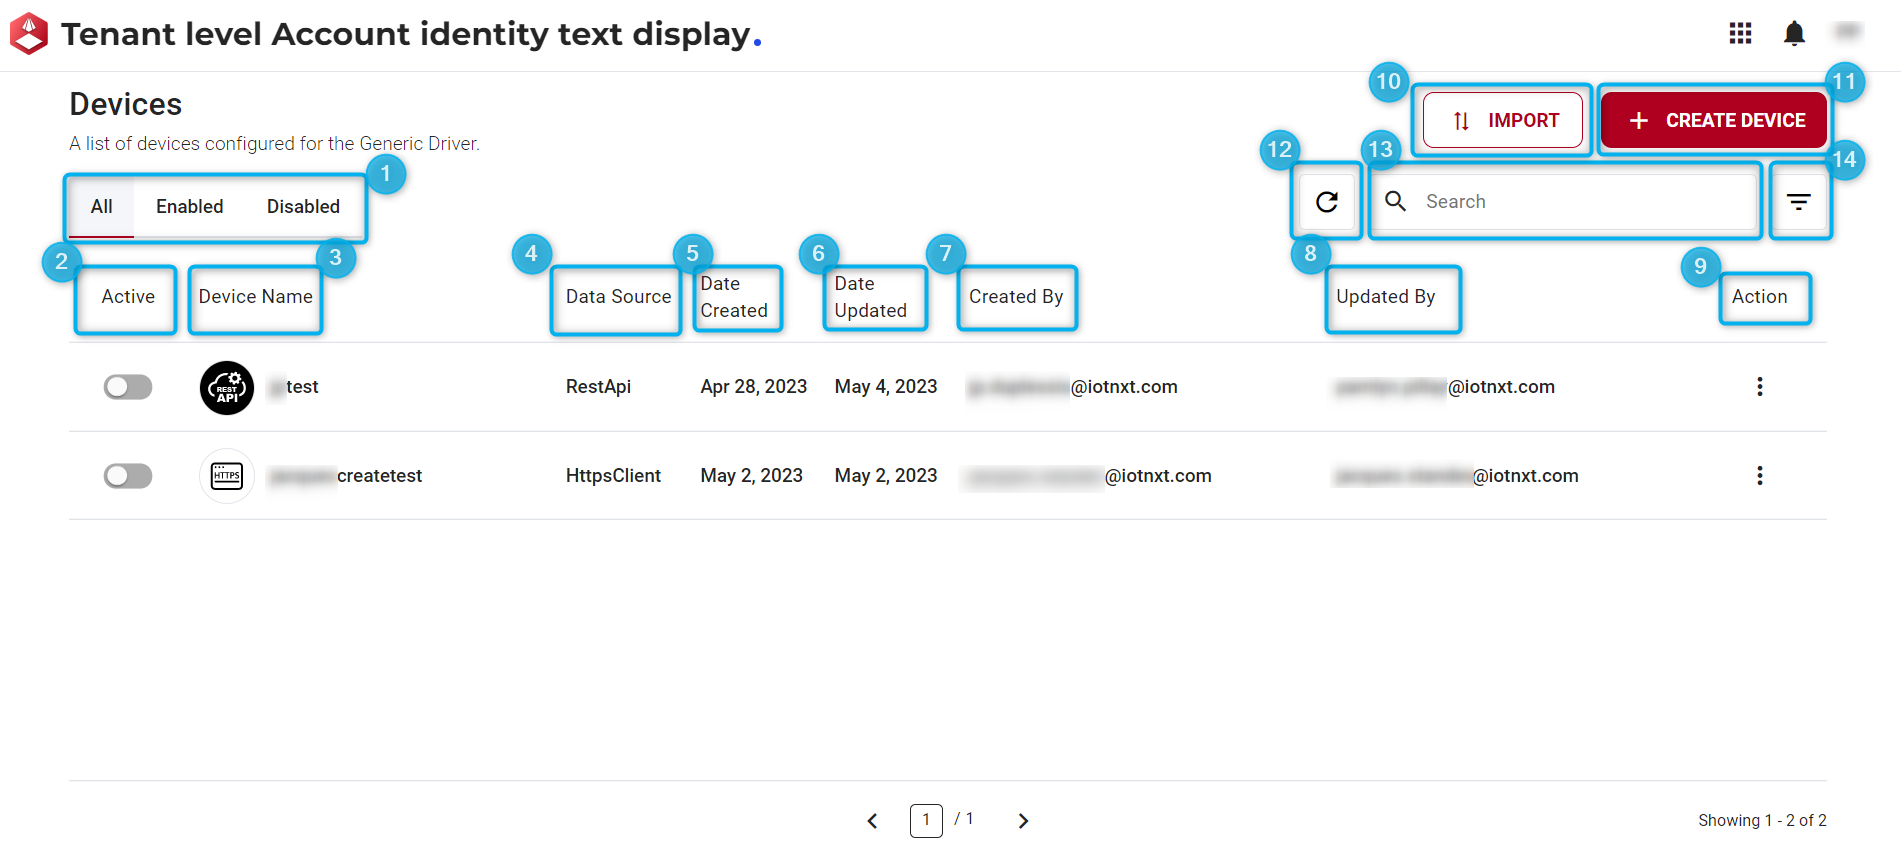
Figure 1 - Generic Driver Landing page
- All, Enabled, and Disabled: These are filter options used to display a list of devices configured for the Generic Driver.
- Active status: Toggle to enable or disable the device.
- Device name: The name given to the device.
- Data source (device protocol): Specifies the device protocol, such as HTTPS Client, MQTT, NATS, RabbitMQ, and REST API.
- Date created: Indicates the creation date of the device.
- Date updated: Displays the last update date of the device.
- Created by: The name of the user who created the device.
- Updated by: The name of the user who last updated the device.
- Action: Vertical ellipsis icons that allow users to edit, delete, and export device configurations.
- Import: This function is used to import a document in JSON format. As an example, refer to the code sample below.
- Create Device: Opens a new window for the configuration of a new device.
- Refresh: Allows users to refresh the landing page.
- Search Bar: Enables users to search for specific uploaded data.
Action Button
The vertical ellipsis symbol located at the end of each device row provides access to three available actions that can be performed on the devices.
- Edit
- Delete
- Export
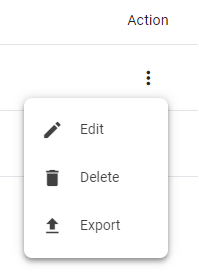
Figure 2 - Action button
Creating a Device
Creating a device offers users two distinct options. The first method involves importing a device through a JSON file, while the alternative allows users to manually create a device.
Option 1: Importing a device from a JSON File.
To import a device from a JSON file, users can follow these steps:
- Enter a Device Name in the provided field on the screen.
- Click on the option to browse for a JSON file.
- Click on
SAVE & CLOSEto save the information and exit the screen. By opting for theCONTINUEbutton, users gain access to the ‘Create Device’ window, as shown in Figure 4. Within this window, users can proceed to configure the device. Alternatively, theCANCELbutton allows users to discontinue the configuration process.
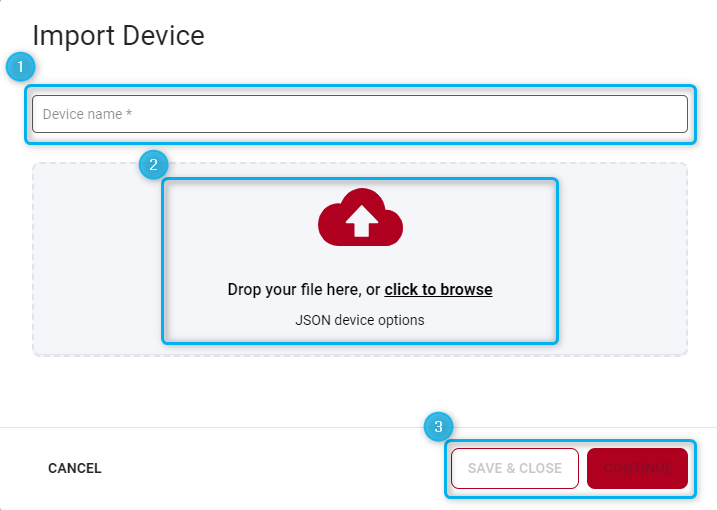
Figure 3 - Import Device
Here is an example of the JSON structure that serves as a template for importing device configurations, containing essential details and information about the creation and update history of the device.
{
  "enabled": false,
  "debug": false,
  "deviceType": "Generic",
  "gatewayId": null,
  "groupName": "GenericGroup",
  "actionDelay": 0,
  "propertiesDeviceName": null,
  "dateCreated": "2023-04-19T08:06:45",
  "dateUpdated": "2023-04-19T20:27:51",
  "createdBy": "[email protected]",
  "updatedBy": "[email protected]",
  "dataSource": {
    "host": "https://test.com",
    "portNo": 8883,
    "topics": { "topic1": "value1" },
    "useTls": true,
    "validateTlsCertificate": false,
    "userName": null,
    "password": null,
    "reconnectDelay": 5000,
    "cleanSessions": true,
    "noLocal": true,
    "qosLevel": 1,
    "retainAsPublished": false,
    "retainHandling": 0,
    "keepAlivePeriod": 15000,
    "dataSourceType": "Mqtt", //Here the user would reference to the device protocol.
    "parseTopic": null
},
  "filters": [
    {
      "filterType": "JsonAutoMapper",
      "order": 0,
      "jsonType": 0,
      "dictionaryKeyType": 1,
      "ignoreDictionaryKeys": null,
      "rootBasePath": null,
      "timeStampPath": null,
      "timestampType": 0,
      "gatewayIdPath": null,
      "groupNamePath": null,
      "deviceTypePath": null,
      "deviceNamePath": null,
      "propertyMaps": {}
    }
  ],
  "processingMaxDegreeParallelism": 1000,
  "processingBoundedCapacity": 50000,
  "processingAsyncLockTimeout":30000}
Option 2: Selecting the Create Device button.
Choosing the Create Device button opens a new window dedicated to the configuration of the device. In this window, users can add the necessary nodes to define and set up the device according to their specifications. This option provides a more manual approach for users who prefer to configure the device settings from scratch.
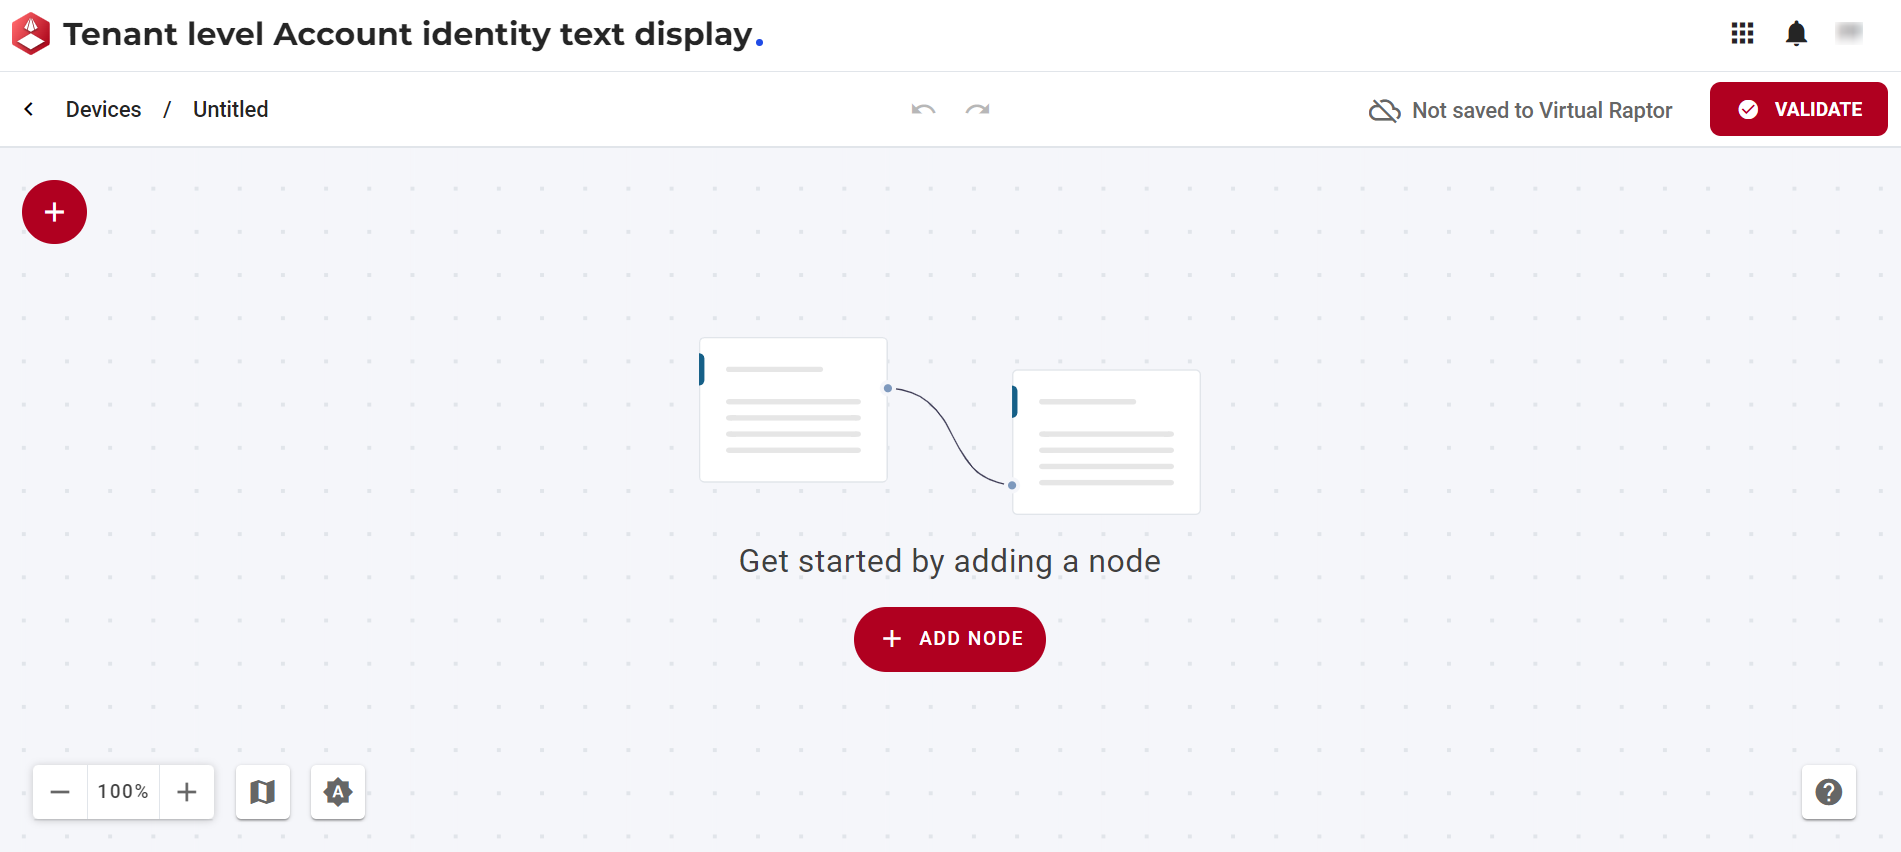
Figure 4 - Create Device
Configuration of Device
Each device should include include the Device Information, Data Source, and Filter nodes. By clicking the + icon on the top-left side of the screen, users can select and add the various nodes required as illustrated in Figure 5. For detailed information, comprehensive descriptions, examples, and step-by-step configuration guidance for each node, refer to the links below. These links will provide thorough documentation to assist you in configuring and optimizing each component of the device according to your specific requirements.
- Device Information
- Data Sources
- Filter
| The information icon linked to the device name serves as a shortcut to access key details about the device. This includes information such as the date of creation, date of the last update, the creator’s name, and the user who last updated the device. Clicking on this icon provides a quick overview of the essential information associated with the respective device. |
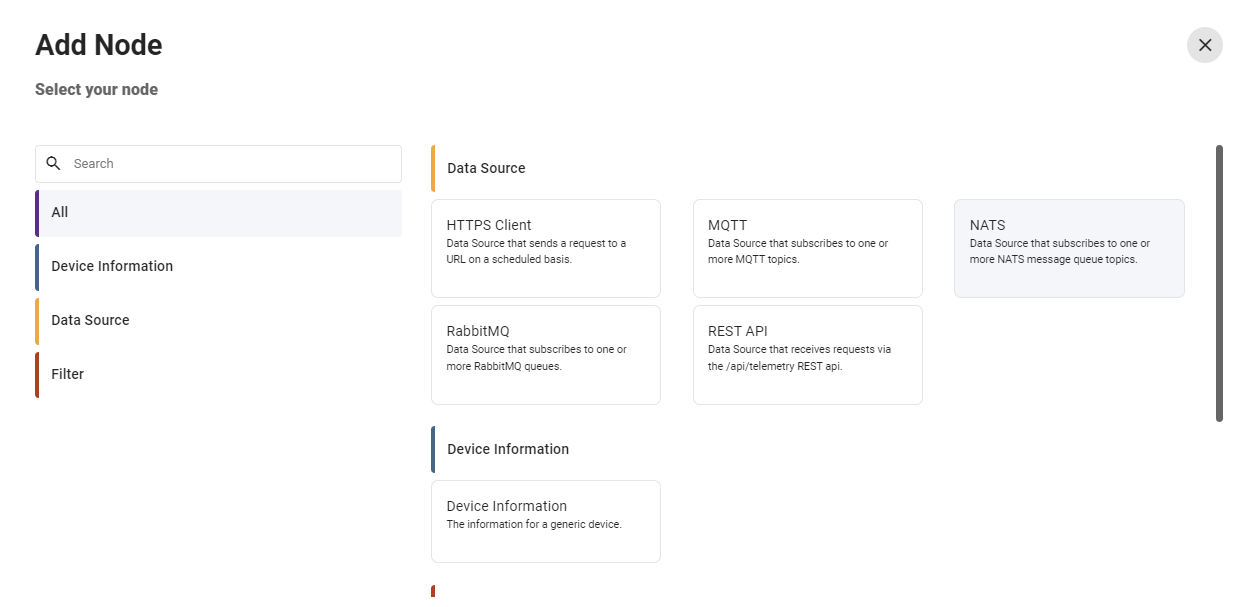
Figure 5 - Add Node
Device Information
The following section will provide a brief overview of the Device Information available in the Generic Driver. Later in this guide, users will also learn how to configure the device information node. A comprehensive description of the device information is detailed in the Device Information page.
Data Sources
A Generic Driver is comprised of a single data source. The following section will provide a brief overview of the data sources available in the Generic Driver. Further, in this guide, users will learn how to configure these data sources. Complete descriptions for each data source are provided in the Data Sources page.
- HTTPS Client
- MQTT
- NATS
- RabbitMQ
- REST API
Filters
A filter is executed sequentially for each data packet. The following section will provide a brief overview of the Filters available in the Generic Driver. Later in this guide, users will learn how to configure these filters. Comprehensive descriptions for each filter are available in the Filters page.
- JSON Manual Mapper
- JSON Auto Mapper
- C Sharp Script
- Sigfox Parser
- Conditional Byte
Node Features
Each node encompasses the following features:
- Configure the node: Allows users to customize and adjust the settings of the selected node according to their requirements.
- Show nodes compatible with the selected node: Displays nodes that are compatible with the selected node, providing a streamlined view of related options.
- Bring up the help centre for the node: Directs users to the help center for the selected node, offering detailed guidance and documentation.
- Copy icon: Permits users to duplicate the selected node, facilitating efficient replication of configurations.
- Delete the node: Enables users to remove the selected node from the configuration, allowing for adjustments and refining the setup.

Figure 6 - Node Features