
HTTPS Client
Dec 6 2023 at 12:00 AM
Introduction
The HTTPS Client data source is designed to send an HTTPS request to the specified URL each time the device is executed. Subsequently, the payload data will be extracted and loaded from the response content.
Example Options File
{
  "Devices": {
    "Device1": {
      "DeviceType": "Generic",
      ...
      "DataSource": {
        "DataSourceType": "HttpsClient",
        "Url": "https//myserver.com/api/telemetry",
        "MethodType": "Get",
        "Headers": {
          "SomeKey": "SomeValue"
        },
        "Authorization": {
           "Authorization": "DigestAuth",
           "UserName": "MyUser",
           "Password": "MyPassword"
        }
      },
      ...
    }
  }
}
Property Details
Here is an overview of the parameters for configuring the HTTPS Client data source:
| Property Name | Description |
|---|---|
| DataSourceType | Indicates the type of data source being utilised, and its value in this context is specified as “HttpsClient”. |
| Url | Specifies the URL to which the request is sent. |
| MethodType | Defines the type of request method to be used, with valid values being “Get” and “Post”. The default is set to “Get”. |
| Headers | A dictionary containing key, and value pairs that will be incorporated into the request headers when sending the request. |
| Authorization | Refers to the authorization options, the details of which can be found in the section below. |
Authorization Options
Here is an overview of the HTTPS Client Authorization Options:
| Property Name | Description |
|---|---|
| Authorization | Specifies the type of authorization to be performed, with a default value of “None”. |
| AuthUrl | The authorization URL used when the “Authorization” is set to ‘OAuth2Password’, ‘OAuth2Client’, or ‘CustomApiBearerToken’. |
| AuthHeaders | A dictionary of key, and value pairs loaded into the authorization request headers when sending the request. This is used when “Authorization” is set to ‘CustomApiBearerToken’. |
| ApiKey | The API key used for authorization, This is used when “Authorization” is set to ‘ApiKey’. |
| UserName | The user name for authorization. This is used when “Authorization” is set to ‘BasicAuth’, ‘DigestAuth’, ‘OAuth2Password’, or ‘CustomApiBearerToken’. |
| Password | The password for authorization. This is used when “Authorization” is set to ‘BasicAuth’, ‘DigestAuth’, ‘OAuth2Password’, or ‘CustomApiBearerToken’. |
| BearerToken | The bearer token used for authorization. This is used when “Authorization” is set to ‘BearerToken’. |
| ClientId | The client identifier used for authorization. This is used when “Authorization” is set to ‘OAuth2Password’ or ‘OAuth2Client’. |
| ClientSecret | The client secret used for authorization. This is used when “Authorization” is set to ‘OAuth2Password’ or ‘OAuth2Client’. |
| CustomApiOptions | Refer to the ‘Custom Api Options’ table for further details. |
| DisableServerCertificateValidation | If set to true, the server certificate will not undergo validation. The default is false. |
Custom Api Options
Here is an overview of the HTTPS Client Custom Api Options:
| Property Name | Description |
|---|---|
| RequestDocumentName | Specifies the name of the request root document in the case of XML data. |
| RequestUserPath | Indicates the path to the UserName property. This will be JsonPath or XmlPath based on the chosen HTTP client type. The value corresponds to the configuration in the Authorization Options UserName property. |
| RequestPasswordPath | Represents the path to the Password property. This will be JsonPath or XmlPath based on the HTTP client type. The value corresponds to the configuration in the Authorization Options Password property. |
| ResponseTokenPath | Specifies the path to the token value in the response. This will be JsonPath or XmlPath depending on the type of the HTTP Client chosen. |
Authorization Types
Here is an overview of the HTTPS Client Authorization Types:
| Authorization Type | Value | Description |
|---|---|---|
| None | 0 | No authorization will be performed. |
| ServiceToken | 1 | Authorization via the Raptor Service Token. |
| ApiKey | 2 | Authorization via a provided API key. The API key is loaded into the header as a bearer token. Required Authorization Properties: - ApiKey |
| BasicAuth | 3 | Authorization via a provided User Name and Password. Required Authorization Properties: - UserName - Password |
| UserContext | 4 | Authorization via the provided bearer token in the user HTTP context. |
| BearerToken | 5 | Authorization via a provided bearer token. Required Authorization Properties: - BearerToken |
| DigestAuth | 6 | Digest Authorization requires a provided User Name and Password Required Authorization Properties: - UserName - Password |
| OAuth2Password | 7 | OAuth 2.0 authorization using Password Credentials. Required Authorization Properties: - AuthUrl - UserName - Password - ClientId - ClientSecret |
| OAuth2Client | 8 | OAuth 2.0 authorization using Client Credentials. Required Authorization Properties: - AuthUrl - ClientId - ClientSecret |
| CustomApiBearerToken | 9 | Authorization will be done via a bearer token that will be obtained via a call to a custom api. Required Authorization Properties: - AuthUrl - AuthHeaders - UserName - Password - CustomApiOptions |
Configuration of the HTTPS data source node
Every device should include the Device Information, Data Source, and Filter nodes. To initiate the creation of a device, click the + icon positioned on the top-left side of the ‘Create Device’ screen as illustrated Figure 1. This action prompts a window to open, facilitating the device configuration. Within the same screen, users can select and add the necessary nodes. The ‘Add Node’ window is accessible and displayed as shown in Figure 2.
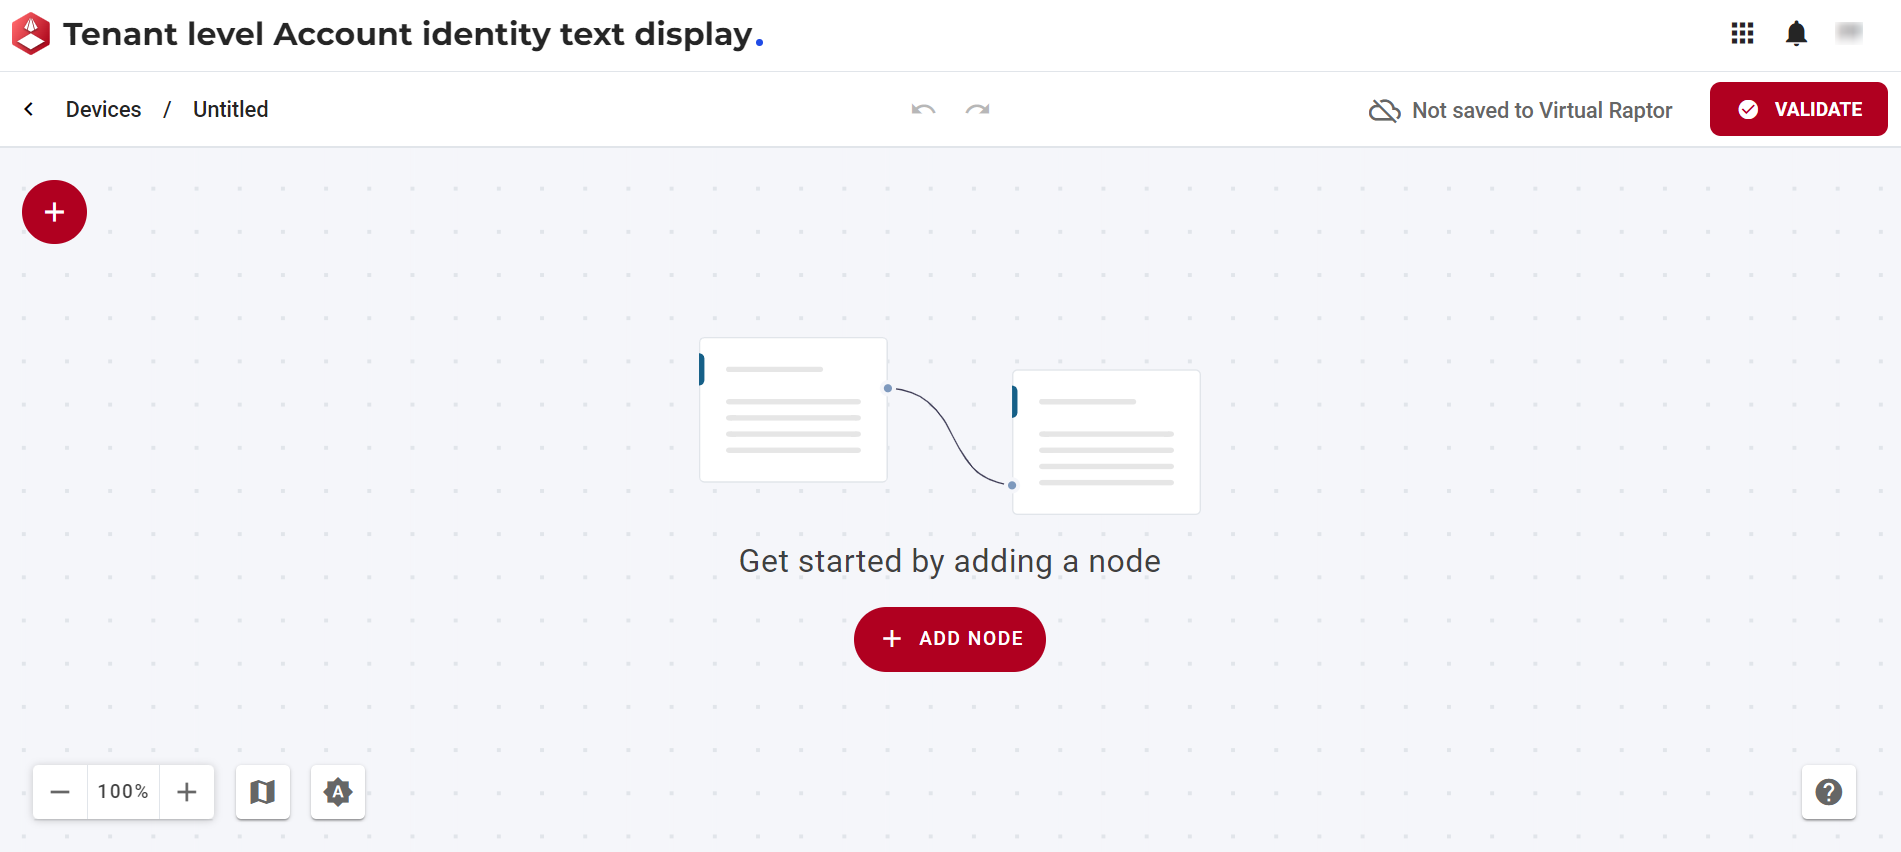
Figure 1 - Create Device
The window below enables users to add and configure a data source node.
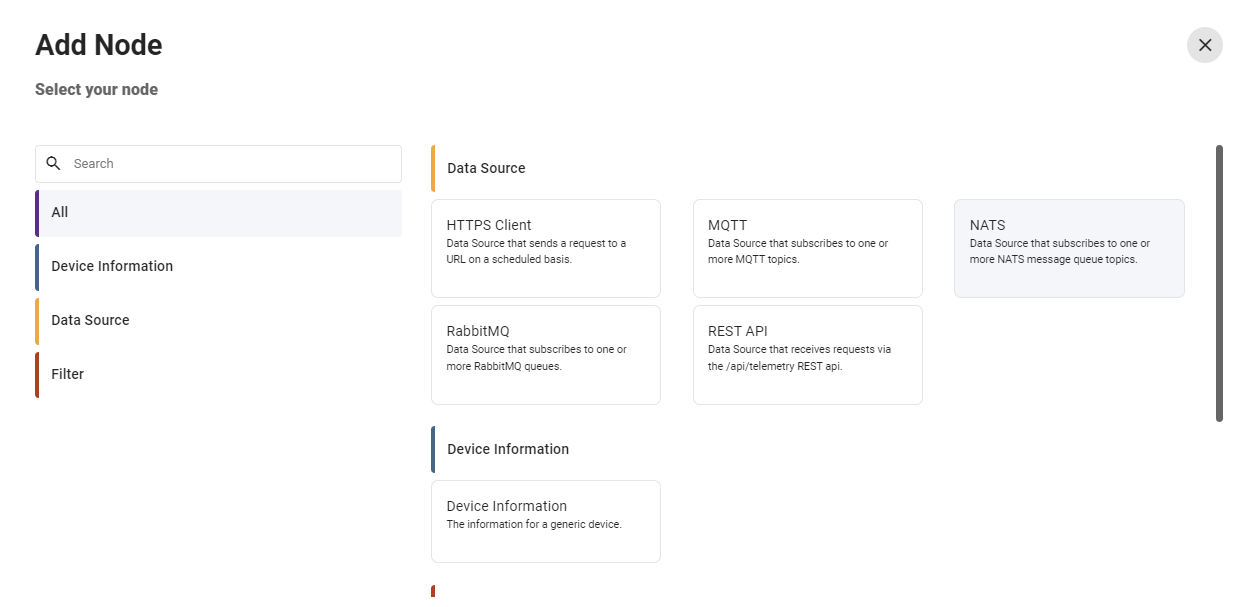
Figure 2 - Add Node
The HTTPS client node consists of features to:
- Configure the node: Allows users to customize and adjust the settings of the selected node according to their requirements.
- Show nodes compatible with the selected node: Displays nodes that are compatible with the selected node, providing a streamlined view of related options.
- Bring up the help centre for the node: Directs users to the help centre for the selected node, offering detailed guidance and documentation.
- Copy icon: Permits users to duplicate the selected node, facilitating efficient replication of configurations.
- Delete the node: Enables users to remove the selected node from the configuration, allowing for adjustments and refining the setup.

Figure 3 - Node Features
Upon selecting the Configure the node button in Figure 3, the HTTPS client data source node screen is presented as illustrated in Figure 4. Within this interface, users can input and edit relevant information.
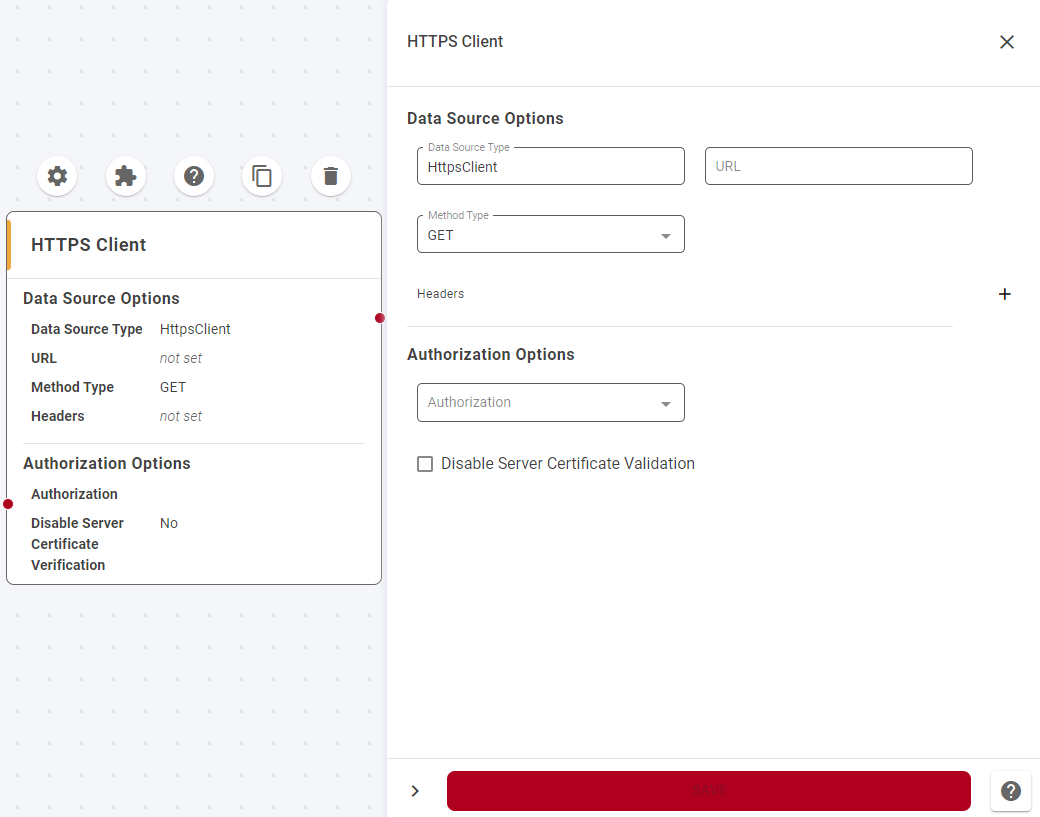
Figure 4 - HTTPS Client data source node
- Data Source Options: This feature enables users to establish the origin and method type of the data source.
- Data source type
- URL
- Method type
- Headers: Header key and header value
- Authorization Options: This feature enables users to authenticate with various clients.
- Authorization
- API Key
- Username
- Password
- Bearer Token
- Disable Server Certificate Validation: This checkbox is a user interface element that, when selected, instructs the system or application to bypass the validation of server certificates during an HTTPS connection. When the Disable Server Certificate Validation checkbox is checked, it means that the usual validation process, which includes checking the certificate against a trusted authority, verifying its expiration, and ensuring its integrity, is skipped.