
SCP Tool
Jan 1 2022 at 12:00 AM
The Raptor™ SCP Tool is a Windows application used by installers to run site configuration for Telco-based implementations. The tool connects physically to the Raptor™ via USB, and is run on the installer’s laptop/PC. Once a Raptor is live on a secure network, the SCP tool can be used remotely to configure a Raptor.
Key Features
- Determine the IP addresses of devices on a site
- Load the latest software and config to the installed Raptor
- Setup the Raptor’s network configuration and BIOS settings
- Configure devices on a Raptor
- Run a site health summary report
Overview
In SCP Tool, clients have the ability to configure their sites and monitor their devices connected to different raptors. The tool connects physically to the Raptor™ via USB, and is ran on the installer’s laptop/PC. One SCP Tool is created for each client but can be used with multiple devices and Raptors. Set up and configure information is sent back forth between SCP Tool and the Raptor(s).
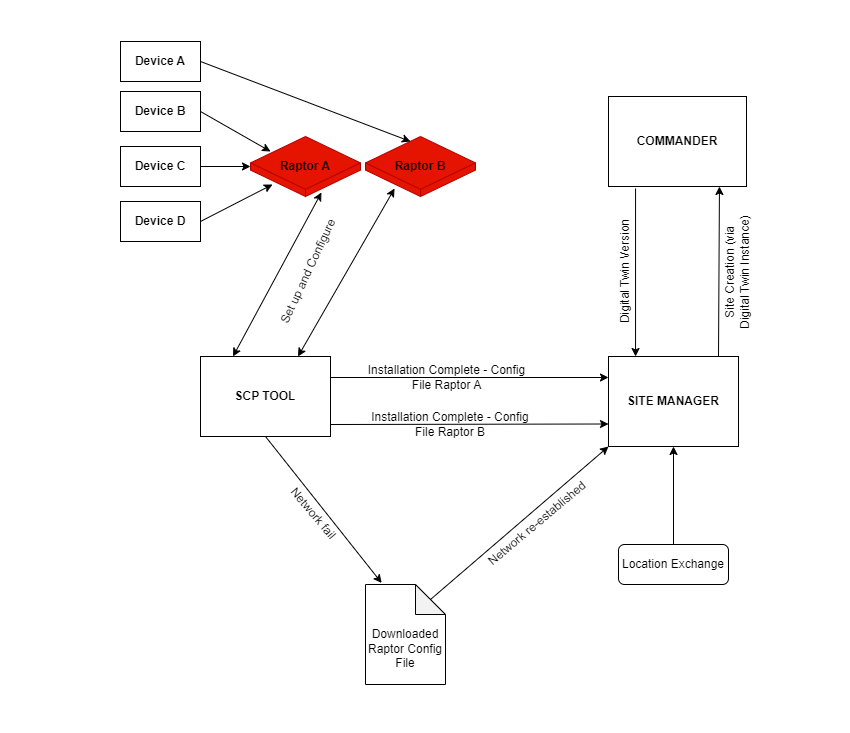
Figure 1 - SCP Tool Process Flow
Once installation is complete, the SCP Tool sends the Installation Complete – Config File from the Raptor(s) to Site Manager. Site Manager gathers all relevant data regarding location etc and creates the site which goes to Commander. Should the SCP Tool fail to send the Config File to the Site Manager for whatever reason (network fail as an example), the file can be downloaded and manually resent once the network is re-established and will continue the process until the site is created and reaches Commander. This can be seen in Figure 1.
SCP Tool Login
In order to use SCP Tool, users must download and install the application. They will be provided with a zip folder that contains the application. Once the application is installed, these are steps to follow in order to log in:
Open the SCP Tool application to access the login page. There are two options for logging in; Scan the QR code or Open login window in browser tab.
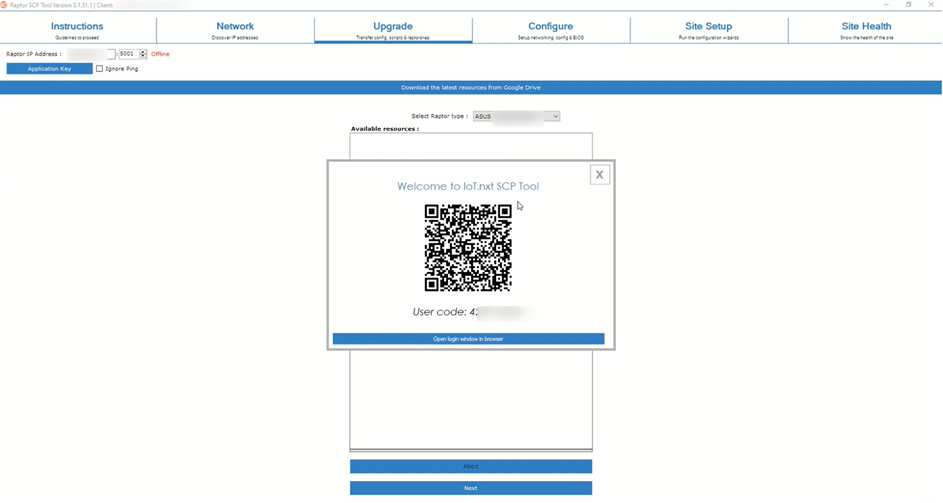
Figure 2 - SCP Tool Login
Enter login details (Commander login details).

Figure 3 - SCP Tool Login Screen
Enter the user code (provided on the login page).
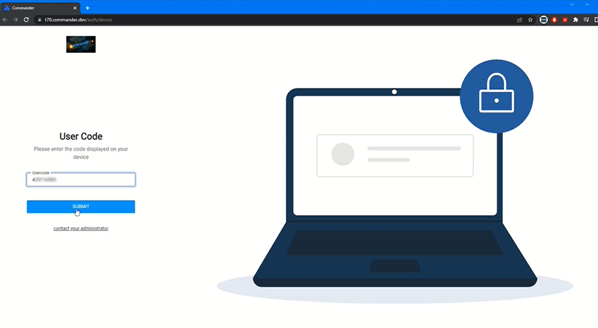
Figure 4 - SCP Tool Login User Code Screen
Authorise the device by typing any preferred description.
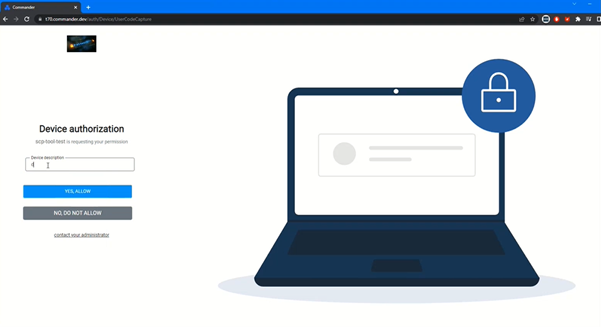
Figure 5 - SCP Tool Login Device Authorisation Screen
Successful login popup will appear.
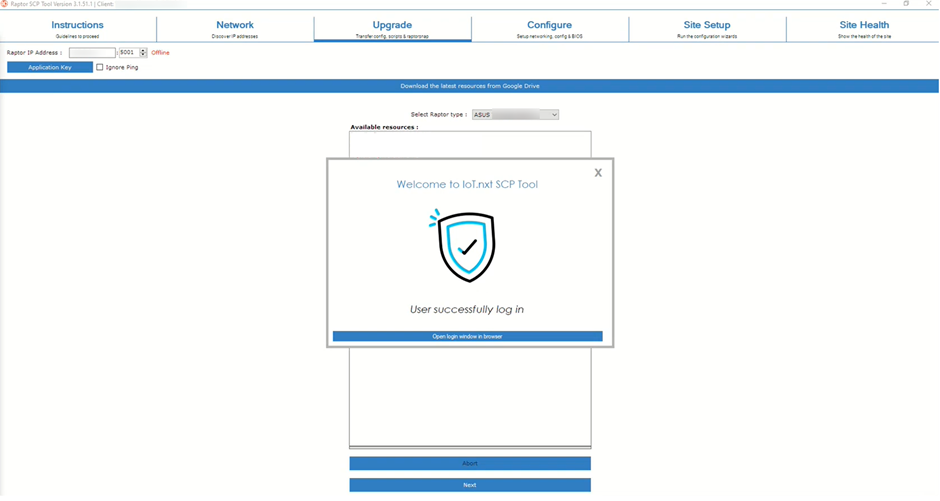
Figure 6 - SCP Tool Successful Login Screen
SCP Tool Application Key
An application key is an encrypted file that is required to use SCP Tool. This key is shared with clients and it is unique to each client. Users must type in the provided application key in the window and save it to continue using SCP Tool.
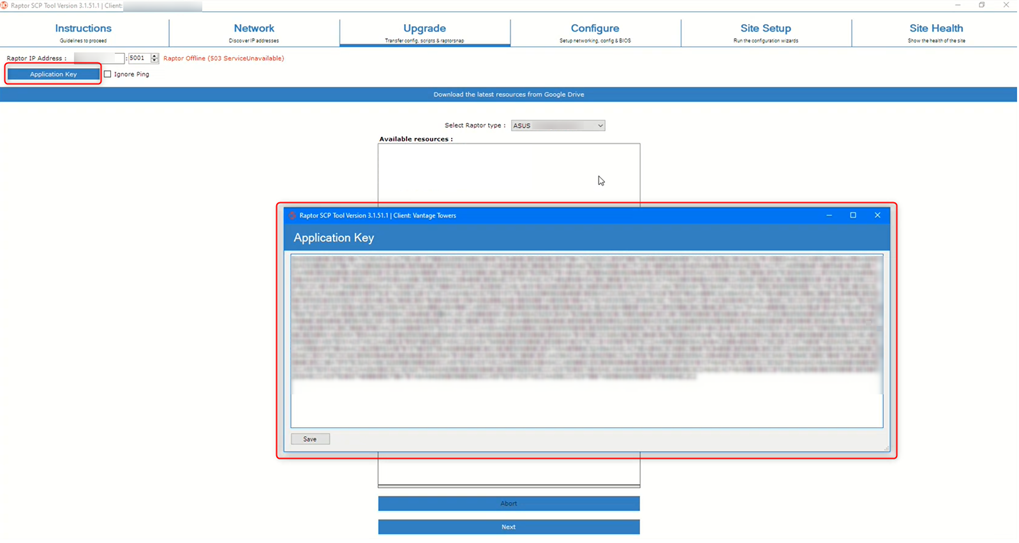
Figure 7 - SCP Tool Application Key
SCP Tool Installerfix
SCP Tool also requires an Installerfix file in order to work. The installerfix is a file containing scripts that must be run on an Edge gateway to set up the device initially, install the golden config with the desired Raptorsnap version, and set up the device to the client’s specific needs with any found fixes.
Before the installerfix can be built, the desired changes must be made to the golden configuration (GC). These changes are to be reviewed, and then the GC is placed in the installerfix folder.
Folder and File Structure
There are several files that are found in the main folder. This section explains each of these and provides more context.
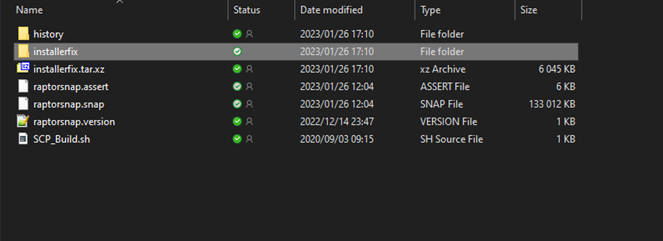
Figure 8 - SCP Tool Installerfix Main Folder
The “History” folder - Contains previous Installerfix.tar.xz files with a date stamp created when running SCP_Build.sh. Installerfix folder - Contains all the files that will be in the installerfix.tar.xz. All these files will be placed in the home directory of the Raptor. Some of these files include the following:
- Files that fix previous errors found - Depending on the client, different files will fix previously encountered problems.
- SCP_Tool_Release_Notes.txt - Release notes of the installerfix to be updated with each revision. This can be used to verify which version of the SCP Tool was used on the Raptor.
- Setup_network.sh - Script to set up the network on the edge gateway.
- Reboot.sh - Run disk sync and reboots the device.
- Golden Config - The GC created for the client.
- Setup_unit.sh -This is executed automatically when the SCP Tool logs into the Edge Gateway with the key (net_ssh_key). It does so automatically so there is no installer intervention required. It also performs basic unit setup.
- Setup_config.sh - Installs golden config and calls
.sh which contains any fixes to problems previously encountered in the project. This is done regardless of the prompts being skipped. -
.sh – This script contains any specific commands/fixes to be run for the client's Raptor. For example, a fix for ethernet ports or modem firmware updates.
Installerfix.tar.xz file – This is the .tar of the installerfix folder which will be uploaded to Google Drive. Raptorsnap.assert – This is the assert file – a certificate file that allows a snap file to be installed. This needs to be installed first before a snap file can be installed. Raptorsnap.snap – This is the snap file. The actual program that must be installed Raptosnap.version – This is a text file containing a string of the Raptorsnap version. This should be updated if there is a change. SCP_Build.sh - Script used to create a .tar file in the installerfix folder to Installerfix.tar.xz. It changes directory into the Installerfix folder and creates a .tar.xz. with the required files that be installed. Makes a copy of it with the date and add it to the History folder. Open the WSL terminal in that directory and run ‘./SCP_Build.sh’
Installerfix Installation Steps
Before the installerfix can be built, the desired changes must be made to the golden configuration (GC). These changes are to be reviewed, and then the GC is placed in the installerfix folder. When all of the required files in the Installerfix folder have been updated, the SCP_Build file can be executed to create a .tar.xz file of the installerfix to be uploaded to Google drive together with the .snap, .assert, and .version.
The following steps are followed to create the installerfix.
- Require access to ‘Raptor SCP Tool’ from Jannie Pretorius where the ‘Resources’ folders are hosted for various projects via email/Teams message.
Once access is granted, make changes to the relevant files. In most cases, the changes will only occur in the
.sh file and the Raptorsnap.version file. After the changes have been made, the installerfix is built using the SCP_Build.sh file. 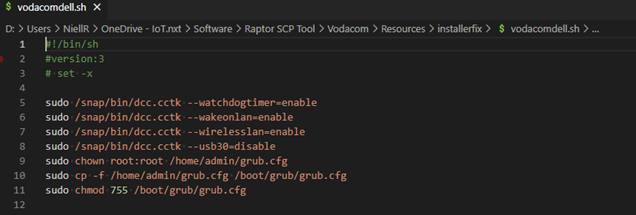
Figure 9 - Installerfix Changes Screen
- On completion of the SCP_Build script, copy over the following 4 files to Google Drive (link will be provided):
- Installerfix.tar.xz;
- Raptorsnap.assert;
- Raptorsnap.snap; and
- Raptosnap.version.
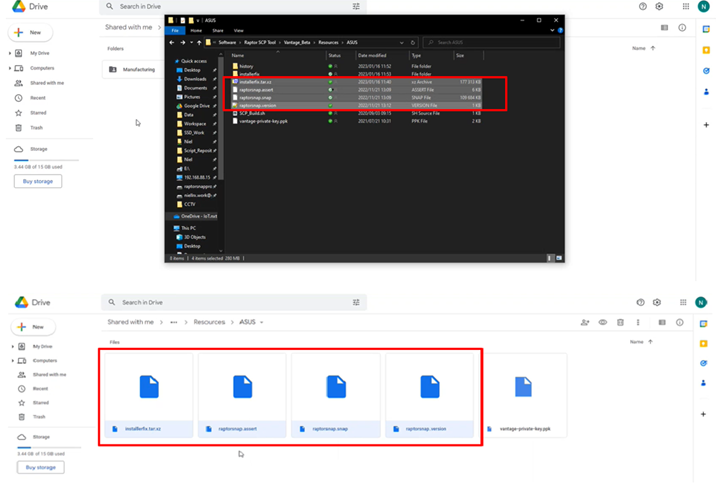
Figure 10 - Installerfix Google Drive Files
- Open the SCP Tool application and download the latest resources.
Check that resources are downloaded and appear in the Available Resources window.
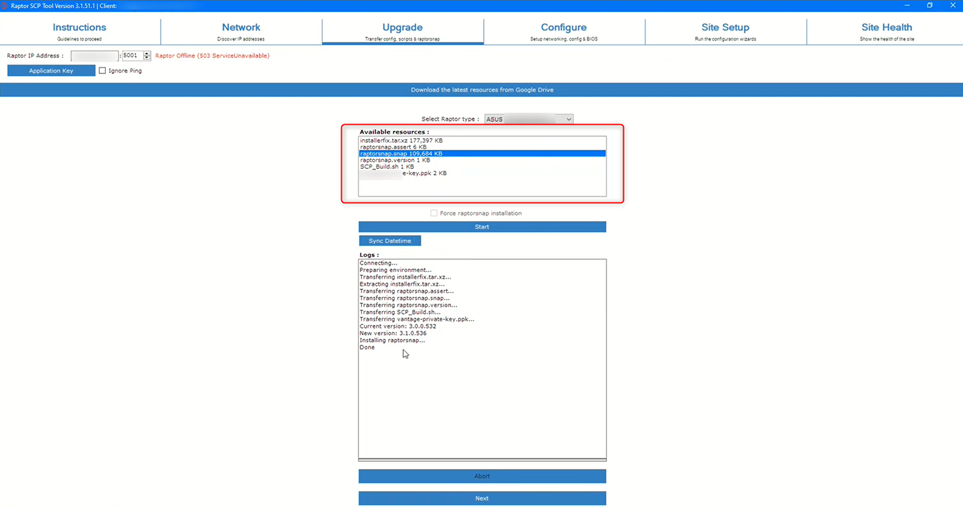
Figure 11 - Latest Resources Tab
SCP Tool Pages
SCP Tool has five pages which take the installer through the entire process. They are given a basic overview of the SCP Tool in the Instructions page. They can discover IP addresses in the Network page. They do configuration transfers and script running in the Upgrade page.
The configuration is done in the Configure page. Here, they can set up network and other required config settings. The Site page is used to set up the customisable site. Finally, the Site Health page is used to check site health to ensure that all devices are fine. Each of these pages are discussed further below. The process and steps required to use SCP Tool are also discussed in each of the different page section.
Instructions
This page has the basic overview of SCP Tool operation with a Raptor™ on site. It shows basic guidelines on what to do. The Raptor IP Address provided will be the default for all Raptors straight out of the factory. Users can enter this address to get started.
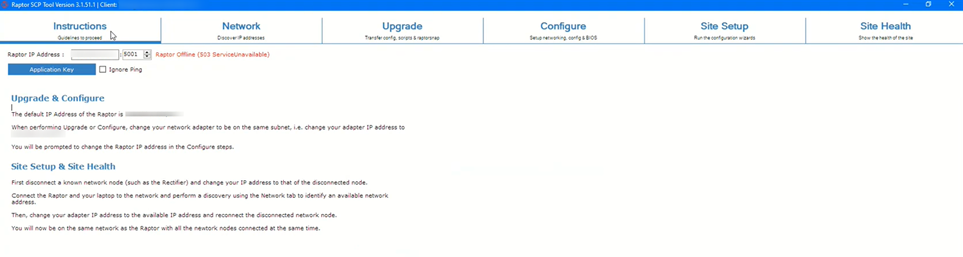 |
Figure 12 - SCP Tool Instructions Page
Network page
This is where you determine the IP addresses of devices on a site. IP addresses can be typed in and the Raptors on site will be shown. If forgotten, this page can help scan and discover the IP addresses as well. The steps to follow are shown below:
- Click on the Start Discovery button.
- All available IP addresses within range will be searched for.
- IP Address in use will be shown in the ‘in use’ window.
- Enter the gateway correct IP address to establish a connection. Once the is a stable connection, a ‘Online (200 OK)’ message will be seen. If it shows a red Offline message, it means that the gateway can be pinged but the Raptor is not running yet. Check to ensure Raptor is running and then continue.
- Click Next to go to the Upgrade page.
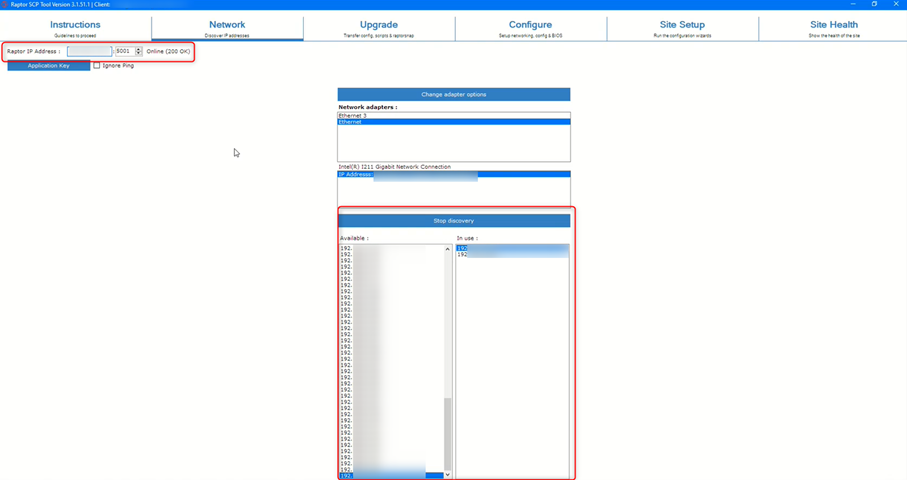 |
Figure 13 - SCP Tool Network Page
Upgrade
You can load the latest software and config to the installed Raptor™, from the Upgrade page. The Raptor type can be selected from a list of possible ones. There are a number of scripts that are listed in the Available Resources window. This includes the installerfix file that has all the plugins, messages, wizards, etc that have already been set up.
The installer will upgrade and download the latest files and scripts when pressing start and copy all the files to the gateway and start the configuration process. The steps to follow are shown below:
- Select Raptor type.
- Check that the latest resources are downloaded in the Available Resources window. If there is nothing there, click the download button.
- Enter the gateway IP address to establish a connection. Once the is a stable connection, an Online (200 OK) message will be seen. If it shows a red Offline message, it means that the gateway can be pinged but the Raptor is not running yet. Check to ensure Raptor is running and then continue.
- Sync up the datetime. Click on the button to synch with the device.
- Press the Start button to copy files and upgrade the Raptor software.
- Click Next to go to the Configure Page.
 |
Figure 14 - SCP Tool Upgrade Page
Configure
The Configure tab opens up a PuTTy terminal that allows a user to apply the correct configs and any additional required scripts that might be required for the specific client. The user basically sets up the Raptor’s network configuration and BIOS settings (Users are trained based on what the client needs). A desired config can be selected which will then be copied over. It will pin out logs with data such as the status of the OS.
Upgrades can then be made to OS software like the network managers to ensure everything is fine for installation. Configuration is done on the gateway and not only the Raptor. Once this is done, there will be a save a reboot that appears to show it has been configured correctly. The steps to follow are shown below:
- Click the Start button to bring the configure screen.
- The configure screen asks where a user is receiving error 500 when opening Raptor Portal in the web browser. Type ‘n’ to continue.
- Select 1 to continue and set the required configurations.
- Reboot is performed automatically.
- Click Next to go to Site Setup Page.
 |
Figure 15 - SCP Tool Configure Page
Site Setup
You can also configure devices on a Raptor™ through the Site Setup Wizard. A Raptor web browser is opened in the box which will have a customised step by step wizard based on client requirements. Some features include selecting a device, Device IDs, and enabling and disabling devices.
Once they have customised their setup, in the backend, a file will be compiled that will be uploaded to a service in the cloud that goes and creates a site in Commander automatically without manual inputs. The steps to follow are shown below:
- Click the Start button to open the setup wizard.
- Select the required tags from the dropdown lists (these will vary depending on the client and gateways being used).
- Type any required additional tags should there be any.
Click the Next button to move to the Site tab.
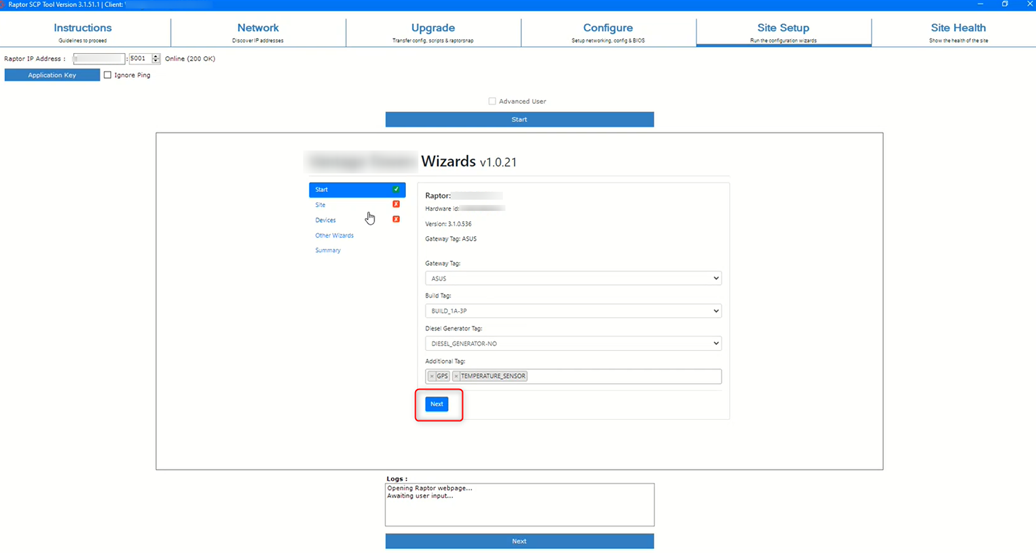
Figure 16 - Site Setup Start Screen
- Enter the required details in the fields to identify the location of the Raptor.
Click the Next button to go to the Devices tab.

Figure 17 - Site Setup Site Screen
- Enter the required details in the fields to specify devices.
Click the Next button to go to the Other Wizards tab.
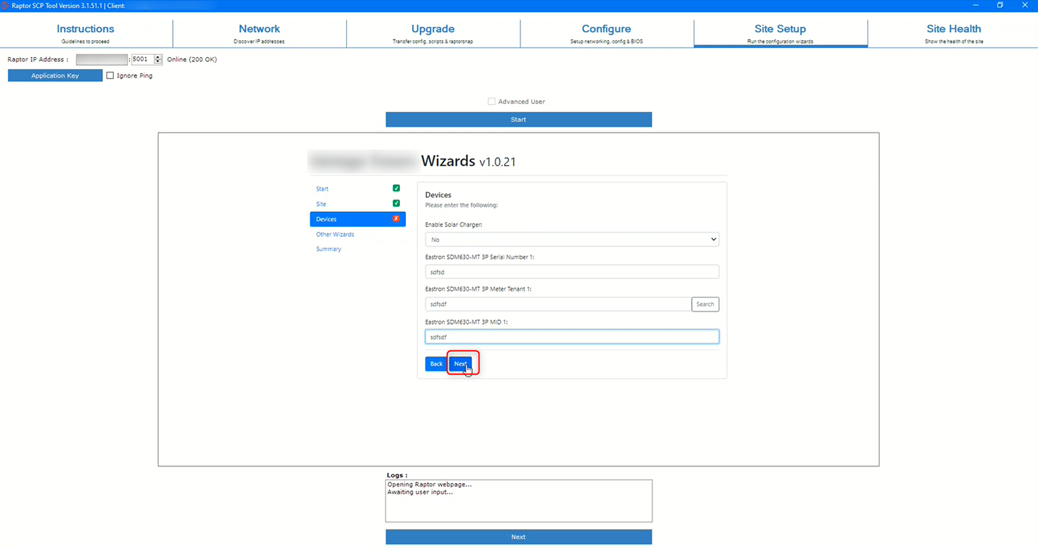
Figure 18 - Site Setup Device Screen
- Enter the required details in the fields for additional wizard setup.
Click the Next button to go to the Summary tab.
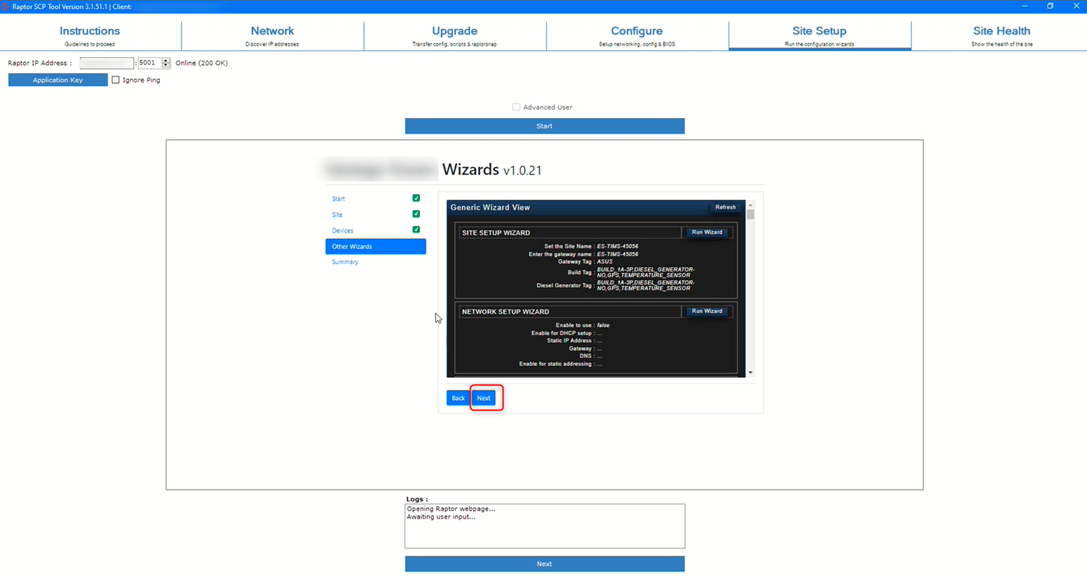
Figure 19 - Site Setup Other Wizards Screen
- Review details summary.
Click the Save and send to Site Manager button.
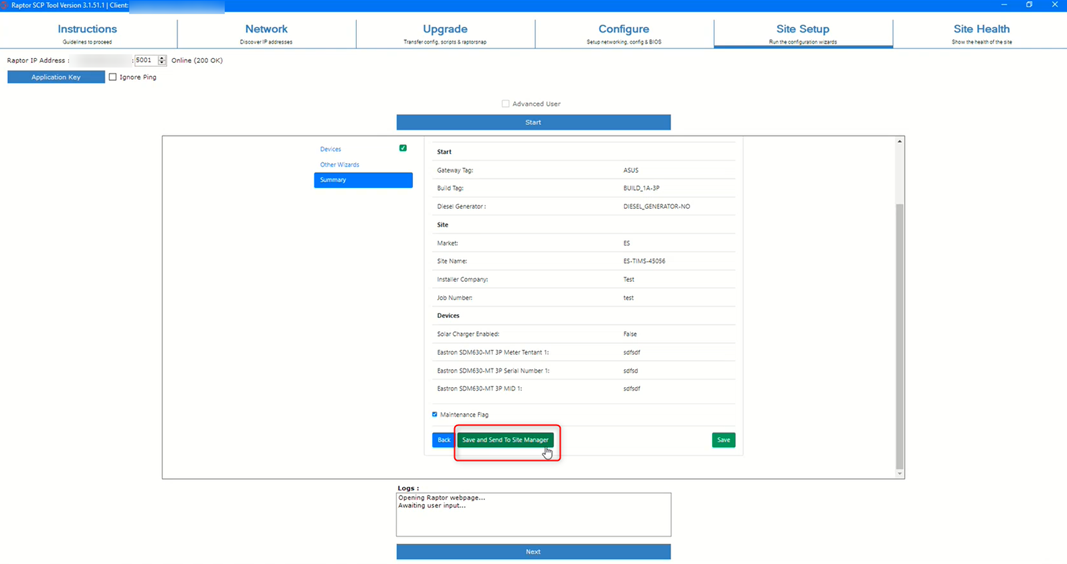
Figure 20 - Site Setup Summary Screen
Changes will be applied, saved, and a reboot will happen automatically. Raptor will also send all saved details to the Site Manager. If there is any error sending automatically, the file can be downloaded and sent manually.
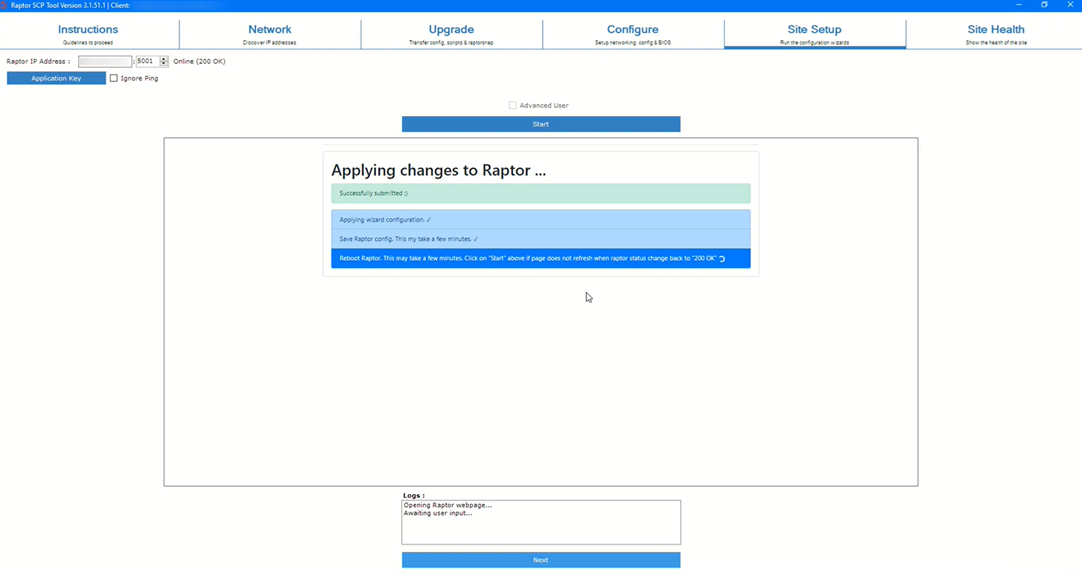
Figure 21 - Site Setup Applying Changes Screen
Site Health
You can run a site health summary report to ensure the correct site setup before leaving the site. You can upload site creator data to Commander™ (via Virtual Raptor™) for automated Commander™ interface creation for the site.
You can run a site health summary report to ensure the correct site setup before leaving the site. You can upload site creator data to Commander™ (via Virtual Raptor™) for automated Commander™ interface creation for the site.
After devices are set up on site, the installer will then do a site health check on all devices to see if they are healthy or not. A grid will popup and show all the statuses of the enabled devices. It will tell state, for example, if the battery is fine, if tell energy meter is fine, etc or if battery number one is maybe offline. This will then help with troubleshooting and determining the exact issues.
At the bottom of the page, there is a ‘Send Installation Complete’ button that can be clicked to complete the process. A file will be compiled that will be uploaded to a service in the cloud that goes and creates a site in Commander automatically without manual inputs.
After all of this is done, there is an ‘Upload History’ window that history of the files that was sent or not sent. It will show the name of the file and the status (sent or not sent). Next this is a download option which can be used as well. This can be used in instances were uploads did not occur for any reason. The file be downloaded and shared with someone who can manually upload it. The steps to follow are shown below:
- Click the Start button to perform health checks.
- Health statuses will be listed.
- Click the Save and send to Site Manager button.
Changes will be applied, saved, and a reboot will happen automatically. Raptor will also send all saved details to the Site Manager. If there is any error sending automatically, the file cane be downloaded and sent manually.
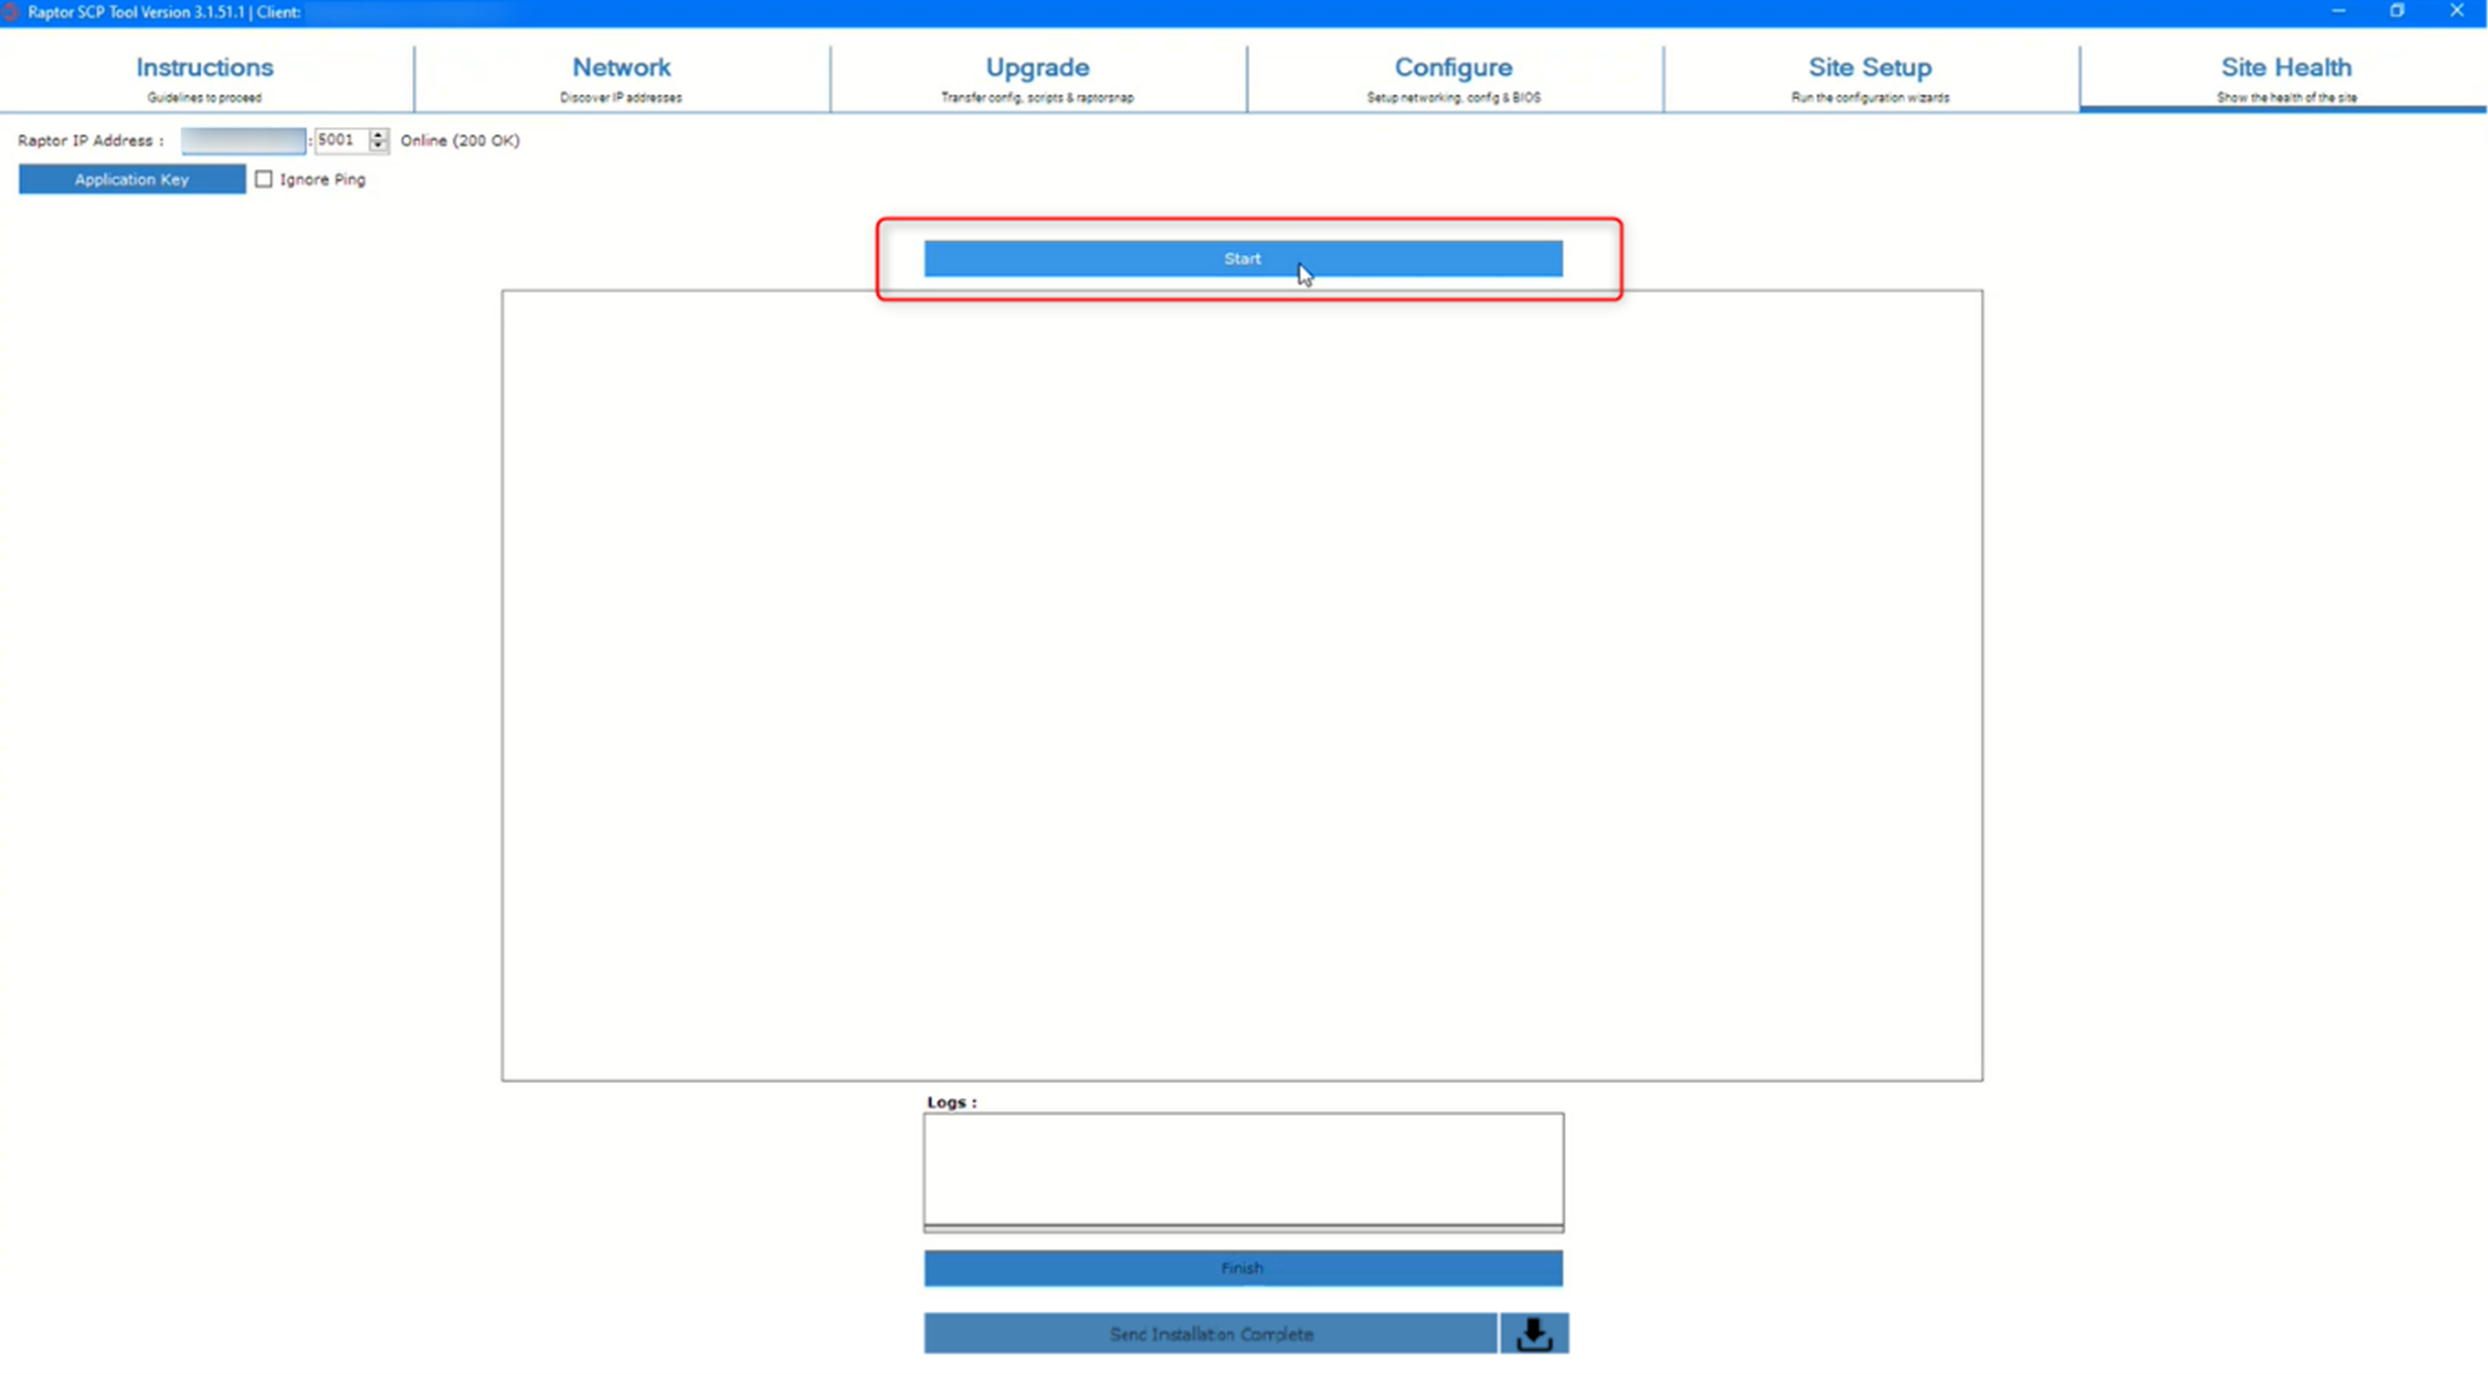
Figure 22 - SCP Tool Site Health Page