
Google Cloud Integration
Dec 19 2022 at 12:00 AM
- Configuring Google Cloud Integration
- Role augmentation
- Set up your Google Workspace account
- Add Users to your Google Workspace account
- Create Google Credentials
- Create OAuth Subscription in Commander
- Create User Groups and Entity Access Groups to Link to OAuth Subscription
- Link Roles in OAuth Subscription to User Groups/Entity Access Groups
- Link Google Cloud Identity to Commander Login Providers
Configuring Google Cloud Integration
The Commander™ platform allows users to log into their account using Google Cloud credentials. This ensures streamlined account management between an IoT.nxt® tenant and a client’s Google Cloud portal.
Before Commander can be linked with Google Cloud, the user needs to register Google Cloud as a login provider for Commander. The user will also need to register a new app on their Google Cloud server.
| The functions below can only be performed by the tenant owner or a user with the relevant account access. |
To create a link between a Google Cloud application and the Commander platform, an OAuth 2.0 Client Id needs to be created in Google Cloud and then linked to the relevant application in Commander. This process includes the following steps:
In Google Cloud Console:
- Selecting a project and setting up an OAuth Consent Screen.
- Creating Credentials for the project.
- Saving/downloading the OAuth 2.0 Client Id and Client Secret.
In Commander:
- Configuring the Google Cloud environment by retrieving the Client Id and Client Secret, and enabling the link on the platform.
| This section will show how a user can set up a Consent Screen to enable a Google Cloud domain to link with the Commander portal. It assumes that the domain has already been registered and configured by the client. |
Select a project and set up an OAuth Consent Screen
To set up an OAuth Consent Screen, select a previously configured project from the dropdown next to the Google Cloud logo (top left-hand side of the page):
Clip 1 - Open Project
- Click on the button next to the Google Cloud logo to open a window with a list of projects.
- Select the organisation within which the project is located.
- Choose the relevant project listed under the selected organisation.
- Click on Open.
Once the project has been chosen, navigate to OAuth Consent Screen using the left-hand navigation bar (Figure 1):
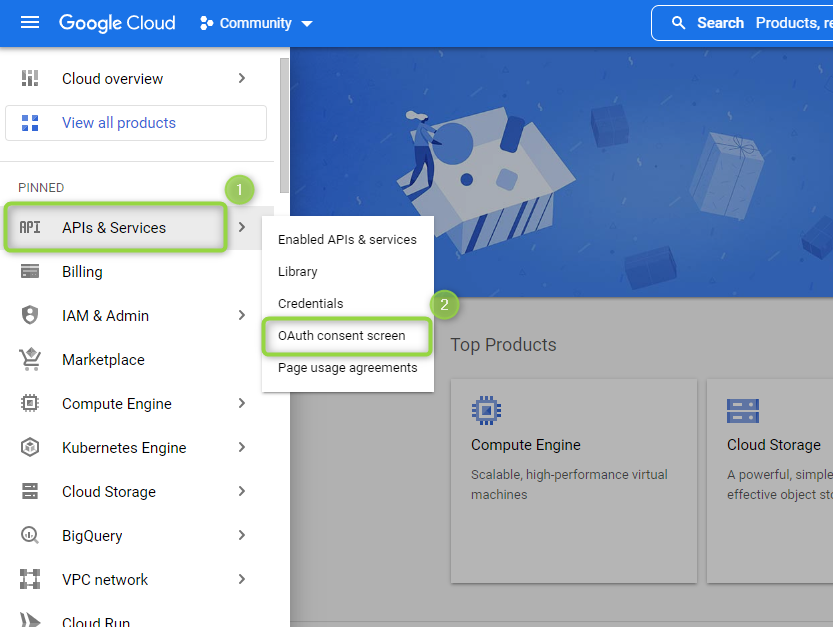
Figure 1 - Navigate to OAuth Consent Screen
- Hover over APIs & Services.
- Click on OAuth consent screen.
Once in the OAuth Consent Screen section, you can configure the following fields:
- User Type
- App information
- App domain
- Developer contact information
- Scopes
- Test Users and Filter Criteria
User Type
Choose between Internal and External. This will depend on the type of application the client has set up. For the purposes of this demonstration, Figure 4 below has selected External.

Figure 4 - User Type
- Choose between Internal or External.
- Click on CREATE.
App information
In the App information section, fill in/upload the following:
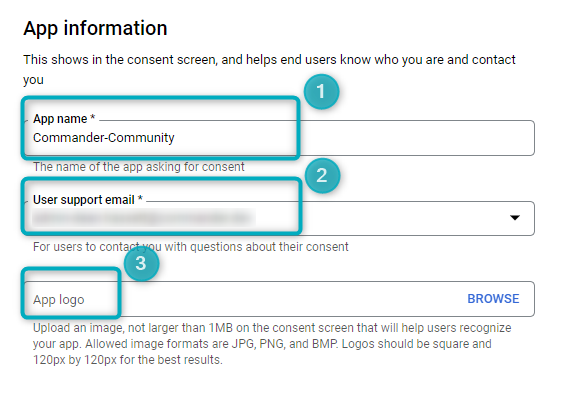
Figure 2 - App information
- App name - add the name of your application.
- User support email - add a support email
- App logo - add an app logo (optional)
App domain
In the App domain section, fill in the following:
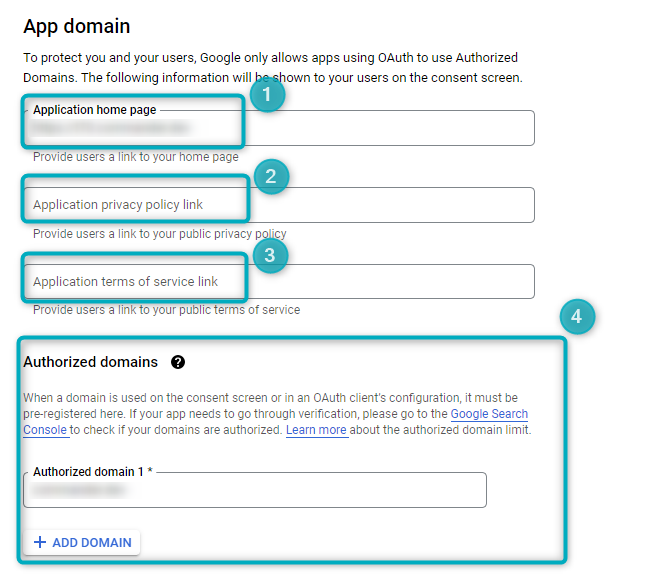
Figure 3 - App domain
- Application home page - provide users with a link to the home page of the relevant application from Commander.
- Application privacy policy link - add a link to a public privacy policy.
- Application terms of service link - add a link to a public terms of service portal.
- Authorized domains - add a pre-registered domain here (the domain linked to the organisation within which the project is found). Click on ADD DOMAIN and provide the relevant pre-registered domain in the input field.
Developer contact information
Add an email address of the contact person responsible for troubleshooting possible issues (for example security issues) related to the account (Figure 5):
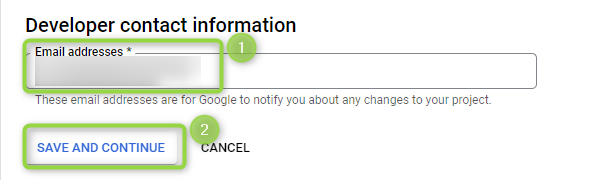
Figure 5 - Developer contact information
- Add the relevant email address.
- Click on SAVE AND CONTINUE.
Scopes
Configure the scope of your application’s permissions and user access. This includes non-sensitive scopes, sensitive scopes and restricted scopes (see Figure 6).
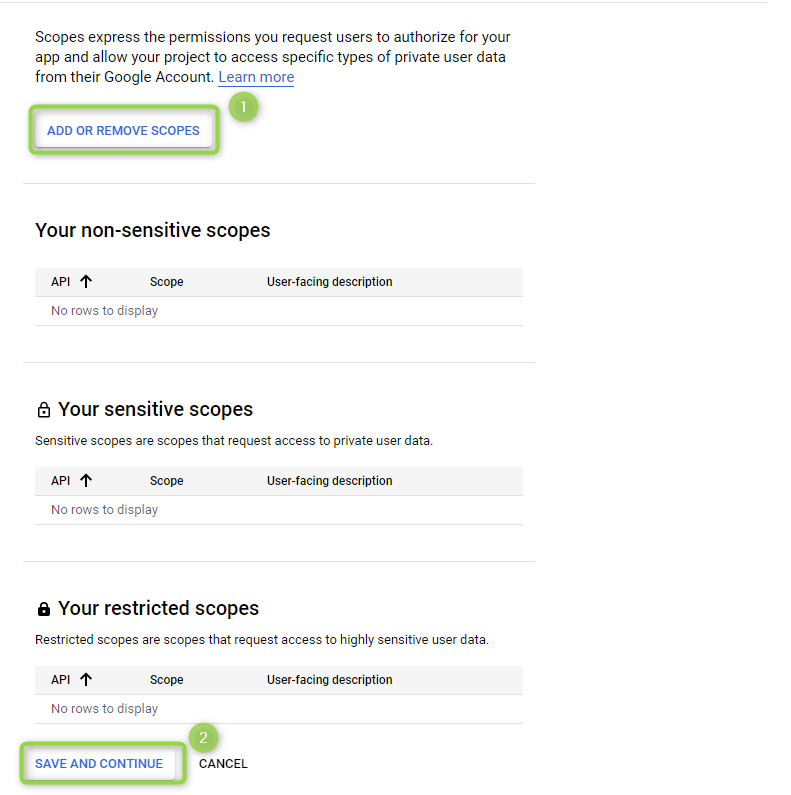
Figure 6 - Scopes
- Click on ADD OR REMOVE SCOPES and add scopes relevant to the application.
- Once you have configured the scopes, click on SAVE AND CONTINUE.
Test users and filter criteria
Add test users and configure filter criteria (Figure 7).
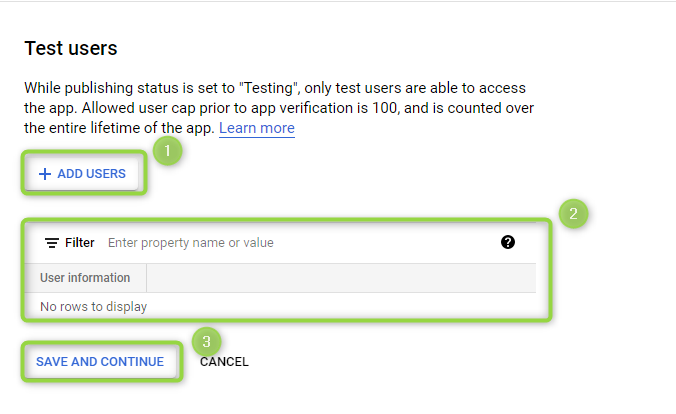
Figure 7 - Test users
- Click on ADD USERS to add Test users.
- Configure any relevant filter criteria.
- Click SAVE AND CONTINUE.
Once all the fields have been filled in, the OAuth Consent Screen section will show a Summary of the configured fields (Figure 8):
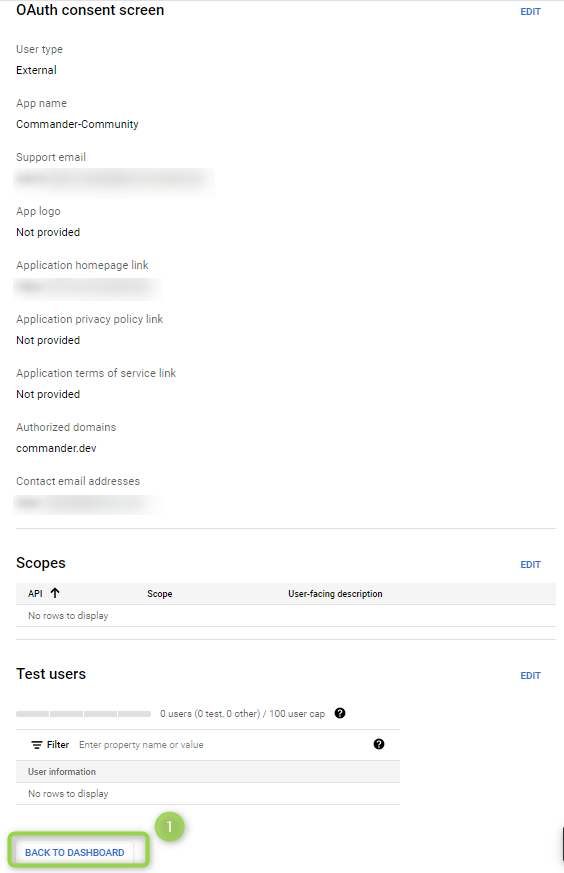
Figure 8 - Summary
- Click on BACK TO DASHBOARD to exit and see the project’s dashboard.
Create Credentials
Navigate to the Credentials section of the relevant project to create your OAuth Client Id and Client Secret.
Clip 2 - Create credentials
As shown in Clip 2 above:
- Open the left-hand side navigation bar and navigate to APIs & Services -> Credentials.
- Click on CREATE CREDENTIALS -> OAuth client ID.
- A new page will open with a dropdown for Application type - click on the dropdown and choose Web application.
This will open the following configuration options:
- Name your OAuth 2.0 client.
- Authorize Javascript Origins.
- Authorize Redirect URLs.
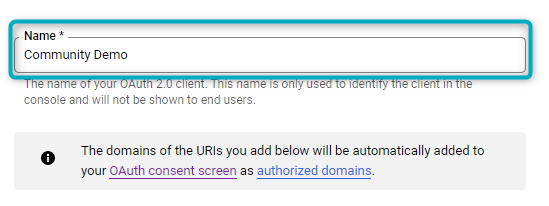
Figure 9 - Name client
Name your OAuth 2.0 client. This identifies the client in the console and will not be shown to end users.

Figure 10 - Authorise Javascript Origins
Add the tenant URI of the linked Commander application.
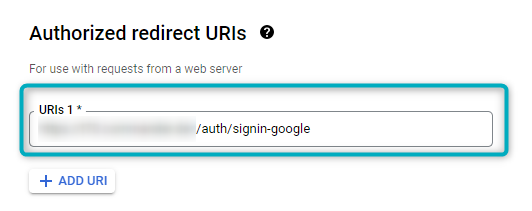
Figure 11 - Authorise Redirect URIs
This URI has the same base URI as the one used in Authorised Javascript Origins, after which the path is /auth/signin-{key created in configuration screen}. As the example above only includes one account, the key is “google”. However, if the project/app has multiple accounts, the key will depend on the specific account being selected.
Once the credentials have been configured, click the CREATE button (found at the bottom of the screen). The following popup window will open, providing the Client Id and Client Secret (Figure 12):
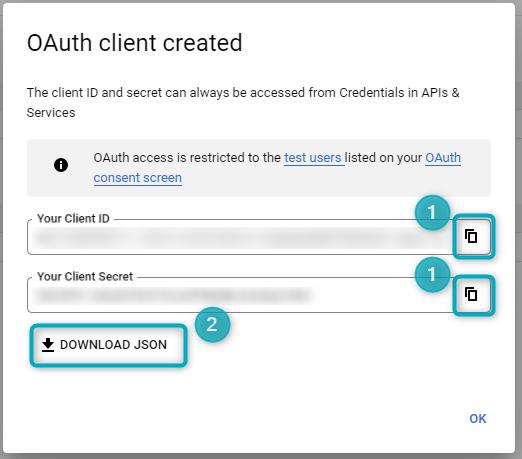
Figure 12 - Client Id and Client Secret
- To Copy the Client Id and/or Client Secret, click on the icon to the right.
- To download the JSON file to another folder, click on DOWNLOAD JSON.
The Client Id and Client Secret will be available in this popup whenever needed.
Configure Google Cloud Environment in Commander
To set up an identity provider per account in Commander, refer to the Google Cloud Account Identity Setup.
Role augmentation
The next step in the integration configuration is linking roles and permissions created in the Google Console account to the related Commander account.
This section will show how to link roles and permissions. It will cover the following main steps:
In Google Cloud Console and Google Admin Console:
- Set up and configure a Google Cloud account.
- Configure Google Credentials and link them to the Google Cloud account.
In Commander:
- Create an OAuth Service and link Google Credentials.
- Create User Groups and Entity Access Groups and link them to the relevant OAuth Service role.
- Configure Commander’s Google external login to update with the new Google Cloud account details.
| A Google Cloud account can only be created (and roles and permissions can only be linked to Commander) once the user has set up the OAuth Consent Screen shown in the first part of this document. |
Set up your Google Workspace account
To set up a Google Workspace account, create a Google Cloud Identity for the organisation in order to assign roles and permissions related to the relevant application.
To start setting up the Google Cloud Identity, sign into Google Cloud console and choose the related project:
Clip 4 - Sign in and start setup for Google Cloud Identity
- From the Welcome page in Google Cloud console, click on the Projects dropdown at the top left of the page.
- In the window that opens, select the relevant project.
- Once in the relevant project’s Welcome page, navigate to the menu icon found at the top left of the page. Expand the menu.
- In the expanded menu, hover on “IAM & Admin” and then select “Identity & Organization” in the dropdown that opens to the right.
This will open the “Set up Google Cloud for your organization” window. Click on GO TO THE CHECKLIST:
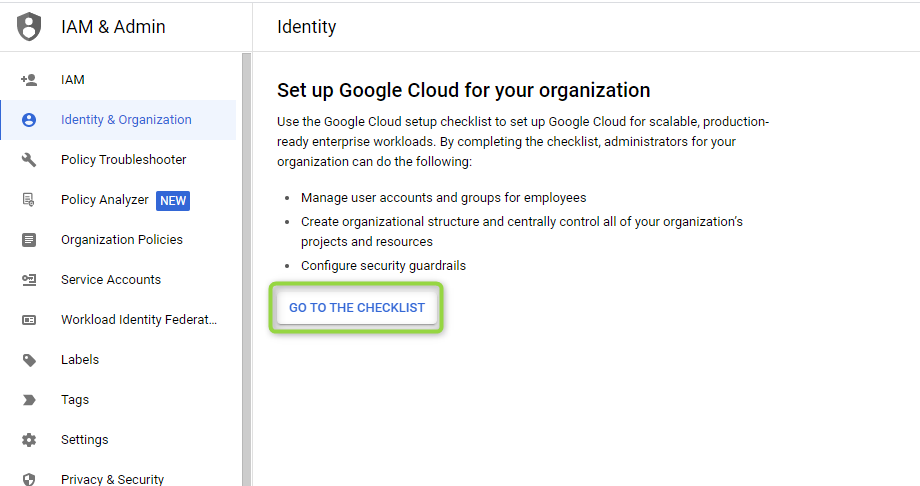
Figure 13 - Go to the Checklist
A window will open that prompts the user to BEGIN THE SETUP. Click on the button to start the setup:
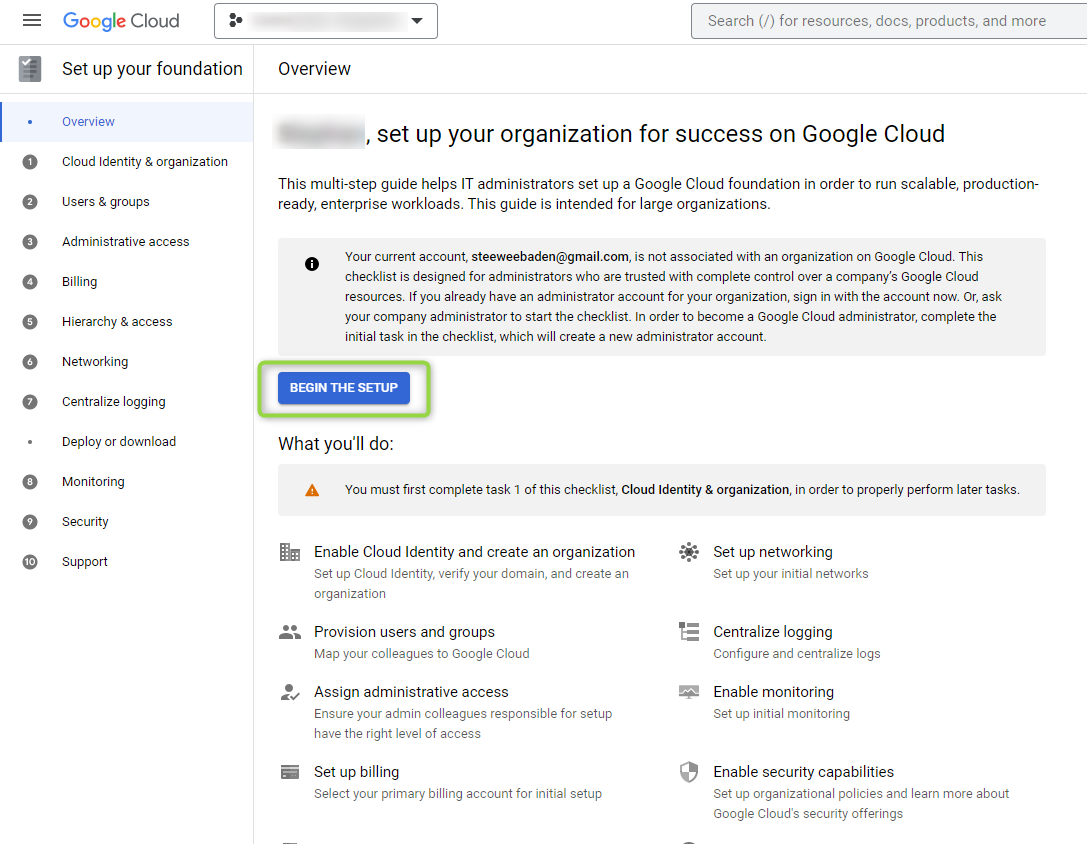
Figure 14 - Begin the Setup
This will open a window that asks the user to “Sign up Cloud Identity and verify your domain”. Click on SIGN UP FOR CLOUD IDENTITY:
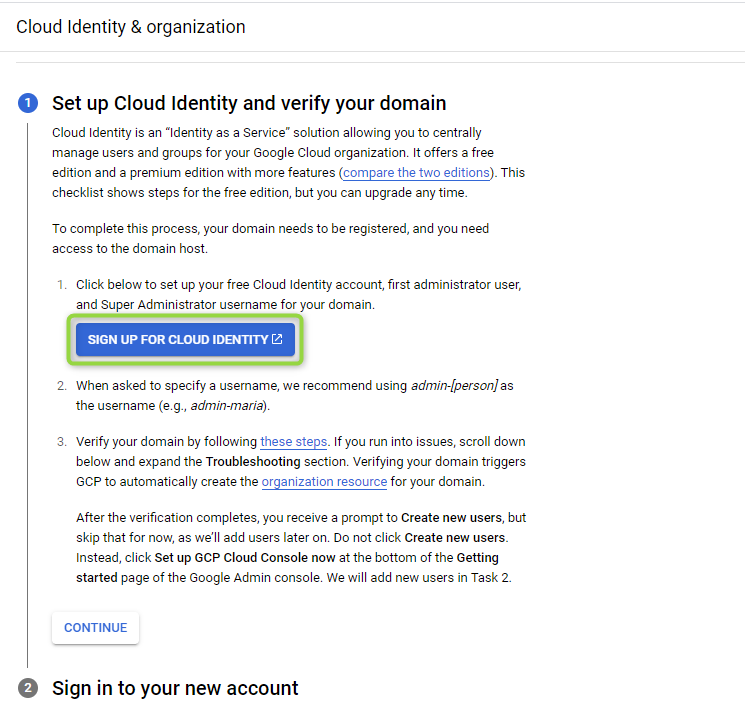
Figure 15 - Sign up for Cloud Identity
A separate window will open that prompts the user to create a profile with a business name, business domain name and contact information:
Enter the business’s name (1), number of employees (2), and region (3). Then click
NEXT: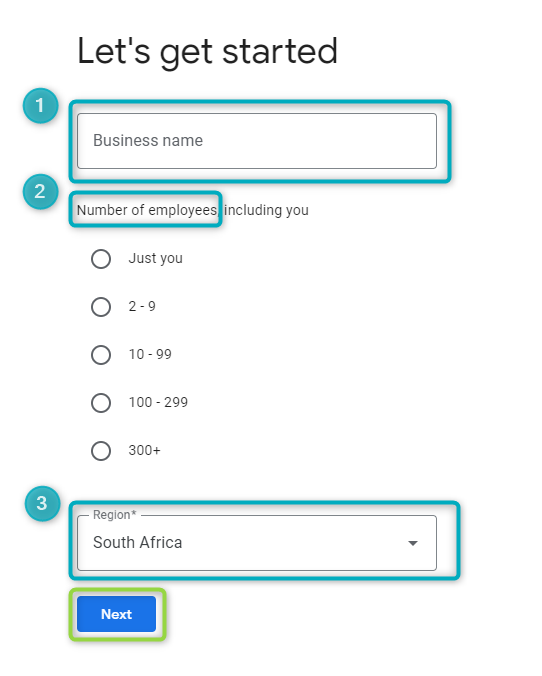
Figure 16 - Create Profile - 1
Provide contact information. Note that this will be contact information of the person who will be the admin for the Google Workspace account. This will normally be the lead of the project. The “Current email address” is the designated person’s current email, this is not the email that will be created once the Cloud Identity has been created. Once the fields have been entered, click on
NEXT: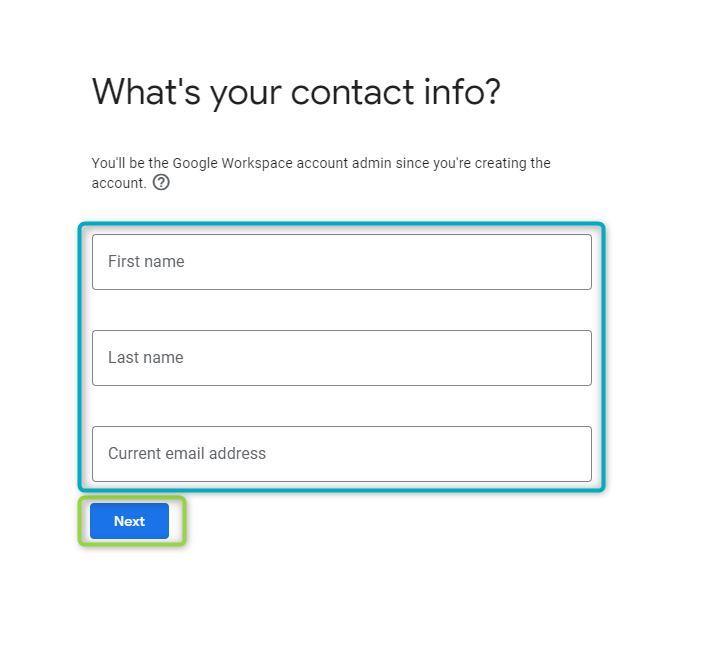
Figure 17 - Create Profile - 2
Enter your business’s domain name. This domain will be used to set up custom Google Cloud Identity email addresses. Add the domain and click
NEXT:
Figure 18 - Create Profile - 3
The next page will confirm the business domain. The domain provided in the previous step will automatically generated and the user will be prompted to confirm the domain name by clicking on
NEXT: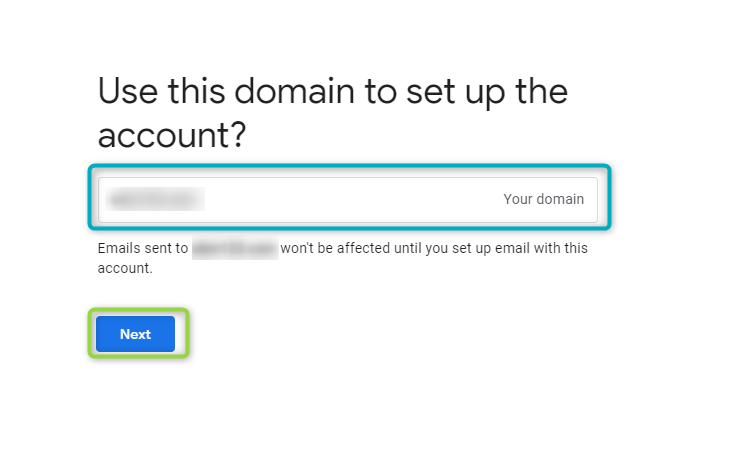
Figure 19 - Create Profile - 4
The two pages that follow allow the user to opt-in or opt-out of emails and notifications related to Google Workspace features. This will apply (1) to the individual setting up the account as well as (2) other users linked to the Google Workspace account:
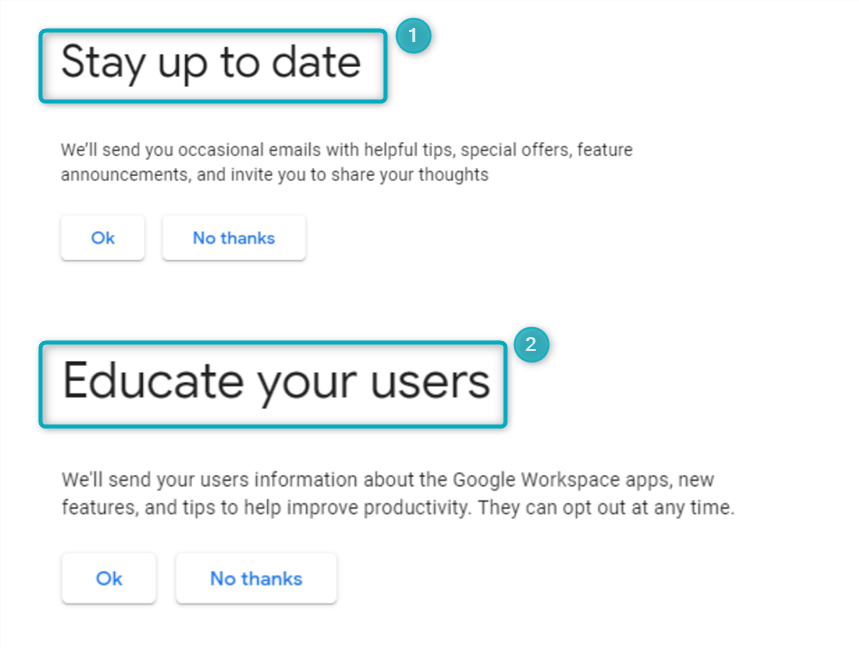
Figure 20 - Create Profile - 5
“How you’ll sign in” lets the user configure the email address and password that they will use to sign into the newly created Google Workspace/Cloud Identity account. Provide the name of your email address (1) as well as a password for this address (2), click on “I’m not a robot” and then
Agree and Continue: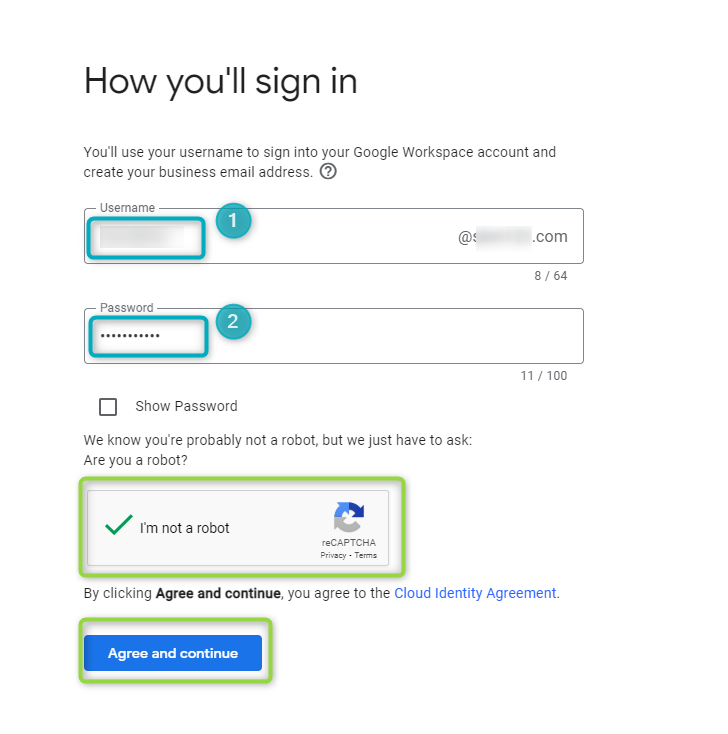
Figure 21 - Create Profile - 6
A window will open that welcomes the user to their new account. It will include the new account’s email address (1) and business domain (2). Click on
I understandto continue: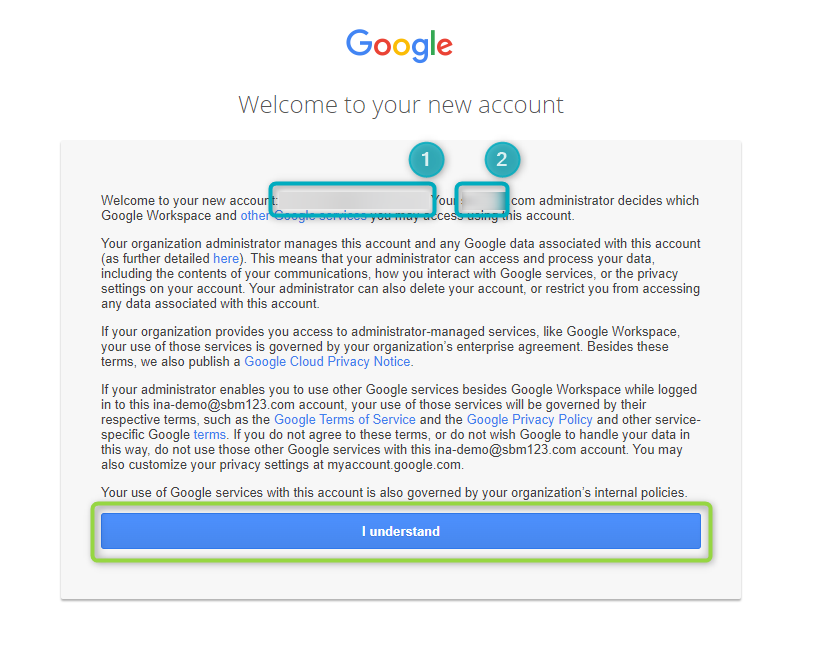
Figure 22 - Create Profile - 7
You are now in the Admin Console. Click on
NEXT: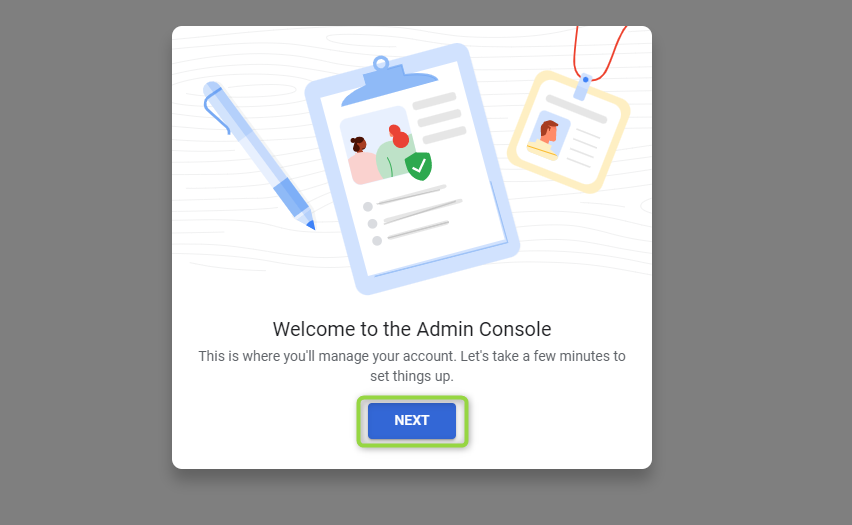
Figure 23 - Create Profile - 8
Once in Admin Console, the user will be prompted to verify and protect their business domain.
| The steps that need to be followed to complete this portion of the configuration will need to be completed by the client. For more information about how to verify a domain, contact your business’s web hosting provider. |
To start this process:
Click on
PROTECTin the “Protect your xxx.com” section: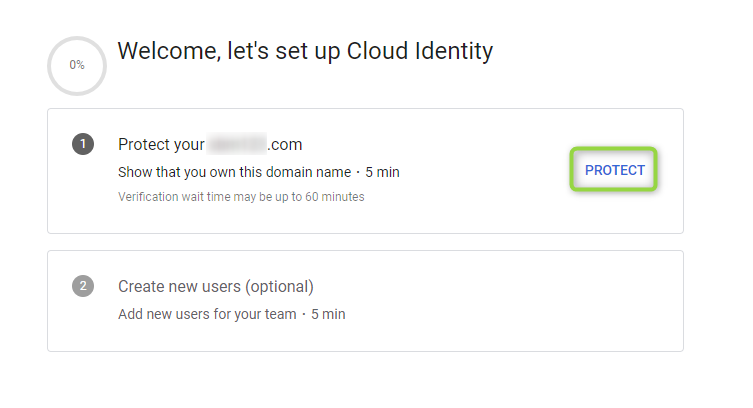
Figure 24 - Protect Domain 1
Click on
I'M READY TO PROTECT MY DOMAIN: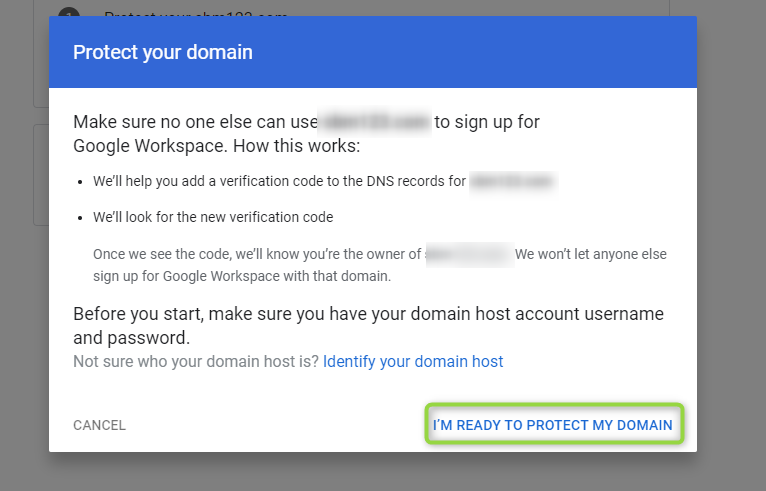
Figure 25 - Protect Domain 2
In “Find your DNS records or settings”, use information obtained from your web hosting provider to complete this step in the verification process. Once configured, click on
NEXT: GO TO STEP 2: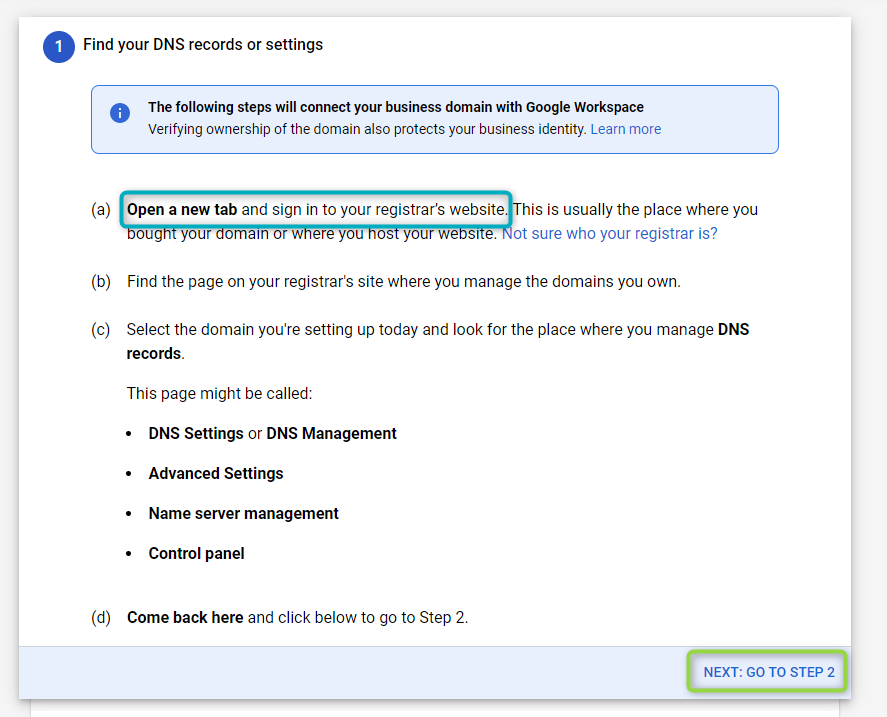
Figure 26 - Protect Domain 3
In “Add verification record”, use the verification code obtained from your registrar to complete the verification process. Then click
PROTECT DOMAIN: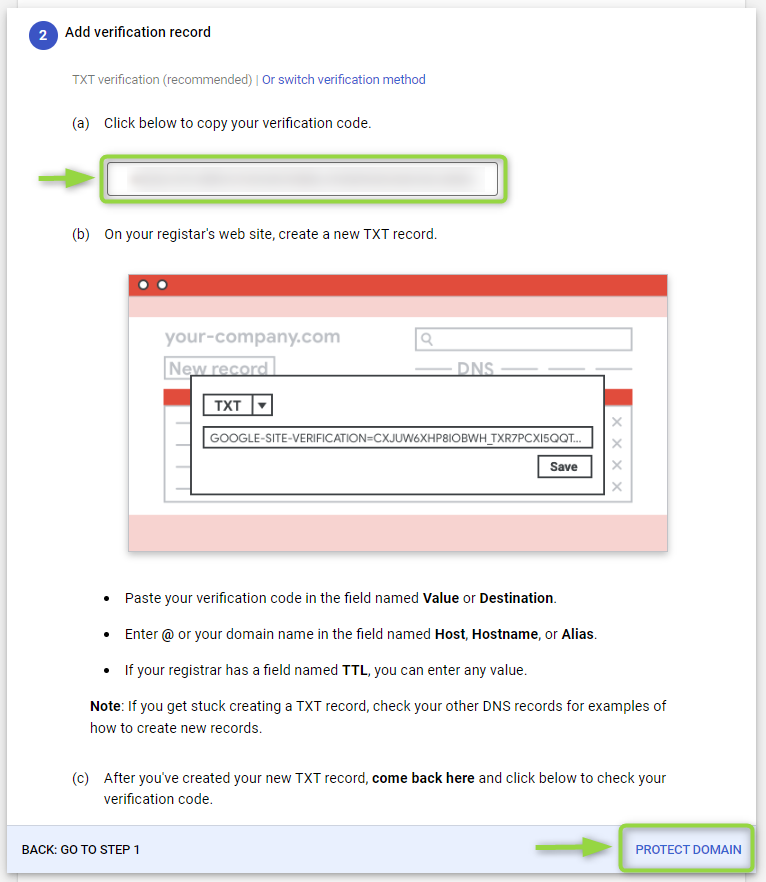
Figure 27 - Protect Domain 4
Add Users to your Google Workspace account
In the “Getting Started” page of the Admin Console of the newly created Google Workspace account, navigate to the main menu icon found at the top left of the page:
Clip 5 - Add Users in Admin Console
Once the main menu has expanded, click on the “Directory” dropdown and then on “Users”. This will open the “Users” page on the right, which shows a list of users and provides the option to “Add new user” (1), “Bulk update users” (2), “Download users” (3) and more (4):
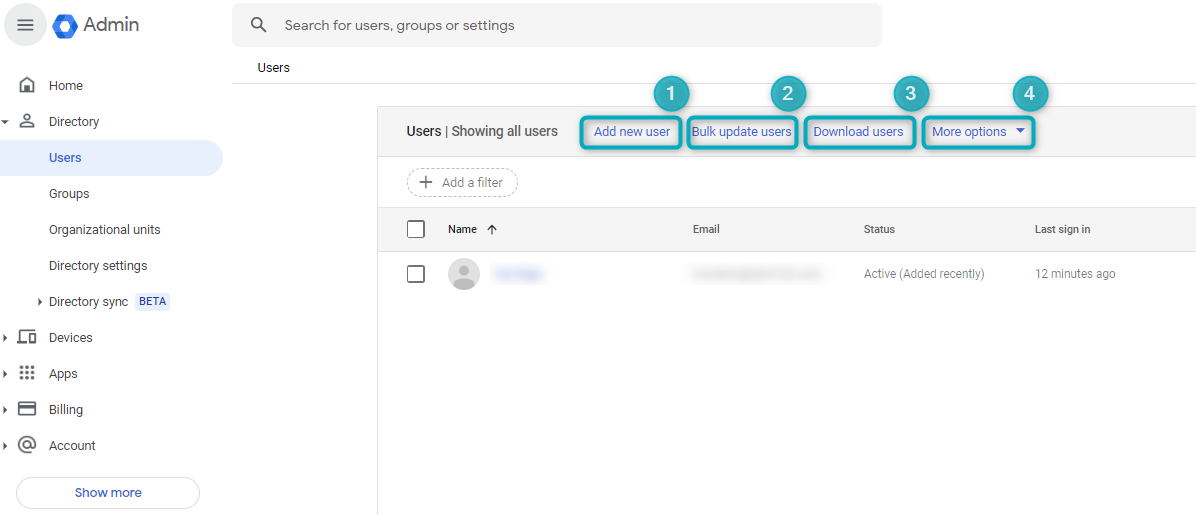
Figure 28 - Admin Console - Users Page
| The steps shown above only provide an overview of what can be configured in this account. The client will be responsible for the configuration of advanced settings, including assigning roles and permissions to users. |
Create Google Credentials
Credentials created in this account will include the Client ID and JSON file necessary to perform the final role integration with Commander. It consists of two steps:
- Create a Service Account in Google Cloud Console.
- Link the new Client ID to Domain Wide Delegation (in Google Admin Console).
Create a Service Account in Google Cloud Console
In Google Cloud Console, navigate to APIs & Services found in the main menu (found at the left of the screen).
Once the Service Account page has been opened, configure the Service Account that will be linked to the newly created Cloud Identity:
- Provide a name for the Service Account.
- The Service Account ID will be automatically generated.
- Provide a description of the Service Account.
- Click on
CREATE AND CONTINUE. - Click on
DONE.
Once the Service Account has been created, generate a new key related to this account:
- Navigate back to the list of Service Accounts and select the newly created account.
- Open the “KEYS” tab and click on
ADD KEY. This will open a window that allows you to create a new key. - Click on “Create private key for [Service Account Name]”.
- For the Key Type, select JSON.
- Click on
CREATE. - A prompt will notify the user that the private key has been saved to their computer.
The clip below shows an overview of these steps:
Clip 6 - Create a Service Account and Key
| Users should save the private key to their computer as it will be used in later steps when integrating this account with Commander. |
Link Client ID to Domain Wide Delegation (in Google Admin Console)
In Google Admin Console (using the new Cloud Identity and account created in previous steps), navigate to the main menu found at the left of the page:
- Scroll down the main menu and select “Show more”.
- Hover on “Security” and then in the expanded menu, select “Overview”.
- Once the Overview page has opened on the right, scroll down and select API Controls.
- In API Controls, scroll down to Domain Wide Delegation and click on
ADD NEW.
A window will open called “Add a new client ID”:
- Select from JSON file or Unique ID (this can be found in the JSON file or under Service Accounts - see Where to find Client ID below).
Add the following OAuth scopes:
https://www.googleapis.com/auth/admin.directory.userhttps://www.googleapis.com/auth/admin.directory.grouphttps://www.googleapis.com/auth/admin.directory.rolemanagement
- Click on
AUTHORIZE.
The clip below shows an overview of these steps:
Clip 7 - Link Client ID to Domain Wide Delegation
Where to find Client ID
Once the Client ID has been created in Service Accounts and linked to Domain Wide Delegation, it can be retrieved in the following ways:
| Platform | Page (navigation) |
|---|---|
| Cloud Console | Service Accounts -> Select relevant account -> Details (labelled as “Unique ID”) |
| Saved JSON file | The JSON file saved when creating a private key under Service Accounts contains the Client ID. This will be saved to the user’s computer. |
| Admin Console | Security -> Overview -> API Controls -> Domain Wide Delegation -> Client ID next to API Client name (once this has been activated). |
Create OAuth Subscription in Commander
To integrate the newly created Google Credentials, open the relevant Commander account:
Clip 8 - New OAuth Subscription
- Expand the main menu on the left of the page and select “OAuth config”. This will open the OAuth Subscriptions page on the right.
- Select
ADD OAUTH SERVICE. - In the page that opens, click on the Google icon and then click
NEXT.
The Google Credentials window will open:
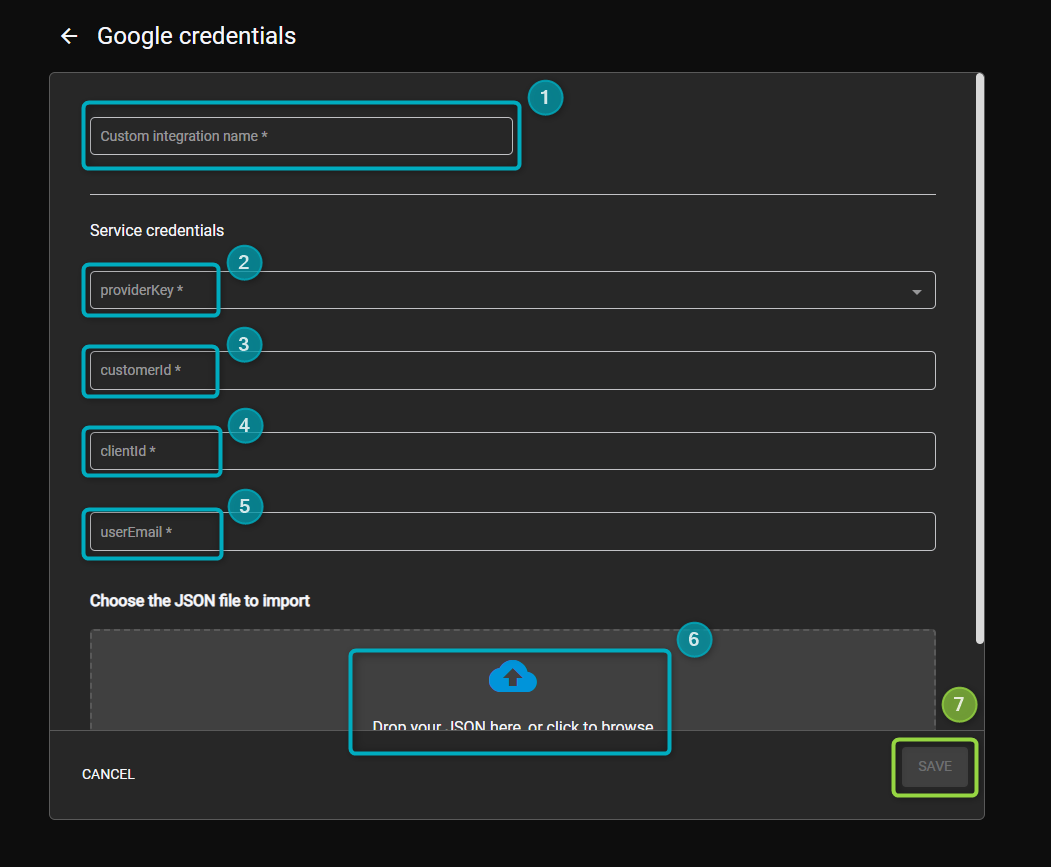
Figure 29 - Configure Google Credentials
- Custom Integration Name - provide a name for this OAuth Subscription (integration).
- providerKey - click on the dropdown and select the relevant Google login. The options available will depend on settings configured in the Authentication Configuration page in Commander (for more see Configure Google Cloud Environment in Commander).
- Customer ID - this ID is found in Google Admin Console under Account Settings -> Profile -> Customer ID.
- Client ID - the unique ID created in Service Account (Google Cloud Console). See Where to find Client ID for more.
- User Email - this will be the email address of a user that has ADMIN/SUPERADMIN permissions in Google Admin Console. To check whether the user has the correct permissions, go to Admin Console -> Users -> Admin Roles & Privileges.
- JSON file - upload the JSON file that was downloaded while configuring the Service Account (in Google Cloud Console). For more see Create a Service Account in Google Cloud Console.
- Click on
SAVE.
Navigate back to the Account Manager landing page on Commander:
- Select “OAuth config” from the main menu on the left side of the page.
- Once the OAuth Subscriptions page has opened, select the newly created subscription from the list of OAuth Subscriptions. This will open the relevant subscription’s page.
- Roles found on the subscription’s page will correspond with roles created in Google Admin Console by the client.
Create User Groups and Entity Access Groups to Link to OAuth Subscription
The newly created OAuth Subscription in Commander (shown in the section above) is the first step to full integration of Commander and Google accounts. Once this step has been completed, the user will be able to see all the roles that have been created in Google Admin Console under this new OAuth Subscription. The next step is to link these roles to User Groups and Entity Access Groups in Commander.
| Commander does not link roles created in Google Admin Console directly to roles in Commander. Roles created in Google Admin Console are linked to the relevant Commander account via User Groups and Entity Access Groups. |
Create User Groups
Navigate to the Commander Account Manager landing page. In the main menu, select User Groups and in the page that opens click on CREATE. The “Add User Group” page will open:
- Name - provide a name for the User Group that will be linked to your OAuth Subscription roles.
- Roles - the dropdown provides available roles in Commander that can be linked to the User Group. Select the relevant roles. Multiple roles may be selected.
- Applications - the dropdown provides available applications in Commander that can be linked to the User Group.
- Group enabled - enable the User Group.
- ADD - click on
ADDto create the User Group.
Create Entity Access Groups
Navigate to the Commander Account Manager landing page. In the main menu, select Entity Access Groups and in the page that opens click on CREATE. The “Add Entity Access Group” page will open:
- Name - provide a name for the Entity Access Group that will be linked to your OAuth Subscription roles.
- Description - describe the Entity Access Group.
- Entity Access - the dropdown will provide available entities that have been created on the user’s account. Select the entities that need to be linked to this group (and OAuth Subscription).
- ADD - click on
ADDto create the Entity Access Group.
Link Roles in OAuth Subscription to User Groups/Entity Access Groups
Once User Groups and Entity Access Groups have been created, the user can link these groups to roles in a selected OAuth Subscription.
Navigate to the Account Manager landing page (Commander) and select OAuth Config from the main menu (found at the left of the page). In the OAuth Subscriptions page that opens:
- Select the relevant OAuth Subscription from the list of subscriptions.
- In the subscription’s page, select the role to which the User Group and/or Entity Access Group will be linked.
- Click on the Edit icon. This will open the “Role name” page.
In the “Role name” page:
- Groups - the dropdown will provide available User Groups to which the role may be linked. Select all relevant User Groups.
- Entity Groups - the dropdown will provide available Entity Access Groups to which the role may be linked. Select all relevant Entity Access Groups.
- SAVE - click on
SAVEto save the role’s edits.
Navigate back to the subscription’s page. The table will show all User Groups and Entity Access Groups linked to roles related to this subscription.
Link Google Cloud Identity to Commander Login Providers
In order to log into the Commander account using the new Google Cloud Identity (Google Admin Console account):
- Click on the user profile icon found at the top right of the page in Commander.
- In the menu that opens, select Security.
- Select Login Providers.
- The Commander login page will open. Click on the Google icon under “Link your External Login” (“Manage External Logins”).
- The Google login page will open with options to login with different Google accounts. Select the account that was created while creating your Google Cloud Identity.
Once logged into Google Admin Console with the relevant Google account, navigate to the main menu:
- Under “APPs”, select “Google Workspace”.
- On the right of the page, scroll down all Google Services (under “Additional Google Services”) and find GMAIL.
- Click on the GMAIL icon and then click on
ADD SERVICES.
| This last step can only be performed if the user’s organisation has a Google Workspace subscription and the linked domain has been verified. |