
Livestream widget setup
Jan 1 2022 at 12:00 AM
Overview of Commander™ Functions
Introduction
The purpose of this document is to help the Commander™ user setup Livestream video and the prerequisite software.
Required software and licenses
The Livestream widget needs Mersoft Move and Mersoft Stream servers to be setup and configured on the tenant. For more information about the Mersoft products please visit https://www.mersoft.com
Setup instructions for Mersoft Move and Mersoft Stream
The below instructions can be used as a guide to setup Mersoft Move and Mersoft Stream, however for more detail please visit the Mersoft website.
- Download Mersoft Move: https://s3.amazonaws.com/install.move.mersoft.com/move.tar.gz
- Install with command: tar xzf move.tar.gz
- Start Mersoft Move:
- cd move
- ./move.sh start
- Download Mersoft stream: https://s3.amazonaws.com/install.move.mersoft.com/stream-1.4.0-linux.tar.gz
- Install with command: tar xzf stream-1.4.0-linux.tar.gz
- Add license key by editing the file stream/conf/env.js
- Under the line, "global.authorization_keys = ["STREAMDEMO2018"];"
- Add the license key
- global.license_key = "XXXXXX"
- Where XXXX is the license key provided.
- Start Mersoft Stream
- cd stream
- ./stream.sh start
- Edit the public/moveSecurity.js and replace the IP addresses on lines 3 and 4 with the server's IP address
- var streamURL = 'https://SERVER_IP:4443';
- var movePushURL = 'wss://SERVER_IP:3443/ws';
- Visit the following URL's and accept the certificate
- Navigate to the URL https://SERVER_IP:4443/static/index.html to test
Commander™ setup
Tenant environment settings
- Authentication code: Authentication code as generated from the Mersoft server setup
- Stream server: Mersoft stream server (Ex. https://SERVER_IP:4443)
- Web socket server: Mersoft stream server (ex. wss://SERVER_IP:3443/ws)
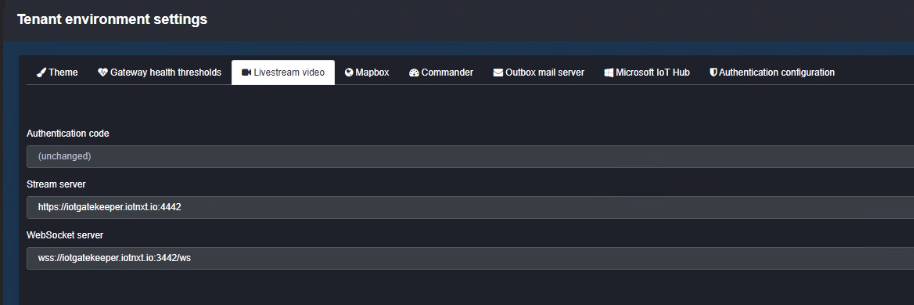
Figure 1 - Tenant environment settings
Livestream video widget setup
Entity setup
For each camera that will be linked to a Livestream Widget a Static endpoint with data type 'Livestream video' must be created in Entity management. The value of the Static endpoint should be the address of the camera (rtsp://192.168.0.1) as specified in Mersoft.
- In Entity management go to the Entity group where the endpoints should be created.
- Create an endpoint with Entity sub-type Static.
- Change data type to Livestream video.
- Set video URL to URL as retrieved from Mersoft server.
Widget subscription
A Livestream widget must be added for each camera
- Open the Dashboard view where the Livestream widget must be added.
- Change the view to Design mode.
- Drop a Livestream widget onto the view.
- Drop the static endpoint onto the widget to confirm the subscription.
The following properties are can be set for each Livestream widget:
- Auto-play enabled : If this property is set then the video will automatically play when the Dashboard view is opened, otherwise the user will have to click on the video to start playback
- Show timer – Show timer on the widget that counts down until the timeout is reached.
- Timeout duration (Min) – Time until Live video is stopped, specified in minutes.