
Webhook Integrations
Jul 3 2022 at 12:00 AM
Webhooks introduction
A webhook is a method of augmenting or altering the behaviour of a web page or web application with user defined HTTP endpoints that are triggered by an event. Webhooks allow you to manage what happens when an event is triggered in real-time.
Please Note: Webhooks are hidden behind a feature flag on the Commander™ platform. If you do not see this feature enabled on your account, please get in contact with your IoT.nxt® representative.
Webhook Environment Thresholds
Webhooks have configuration settings that allows various thresholds to be configured, please note that these setting are not user configurable. Please speak to your IoT.nxt® representative should you have a specific need to configure these settings.
When you create a webhook, its values cannot exceed the maximum values specified in the webhook Environment Threshold.
Enable Batching: Enable batch sending of webhook requests
Maximum batch size: Specify the maximum batch size for webhook requests
Maximum batch wait time (seconds): Specify the maximum batch wait time for webhook requests
Enable Retries: Enable webhook request retries should a request fail
Retry count: Specify the number of retry attempts before failing the request. A retry attempt does not count towards maximum consecutive failed attempts
Maximum consecutive failed attempts: Specify the number of failed attempts before failing the webhook request. Once this threshold is reached, the webhook will be placed in a inactive status and will need to be updated form the Commander™ Portal to bring it out of this state
Data expires in (days): Specify how many days before cached webhook data expires
Working with Webhooks
Webhooks are created using the Portal App on the Commander™ platform. If you do not see the webhooks menu on your Commander™ portal, please get in contact with your IoT.nxt® representative.
History
The History tab shows you previous executions of your various Webhooks. Data is grouped by webhooks and includes the webhook description and URL that the webhook resolves to. The main function of the history tab is to help you identify problems and when they happened.
To see the request breakdown for a webhook, simply click on the webhook name and a drop-down screen will display a detailed history of the webhook’s most recent requests. Columns can be filtered, and you can search per column if you know what you are looking for.
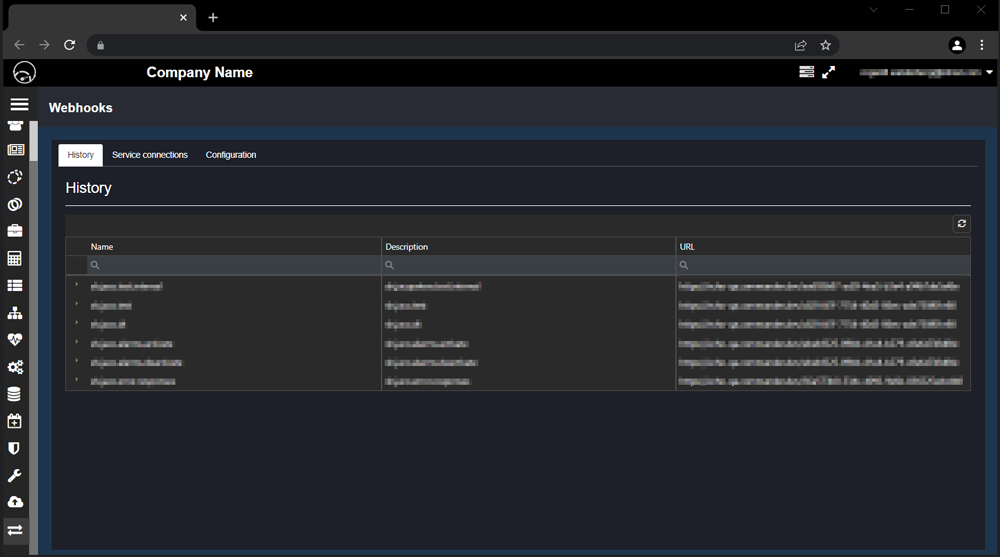
Figure 1 - Webhook request history
Date: Indicates the date and time of the webhook request.
Status: When a webhook request executes normally, the status indicator will return ‘processed’, should an error occur, the status will read ‘failed’.
Reference ID: The Reference ID of the webhook request.
Response Status Code: Indicates the response status code for webhook requests. Response codes between 200 and 999 are treated as successful.
When a webhook request fails, the Status of that webhook will read ‘failed’. You can then click on the date and time of that failed request from where you will be able to see the Request and Response code that produced the error. For successful webhook requests, no Request or Response codes will be displayed.
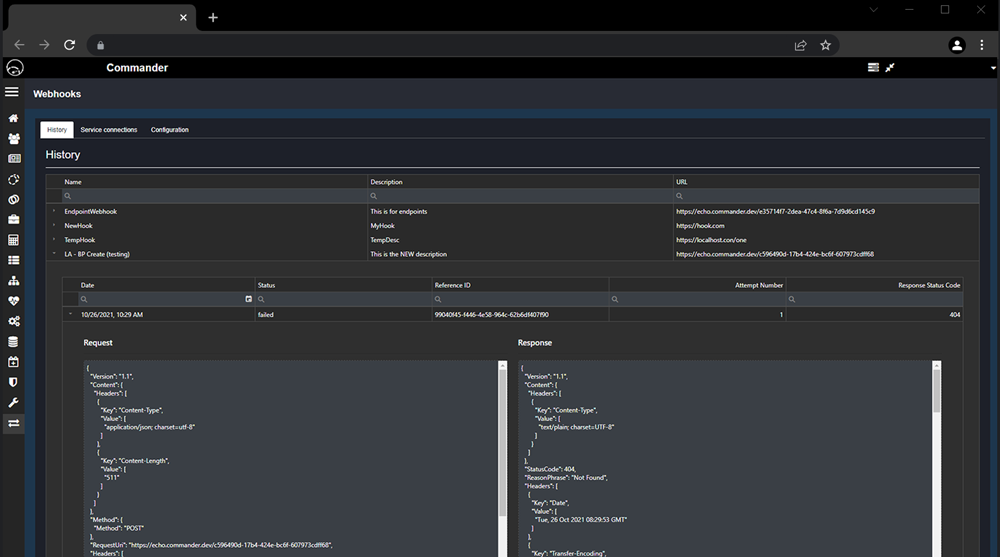
Figure 2 - Webhook request history
Service Connections
Before you can create a webhook, you first need to create a Service Connection for the webhook to use. A service connection is where you set up the authentication mechanism for the webhook and then use it across multiple webhooks.
The Service Connection screen displays your enabled and disabled service connections. You can also Edit, Delete, or Disable, Service Connections.
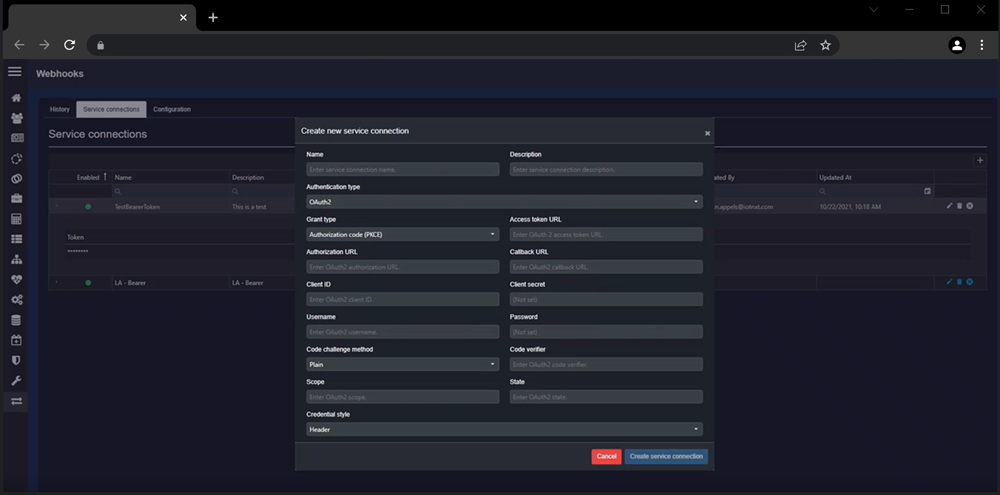
Figure 2 - Webhooks new service connection
Creating a Service Connection
To create a new Service Connection, click on the + symbol on the top right-hand corner of the Service Connections screen. Apart from the Name and Description fields, the information you need to enter will depend on the Authentication type you select.
Supported Authentication types:
- OAuth2
- Api
- Bearer
- Basic
Creating a Webhook
With a new Service connection created, click on the Configuration tab at the top of the Service Connections screen to create a new webhook.
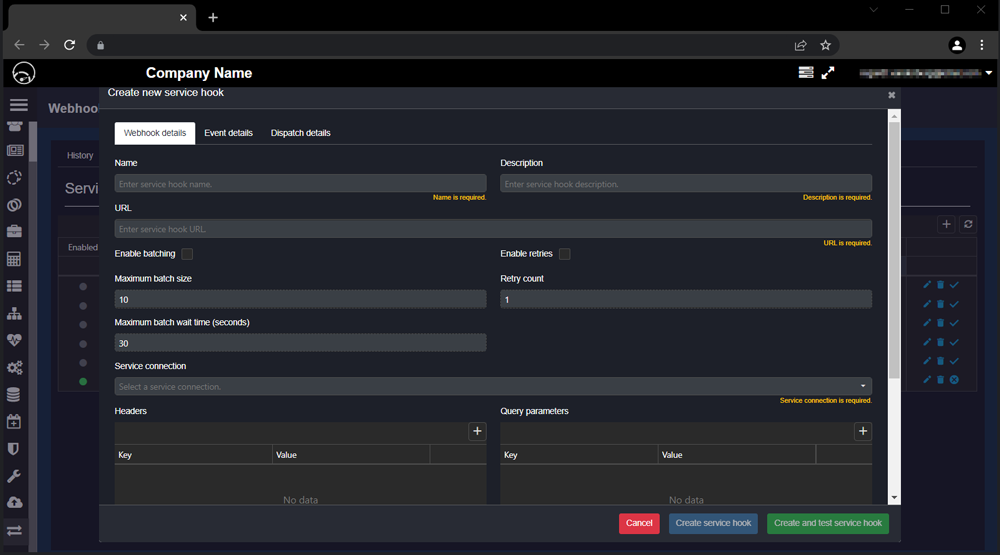
Figure 3 - Webhooks new service connection
Webhook details
The Webhook details section contain the working settings for the webhook. Some of the functions on this page are dependent on the Webhook Environment Thresholds.
Name: Enter service hook name.
Description: Enter service hook description.
URL: Enter the Service hook URL, this is the address where the HTTP request will be sent to.
Batching and retires
If these settings do not correspond with the Webhook Environment Thresholds, an error will be returned when the webhook is run. Retries can be enabled from the core portal, and then optionally overridden for each webhook.
A retry attempt will be triggered 60 seconds after the first request, multiplied by the retry attempt. For example, the first retry will be 60 seconds after the original webhook request. The second retry will be 120 seconds after the first try, the third retry will be 180 seconds after the second retry and so on.
Webhooks will be attempted a specified number of times per event before the webhook will be placed in a ‘disabled’ state. This can then only be rectified once the webhook is updated. This function can be configured on the core portal as the maximum number of consecutive failed attempts.
Enable Batching: Enable batch sending of webhook requests.
Maximum batch size: The maximum number of events that should be in a batch. A batch is guaranteed to never have more than this number of events however it can have fewer events. This cannot exceed the threshold defined for a tenant.
Maximum batch wait time (seconds): The maximum amount of time to wait before the batch is sent regardless of its size. This cannot exceed the threshold defined for a tenant.
Enable Retries: Enable webhook request retry, should a request fail.
Retry count: Specify the number of retry attempts before failing the request.
Service Connection: Select the relevant Service connection for the webhook.
Headers: The headers are used to provide additional information for the webhook request.
Query parameters: The query parameters are used to provide additional information for the webhook request.
Event details
The Event details screen is where you specify which types of events the webhook applies to. Events will be categorised per feature or function.
Event Category
You can select from these event categories:
Blueprint: When a new blueprint is created, or an existing one is updated or deleted.
Entity: When a new entity is created, or an existing one is updated, deleted data or a value change is received for an endpoint.
Digital Twin: When a digital twin template is activated, deactivate, migrated, or rolled out.
Dispatch Details
On the Dispatch details screen you can configure what the payload-body looks like when the webhook is triggered. The payload is essentially the body of the message that the webhook sends out and allows you to gather a range of information that relate to your webhook.
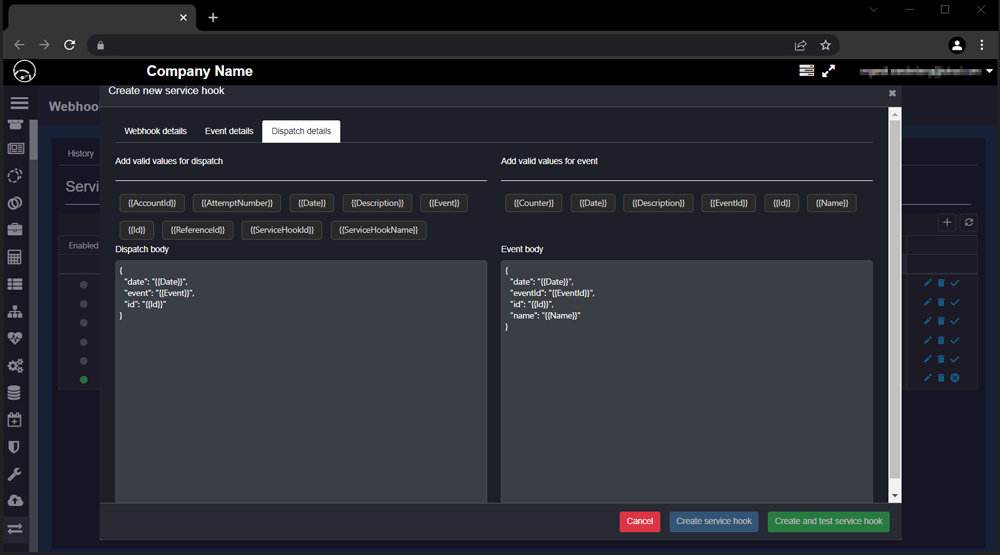
Figure 4 - Webhooks despatch details
When you use the Dispatch body template function, you can only change the property field of the values, you cannot add additional logic to the dispatch logic form. Only these templatised functions are allowed.
Dispatch body
{{AccountId}} : The account Id where the webhook is located.
{{AttemptNumber}} : This indicates the retry attempt number of the webhook request.
{{Date}} : The date and time on which the webhook is sent.
{{Description}} : The webhook description as listed on the webhook details screen.
{{Event}} : Placeholder for the Event body header
{{Id}} : A unique Id number that will be generated for each retry of the webhook request.
{{ReferanceId}} : This Id number will remain the same between retry requests and allows you to correlate various retry attempts.
{{ServiceHookId}} : The Webhook Id that is assigned when you create the webhook.
{{ServiceHookName}} : The Webhook name as listed on the webhook details screen.
Event Body
{{Counter}} : A counter to record the number of events.
{{Date}} : The date of the triggered event.
{{Description}} : Description of the entity value i.e. the entity’s endpoint description.
{{EventId}} : The Id of the event that triggered the Webhook.
{{EventMetadataBody}} : Placeholder for the Event metadata body header.
{{Id}} : A unique reference Id that is created for each event.
{{Name}} : The name of the entity that triggered the event
Event metadata body
A third panel will appear on the Dispatch details screen when you choose ‘Entity’ under Event category and select ‘Value’ from the Entity event type on the Event details screen on the previous tab.
{{Counter}} : A counter to record the number of event entity metadata.
{{Description}} : Description of the endpoint.
{{EventMetadataId}} : Indicates the ID of the endpoint.
{{EventMetadataName}} : Indicates the name of the endpoint.
{{EventMetadataValue}} : The value that was changed i.e temperature change.
{{Id}} : The unique Id for each metadata event.
Security
All data transmitted from Commander™ will be encrypted using TLS. An authentication type must be selected for each webhook service. Failed authentication attempts will result in failure and will contribute towards the failed consecutive attempts.