
RabbitMQ Setup and Config
Jan 1 2022 at 12:00 AM
- Installing RabbitMQ on Ubuntu
- Enable and use the RabbitMQ management console
- RabbitMQ Configuration
- Configuring Commander for RabbitMQ
- RabbitMQ Monitoring
- RabbitMQ Disaster Recovery Process
Installing RabbitMQ on Ubuntu
Update the system
Use the following commands to update your Ubuntu system to the latest stable status:
> sudo apt-get update
> sudo apt-get upgrade
Install Erlang
Since RabbitMQ is written in Erlang, you need to install Erlang before you can use RabbitMQ:
> cd \~
> wget http://packages.erlang-solutions.com/site/esl/esl-erlang/FLAVOUR\_1\_general/esl-erlang\_20.1-1\~ubuntu\~xenial\_amd64.deb
> sudo dpkg -i esl-erlang\_20.1-1\\\~ubuntu\\\~xenial\_amd64.deb
Verify your installation of Erlang:
> erl
You will be brought into the Erlang shell which resembles:
Erlang/OTP 20 \[erts-9.1\] \[source\] \[64-bit\] \[smp:8:8\] \[ds:8:8:10\] \[async-threads:10\] \[hipe\] \[kernel-poll:false\]
Eshell V9.1 (abort with ^G)
Press Ctrl+C twice to quit the Erlang shell.
Install RabbitMQ
Add the Apt repository to your Apt source list directory (/etc/apt/sources.list.d):
> echo "deb https://dl.bintray.com/rabbitmq/debian xenial main" | sudo tee /etc/apt/sources.list.d/bintray.rabbitmq.list
Next add our public key to your trusted key list using apt-key:
> wget -O- https://www.rabbitmq.com/rabbitmq-release-signing-key.asc\ | sudo apt-key add
Run the following command to update the package list:
> sudo apt-get update Install the rabbitmq-server package:
> sudo apt-get install rabbitmq-server
Start the Server
> sudo systemctl start rabbitmq-server.service
> sudo systemctl enable rabbitmq-server.service
You can check the status of RabbitMQ:
> sudo rabbitmqctl status
By default, RabbitMQ creates a user named guest with the password guest . You can also create your own administrator account on RabbitMQ server using following commands. Change the password to your own password, but it is important to retain the guest user when you first deploy the tenant as the RabbitBroker service on the stack will create its own secure users and passwords to access the RabbitMQ server.
Please Note: These users’ passwords can be set up manually in the configuration screen in IoT.nxt® portal. This is noteworthy when you are setting up a RabbitMQ server to be used for more than one Tenant. If no passwords are entered, then the system will randomly generate a password to set up in rabbit
Enable and use the RabbitMQ management console
Enable the RabbitMQ management console so that you can monitor the RabbitMQ server processes from a web browser:
> sudo rabbitmq-plugins enable rabbitmq\_management
> sudo chown -R rabbitmq:rabbitmq /var/lib/rabbitmq/
Next, you need to setup an administrator user account for accessing the RabbitMQ server management console. In the following commands, “mqadmin” is the administrator’s username, “mqadminpassword” is the password. Remember to replace them with your own.
> sudo rabbitmqctl add\_user mqadmin mqadminpassword
> sudo rabbitmqctl set\_user\_tags mqadmin administrator
> sudo rabbitmqctl set\_permissions -p mqadmin ".\*" ".\*" ".\*"
Now, visit the following URL:
http://<your-rabbimq-server-IP>:15672/
Log in with the credentials you had specified earlier. You will be greeted with the RabbitMQ remote management console, where you can learn more about RabbitMQ.
RabbitMQ Configuration
SSL Configuration
The RabbitMQ needs to be configured for SSL access as the platform will only communicate over a secure link. Configuration settings are shown below:
loopback\_users.guest = guest
listeners.ssl.default = 5671
ssl\_options.keyfile = /etc/rabbitmq/cert/privkey.pem
ssl\_options.certfile = /etc/rabbitmq/cert/cert.pem
ssl\_options.cacertfile = /etc/rabbitmq/cert/chain.pem
ssl\_options.verify = verify\_peer
ssl\_options.fail\_if\_no\_peer\_cert = false
handshake\_timeout = 60000

management.listener.port = 15672
management.listener.ssl = true
management.listener.ssl\_opts.cacertfile = /etc/rabbitmq/cert/chain.pem
management.listener.ssl\_opts.certfile = /etc/rabbitmq/cert/cert.pem
management.listener.ssl\_opts.keyfile = /etc/rabbitmq/cert/privkey.pem
Please Note: If the certificates expire, they can cause a break In connection from the stack to the RabbitMQ server. It is therefore important to monitor certificates for renewal, or set up a certbot-type automation to renew these certificates automatically.
Plugins
Additional plugins can be added to RabbitMQ to allow extra access and monitoring.
If you require mqtt access for RabbitMQ then you will need to add the mqtt plugin
> sudo rabbitmq-plugins enable rabbitmq\_mqtt
For monitoring and support purposes IoT.nxt® uses the following two plugins on all our RabbitMQ servers.
> sudo rabbitmq-plugins enable rabbitmq\_prometheus
> sudo rabbitmq-plugins enable rabbitmq\_top
Ports
The following ports will need to be opened for TCP and UDP on the firewalls:
- 15672 – RabbitMQ management console HTTPS port
- 5671 – Secure AMQP port
- 8883 – Secure MQTT port
Please Note If mqtt is required then the rabbitmq_mqtt plugin must be added to rabbit installation as well as the following config:
mqtt.exchange = topic
mqtt.subscription\_ttl = 1800000
mqtt.listeners.tcp.default = 1883
mqtt.listeners.ssl.default = 8883
Access through a firewall.
The following URL’s will need to be opened through your firewall to allow the IoT.nxt® platform to send data from the edge to the main platform:
Green queue server: DNS: greenqueue.prod.iotnxt.io
Ports:
  5671 (AMQP)
  8883 (MQTT)
Red queue server: DNS: <<tenantid>>-queue.tenant.prod.iotnxt.io
Ports:
  5671 (AMQP)
  8883 (MQTT)
Configuring Commander for RabbitMQ
Please Note: It is recommended where at all possible that the hostnames are used to exit the firewall as opposed to IP addresses as the IP address can change if the service is moved between data centres or redeployed to a different cloud. This might be done due to performance enhancements or due to service failover and redundancy.
All data in the environment is passed between services and collected from gateways using rabbit queues. All gateways and services are registered through the green queue on the core server to get secure credentials to the tenant RabbitMQ server.
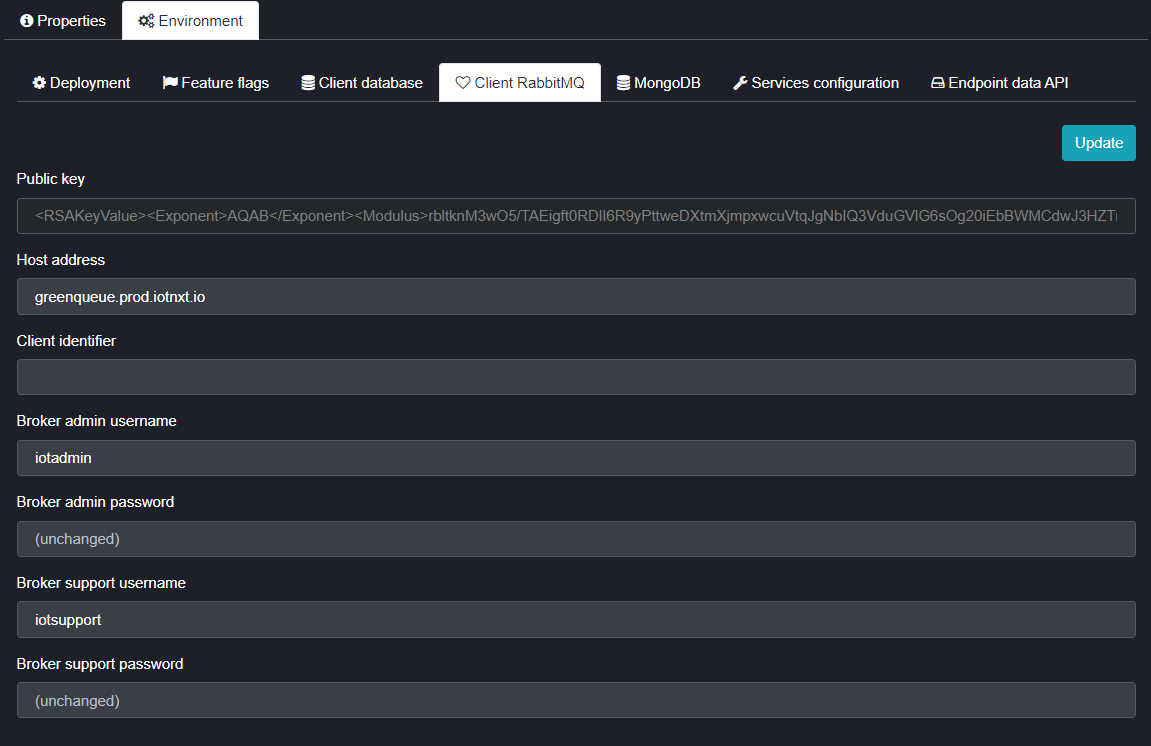
Figure 1 - Client RabbitMQ configuration screen
The production green queue is configured at setup, but for the time being the system assumes a fixed URL for each tenant server. As such, once the RabbitMQ server has been setup and is running, the public IP address needs to be given to the IoT.nxt® DevOps team to allow them to set up the necessary DNS entries. (example of the URL is in the firewall access section)
Fields
- Public Key This is the public key used to access the Green server for authentication of gateways.
- Host Address This is the URL used to point to the RabbitMQ server where our green queue is hosted.
- Client Identifier This is the Tenant ID for this Tenant (i.e. t000000001)
- Broker Admin Username This username is set up on RabbitMQ by the system as an Admin User.
- Broker Admin Password This is the password set up for admin users. If this field is left unchanged then the system will automatically generate a random password on creation of the user, the first time.
- Broker Support Username This is a support user that can be used by support teams to login, investigate issues and monitor the RabbitMQ server.
- Broker Support Password This is the password set up for support users. If this field is left unchanged then the system will automatically generate a random password on creation of the user, the first time. This is however not recommended as the team will not know what the password is.
RabbitMQ Monitoring
The RabbitMQ server is responsible for all communication in the system therefore should the system be offline, the screens may not load correctly or very slowly and the alarms might not load or trigger on time.
The RabbitMQ environment is responsible for all communication between services running on the tenant’s cluster as well as all services communicating to the cluster or receiving messages from the cluster.
As such this environment needs to be closely monitored as it will not only show when something is wrong with the messaging layer, it will also show early warning signs of services inside the cluster not functioning correctly.
Monitoring is possible through a number of tools. It is up to the technical team responsible for monitoring to decide which tool they will use. The IoT.nxt® team uses the following tools for monitoring and alerting.
Prometheus
The Prometheus database is used to collect metrics from any configured RabbitMQ servers and store the metrics for alerting and monitoring. While there are many metrics available through this interface, the following metrics are generally used to monitor a RabbitMQ server on a high level:
- Message count per node
- Message count per queue
- Connection count by node
- Memory usage by node
- Disk usage by node
- Messages delivered
- Messages acknowledged
Grafana
IoT.nxt® uses Grafana as a consolidated dashboard for our teams to be able to check into what is happening on our RabbitMQ servers. All our dashboards are customised to suit our needs. If required, these can be exported and shared with a customer’s support team.
Datadog
Datadog is a solid alternative to Prometheus and Grafana. The upside to this system is that it is the datastore and dashboard in one. It is however not free and is set up as a managed service which means you pay a license fee per agent that you deploy onto any given server. It is, however, easy to establish and get running and because it is a managed service you do not have to carry the cost of hosting the server to be able to run Prometheus and Grafana.
Alerting
Alerting can be set up on all three of the above-mentioned tools and should be used as an early warning system to identify when something is going wrong or something is simply not functioning correctly.
RabbitMQ monitoring in detail
There is a comprehensive description of the monitoring capabilities and list of metrics and available monitoring tools listed below:
https://www.rabbitmq.com/monitoring.html
https://www.datadoghq.com/blog/rabbitmq-monitoring/
RabbitMQ Disaster Recovery Process
The RabbitMQ system is the queueing engine used to pass all data into and out of the client’s environment as well as passing messages within the environment itself. If this server is offline or compromised in any way, the messages stop flowing and the screens and alarms might not operate as required. Since the server does not usually carry any historic data on it and due to their high availability option having other major problems with connections and performance, this system only run on a single node. We do, however, monitor all queues on the server.
Alarms are raised if:
- A message queue is building up.
- The URL does not respond fast enough.
- RabbitMQ memory or disk space is to high.
- RabbitMQ connections or file descriptors are too high.
- Any of the other normal server metrics are compromised.
Fail Over Plan (New Server)
In the event of a major server outage on any rabbit server that can’t be addressed by normal troubleshooting and support within the first 30 minutes the rabbit server can be rebuilt from the ground up.
This however, can take up to an hour to achieve on occasion so to prevent too much downtime we will switch the live environment to use a secondary RabbitMQ server (shared with other queues) temporarily, and then switch the system back once the new server has been brought back online.
This can be achieved by changing the IP address that the DNS is pointing to.
Then setting up the necessary admin users and passwords on the tenant being recovered in the Portal and deploying the tenant again. This process will automatically connect the tenant services to the allocated RabbitMQ server, and the queues will start operating there as before.
Since all queue traffic is set up using vhosts within the RabbitMQ environment, all queues belonging to each of the tenants sharing the server are kept separate from each other so there is no chance of cross-contamination of any queues.
Possible time of outage:
- 30 minutes support time
- 5 minutes fail over to secondary and 5 minutes to switch back at a scheduled time.
- 15 minutes of validation and testing
Fail Over Plan (Standby Server)
As stated previously - in the event of a major server outage on any Rabbit server that can’t be addressed by normal troubleshooting and support within the first 30 minutes the rabbit server can be switched to point at another server by changing the IP address associated to the server DNS.
In some cases, the customer might want to keep a backup server running for fail over purposes. The server will need to be maintained as a normal production server and kept ready to go at a moment’s notice.
Seeing as this is a dedicated server for that single tenant it may not even be necessary to reconfigure the server settings, the services would simply need to be restarted to establish the new connection.
Please Note: The RedQueueBroker service would need to be restarted first to configure the RabbitMQ server before the rest of the services try to connect.
Possible time of outage:
Outage times will vary depending on the state of the standby server.
- A customer could have the server ready but switched off, in which case it would need to be booted up first.
- The server could keep running all the time and the only delay would be caused by the DNS change needing to propagate.
- The customer might choose to have some sort of proxy in front of the rabbit server which can be simply pointed over to the standby server without much impact or waiting time.
All the above mentioned would be reliant on what speed the team can work at.
Impact
The RabbitMQ server is responsible for all communication in the system and as such once it is offline the impact will be felt with screens not loading correctly or very slowly and potentially alarms not loading or triggering on time. As soon as it is brought back online the services should all connect again in an acceptable time, and the system will be operating normally.