
MongoDB Setup and Config
Jan 1 2022 at 12:00 AM
- Installing MongoDB on Ubuntu
- Configure and Connect MongoDB
- Configuring MongoDB for the platform
- MongoDB Monitoring
- MongoDB Disaster Recovery Process
Installing MongoDB on Ubuntu
MongoDB is a free, distributed, and an open-source document database at its core that powers high availability, horizontal scaling, and geographic distribution. It stores data in JSON-like documents and supports Ad hoc queries, indexing, and real-time aggregation.
Update the system
Use the following commands to update your Ubuntu system to the latest stable status:
> sudo apt-get update
> sudo apt-get upgrade
Install MongoDB
Import the MongoDB repository
Import the public key used by the package management system.
The Ubuntu package management tools ensure package consistency and authenticity by verifying that they are signed with GPG keys. The following command will import the MongoDB public GPG key.
> sudo apt-key adv --keyserver hkp://keyserver.ubuntu.com:80 --recv 7F0CEB10
Create a source list file for MongoDB
Create the /etc/apt/sources.list.d/mongodb-org-3.4.list list file using the command below.
> echo "deb http://repo.mongodb.org/apt/ubuntu xenial/mongodb-org/3.4 multiverse" \| sudo tee /etc/apt/sources.list.d/mongodb-org-3.4.list
Update the local package repository
> sudo apt-get update
Install the MongoDB packages
Install the latest stable version of MongoDB
> sudo apt-get install -y mongodb-org
Install a specific release of MongoDB
You must specify each component package specifically with their version number, check the following example:
> sudo apt-get install -y mongodb-org=3.4 mongodb-org-server=3.4 mongodb-org-shell=3.4 mongodb-org-mongos=3.4 mongodb-org-tools=3.4
Launch MongoDB as a service on Ubuntu 16.04
We need to create a unit file, which tells systemd how to manage a resource. Most common unit type, service, determine how to start or stop the service, auto-start etc.
Create a configuration file named mongodb.service in /etc/systemd/system to manage the MongoDB service.
> sudo vim /etc/systemd/system/mongodb.service
Copy the following contents in the file
#Unit contains the dependencies to be satisfied before the service is started.
[Unit]
Description=MongoDB Database
After=network.target
Documentation=https://docs.mongodb.org/manual
# Service tells systemd, how the service should be started.
# Key `User` specifies that the server will run under the mongodb user and
# `ExecStart` defines the startup command for MongoDB server.
[Service]
User=mongodb
Group=mongodb
ExecStart=/usr/bin/mongod --quiet --config /etc/mongod.conf
# Install tells systemd when the service should be automatically started.
# `multi-user.target` means the server will be automatically started during boot.
[Install]
WantedBy=multi-user.target
Update the systemd service with the command stated below
> systemctl daemon-reload
Start the service with systemcl
> sudo systemctl start mongodb
Check if mongodb has been started on port 27017 with netstat command
> netstat -plntu
Check if the service has started properly
> sudo systemctl status mongodb
The output to the above command will show `active (running)` status with the PID and Memory/CPU it is consuming.
Enable auto start MongoDB when system starts
> sudo systemctl enable mongodb
Stop MongoDB
> sudo systemctl stop mongodb
Restart MongoDB
> sudo systemctl restart mongodb
Configure and Connect MongoDB
Open MongoDB shell on your server by typing below command
> mongo
Switch to the database admin
> use admin
Create the root user
> db.createUser({user:"admin", pwd:”password", roles:[{role:"root", db:"admin"}]})
Exit from the MongoDB shell.
Connect MongoDB
Restart MongoDB (command mentioned above) and connect with user created with this command:
> mongo -u admin -p admin123 --authenticationDatabase admin
You can see the mongo connecting. Check the databases using the following command:
> show dbs
Configure MongoDB Server
Certain settings will need to be set in your configuration file to allow the MongoDB to function as required by the IoT.nxt® application. These setting are found in the mongod.conf file that is created in the /etc folder by the installation.
Configure network interfaces
By default, your database will be configured to listen only on the localhost and as such won’t accept connections from external sources. To enable this, you need to change the bindIp from 127.0.0.1 to 0.0.0.0. This will allow all external the mongo service to listen on all incoming addresses.
The mongo port can also be changed to something else here if it is necessary to not use the default setting of 27017
# network interfaces
net:
port: 27017
bindIp: 0.0.0.0
Configure Security
It is important to configure your MongoDB server to always authenticate, this prevents the open access to the shell that is installed as a default. Setting authorization to enabled will prevent users from being able to perform any actions in the database server without having authenticated first.
A path to a mongo.keyfile can also be set here. This is more important for setting up replication clusters, as all the servers in a replica set need the same key file to allow them to connect to each other and replicate the oplog.
security:
authorization: enabled
keyFile: /etc/mongo.keyfile
Configure Replicaset (High Availability)
If you are setting you mongo servers up as a high availability cluster you will need to set the replsetName setting. This is a name that is set on all servers that will be part of the cluster and it is required as well when connecting to a mongo cluster with a connection string that allows the replica set to switch automatically between servers.
mongodb://admin:admin123@mongo1:27017,mongo2:27017,mongo3:27017/?**replicaSet=rs0**
replication:
replSetName: rs0
Configure Storage
Under storage you can set the dbPath setting to the directory where your data files are to be stored.
If you are running multiple customers / databases on a single mongo server in a shared capacity, it is recommended that you set the directoryPerDB to true. This will ensure that MongoDB creates a directory for each of its databases and allows for easier management and separation of the data between databases. In a performance scenario it would be possible to also then split your databases onto separate disk and so on if necessary.
Also keeping to pattern, it is recommended that you set directoryForIndexes to true. This then means that mongo will store its index files into a different Folder to that of its collections. This can also be important for performance on much bigger high traffic databases as it would allow the team to potentially split the indexes away from the collections and run them on different disks if it becomes necessary.
storage:
dbPath: /var/lib/mongodb
directoryPerDB: true
journal:
enabled: true
# engine:
# mmapv1:
wiredTiger:
engineConfig:
directoryForIndexes: true
Configuring MongoDB for the platform
A mongo DB server is required to store telemetry data that is collected from the various integrations feeding data to the tenant’s gateways. The tenant services all rely on this database for data to operate.
It is recommended to install the database in a high availability cluster of at least three nodes to ensure the ability to fail over if a server goes down. See the MongoDB Setup Guide for instructions on how to set this up
It is also recommended that the Operational database is close to the Kubernetes Cluster as any additional latency between cluster and database can cause the system to start running slowly.
Please Note: From a Firewall and access perspective, all connections are made to MongoDB on port 27017, but this can be made into something different. An inbound rule will be necessary to allow data to be written to or read from the database.
Please Note: If you have a HA cluster set up, you will likely have to provide rules for each of the clusters to access each other.
Setup MongoDB Configuration
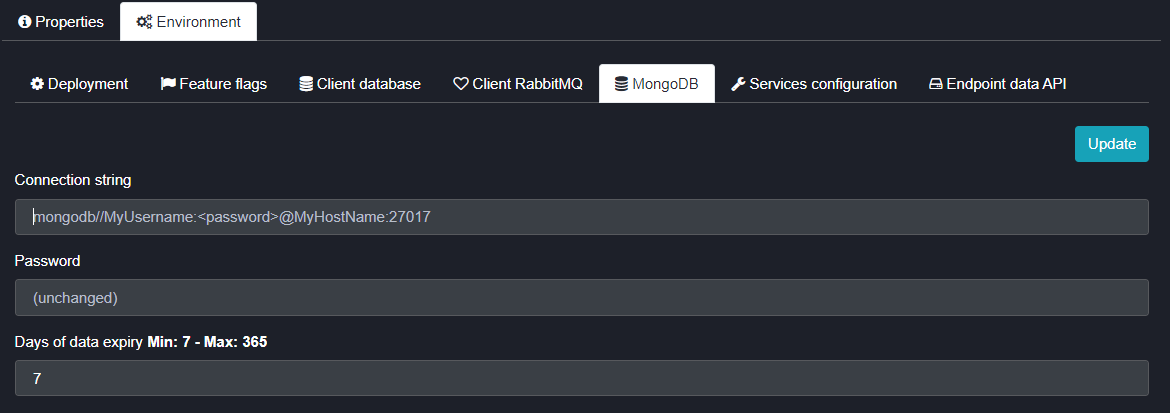
Figure 1 - MongoDB Environment Settings
The MongoDB configuration for the platform is done in the IoT.nxt® Client Portal. It is fairly straight forward and requires a connection string, password and a placeholder with the number of days of data to retain. This is the main configuration and this setup will determine where all system and config data are stored.
If it is not a high telemetry customer and the team is not required to separate telemetry data from the rest of the system and config data, then you can set this section only and the entire system will use these settings. If, however you require a different server to store telemetry data, then you need to set that up in section 1.2.
Connection String
This is the connection sting that is used to connect to your Mongo server. This connection sting is taken as-is and used by the Mongo driver to connect to Mongo. The string requires one place holder for password (<password>) in the connection string as we store the password in a separate masked field to prevent it being easily readable.
These two examples of connection strings are generally used in the IoT.nxt® system for:
- Replicaset Clusters - mongodb://adminuser:<password>@mongo1:27017,mongo2:27017,mongo3:27017/?replicaSet=rs0
- Single databases - mongodb://adminuser:<password>@mongo1:27017?connect=direct
The connection string can also be used to pass Mongo settings through to the driver connecting to the database by adding each setting such as the two below:
- &maxIdleTimeMS=180000
- &waitQueueSize=1000000
- &maxPoolSize=6
It may also be necessary to set up a user for each customer database as opposed to using a shared user and password for the entire server. If this is the case, you can specify the name of the database just after the last server in the string as below:
mongodb://adminuser:<password>@mongo1:27017**/DBName**?connect=direct
Password
- The password for the Mongo connection string is stored in this field. It is a masked field so that it is not human readable. Once the password is stored it is not read back out of the system when the user interface is loaded, instead you will see (unchanged) in the field.
Days of Data/Data retention
- This is a number between 7 and 365 days which tells the system how many days of telemetry data must be kept/stored. It is important to remember that this is a live presentation platform and it is not designed to store and run on Big Data. If historic data is required to be stored for long periods of time it should be exported to an external database for that purposes.
Setup Endpoint Data API
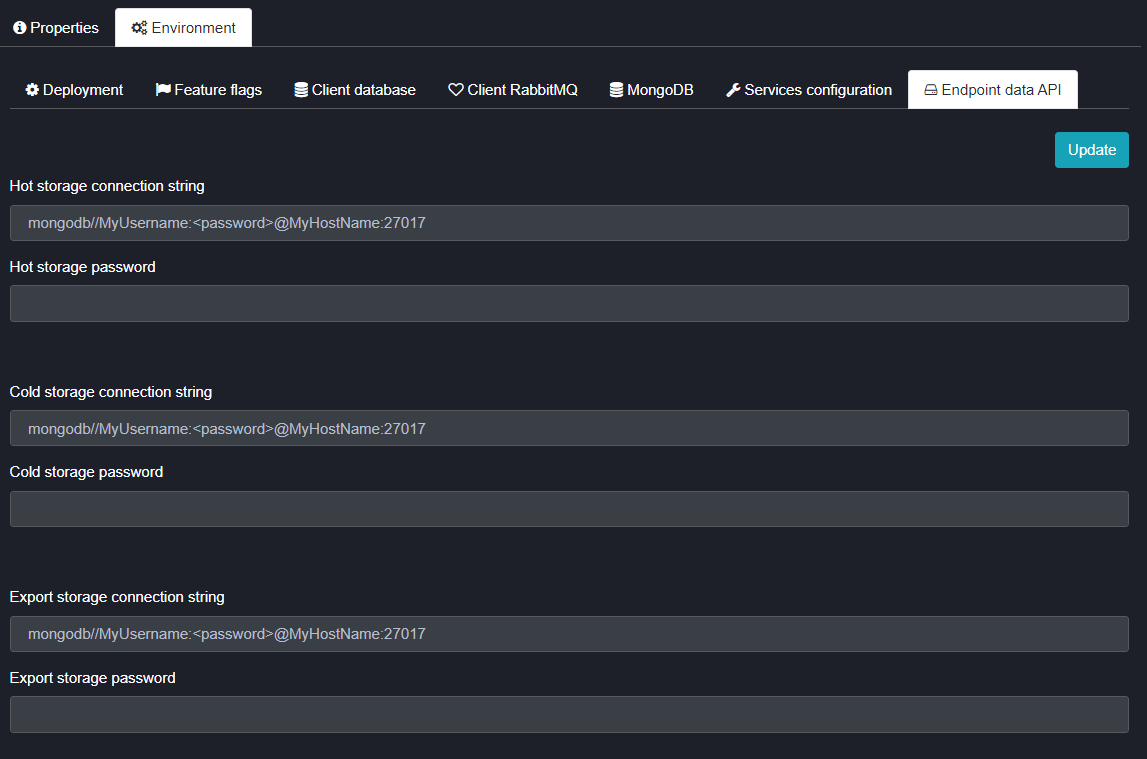
Figure 2 - MongoDB Endpoint Data API Settings
The system also has the ability to split the telemetry (endpoint) tables into a separate database. This is important for larger tenants that have a high volume of inbound data. It allows the client to create one or more high performance databases to support the high volume of data.
These databases can all be configured in the Endpoint data API tab. There are three separate connection strings here, if necessary, each of these can be pointed to a different server to help increase performance capacity.
The three strings are set up using the same rules as in the previous section.
Servers can be configured for the following:
- Hot Storage
- Cold Storage
- Export Storage
Migrating and Existing MongoDB into your own cluster
In the case of moving a tenant to their own cluster or platform in their own cloud or data center, it would be necessary to move the operational database with the cluster. IoT.nxt® DevOps teams achieve this by spinning up a new node in the HA cluster that is placed in the new location that the tenant cluster will be moved to and adding it to the replica set of the existing operational database.
Once all the data has been synchronised this server will run in replication mode until the cluster has been moved to its new home. As soon as that is done, the database can be switched to be the primary server in the replica set and the cluster can then be pointed to it.
If necessary, the other servers can be dropped off the replica set, and others added in the clients’ own cloud or data center.
MongoDB Monitoring
A MongoDB server is required to store telemetry data that is collected from the various integrations feeding data to the tenant’s gateway. The tenant services all rely on this database for data to operate. It is recommended to install the database in a high availability cluster of at least three nodes to ensure the ability to fail over if a server goes down and we monitor this performance as this can have a direct influence on the performance of the environment.
Prometheus
The Prometheus database is used to collect metrics from any configured MongoDB servers and store the metrics for alerting and monitoring. While there are many metrics available through this interface, the following metrics are generally used to monitor a MongoDB server on a higher level.
- Memory usage by server
- Disk usage by server
- CPU usage by server
- Memory cache eviction
- Disk IO utilisation
Grafana
IoT.nxt® uses Grafana as a consolidated dashboard for our teams to check into what is happening on our RabbitMQ servers. All our dashboards are customised to suit our needs, but these can be exported and shared with a customer support team if required.
Datadog
Datadog is a solid alternative to Prometheus and Grafana. The upside to this system is that it is the datastore and dashboard in one. It is however not free and is set up as a managed service which means you pay a license fee per agent that you deploy onto any given server. It is, however, easy to establish and get running and because it is a managed service you do not have to carry the cost of hosting the server to be able to run Prometheus and Grafana.
Alerting
Alerting can be set up on all three of the above-mentioned tools and should be used as an early warning system to identify when something is going wrong or something is simply not running correctly.
MongoDB monitoring in detail
There is a comprehensive description of the monitoring capabilities and list of metrics as well as available monitoring tools and relevant metrics to watch and why listed below:
https://severalnines.com/database-blog/key-things-monitor-mongodb
https://www.datadoghq.com/blog/monitoring-mongodb-performance-metrics-wiredtiger/
MongoDB Disaster Recovery Process
The Mongo database is monitored continually for all the normal usage metrics to ensure that nothing untoward is going to happen. This is a data server, so it does carry large databases which makes it hard to simply switch and move.
As such we have two or more replication servers that are replicating the data to different geolocations and the system will automatically switch servers if the primary server should fail.
Fail Over Plan
The system will automatically switch servers if the primary server should fail. Replication does not automatically cover all DR (disaster recovery) situations however, and in the case of a complete loss of all servers or data we take backups of all tables (excluding the telemetry tables due to its size) daily.
This schedule is negotiable depending on the customer requirements. In the case of a complete loss of data or servers, the database can be restored to another shared MongoDB cluster.
The Mongo connection setting will be changed in the Portal and the tenant will be deployed with the new DB settings.
Because the system backups do not contain large amounts of telemetry and the system can also run while the restore happens, the deployment can happen quickly after a restore starts.
Telemetry backups can also be set up on a scheduled basis. These restorations can happen while the system is running without a major impact on the system and so a telemetry restore can be done after the system has been brought back to a functional status.
Possible time of outage:
- 30 minutes support time
- 10 minutes fail over
- 15 minutes of validation and testing
Impact
The MongoDB is where all telemetry data is stored and as such for the time of the outage, we will not be able to store or read data from the DB in some measure.
This however does not result in data loss as the messages are stored on a queue and will be recovered as soon as connection has been re-established.